Dashboard
Dashboard
In the Just billing app, the dash board provides at-a-glance view of the various aspects of business data like Invoice,Order,Purchase ,Products,Customers,Suppliers and Settings. Discussed below are various sections from the dashboard.
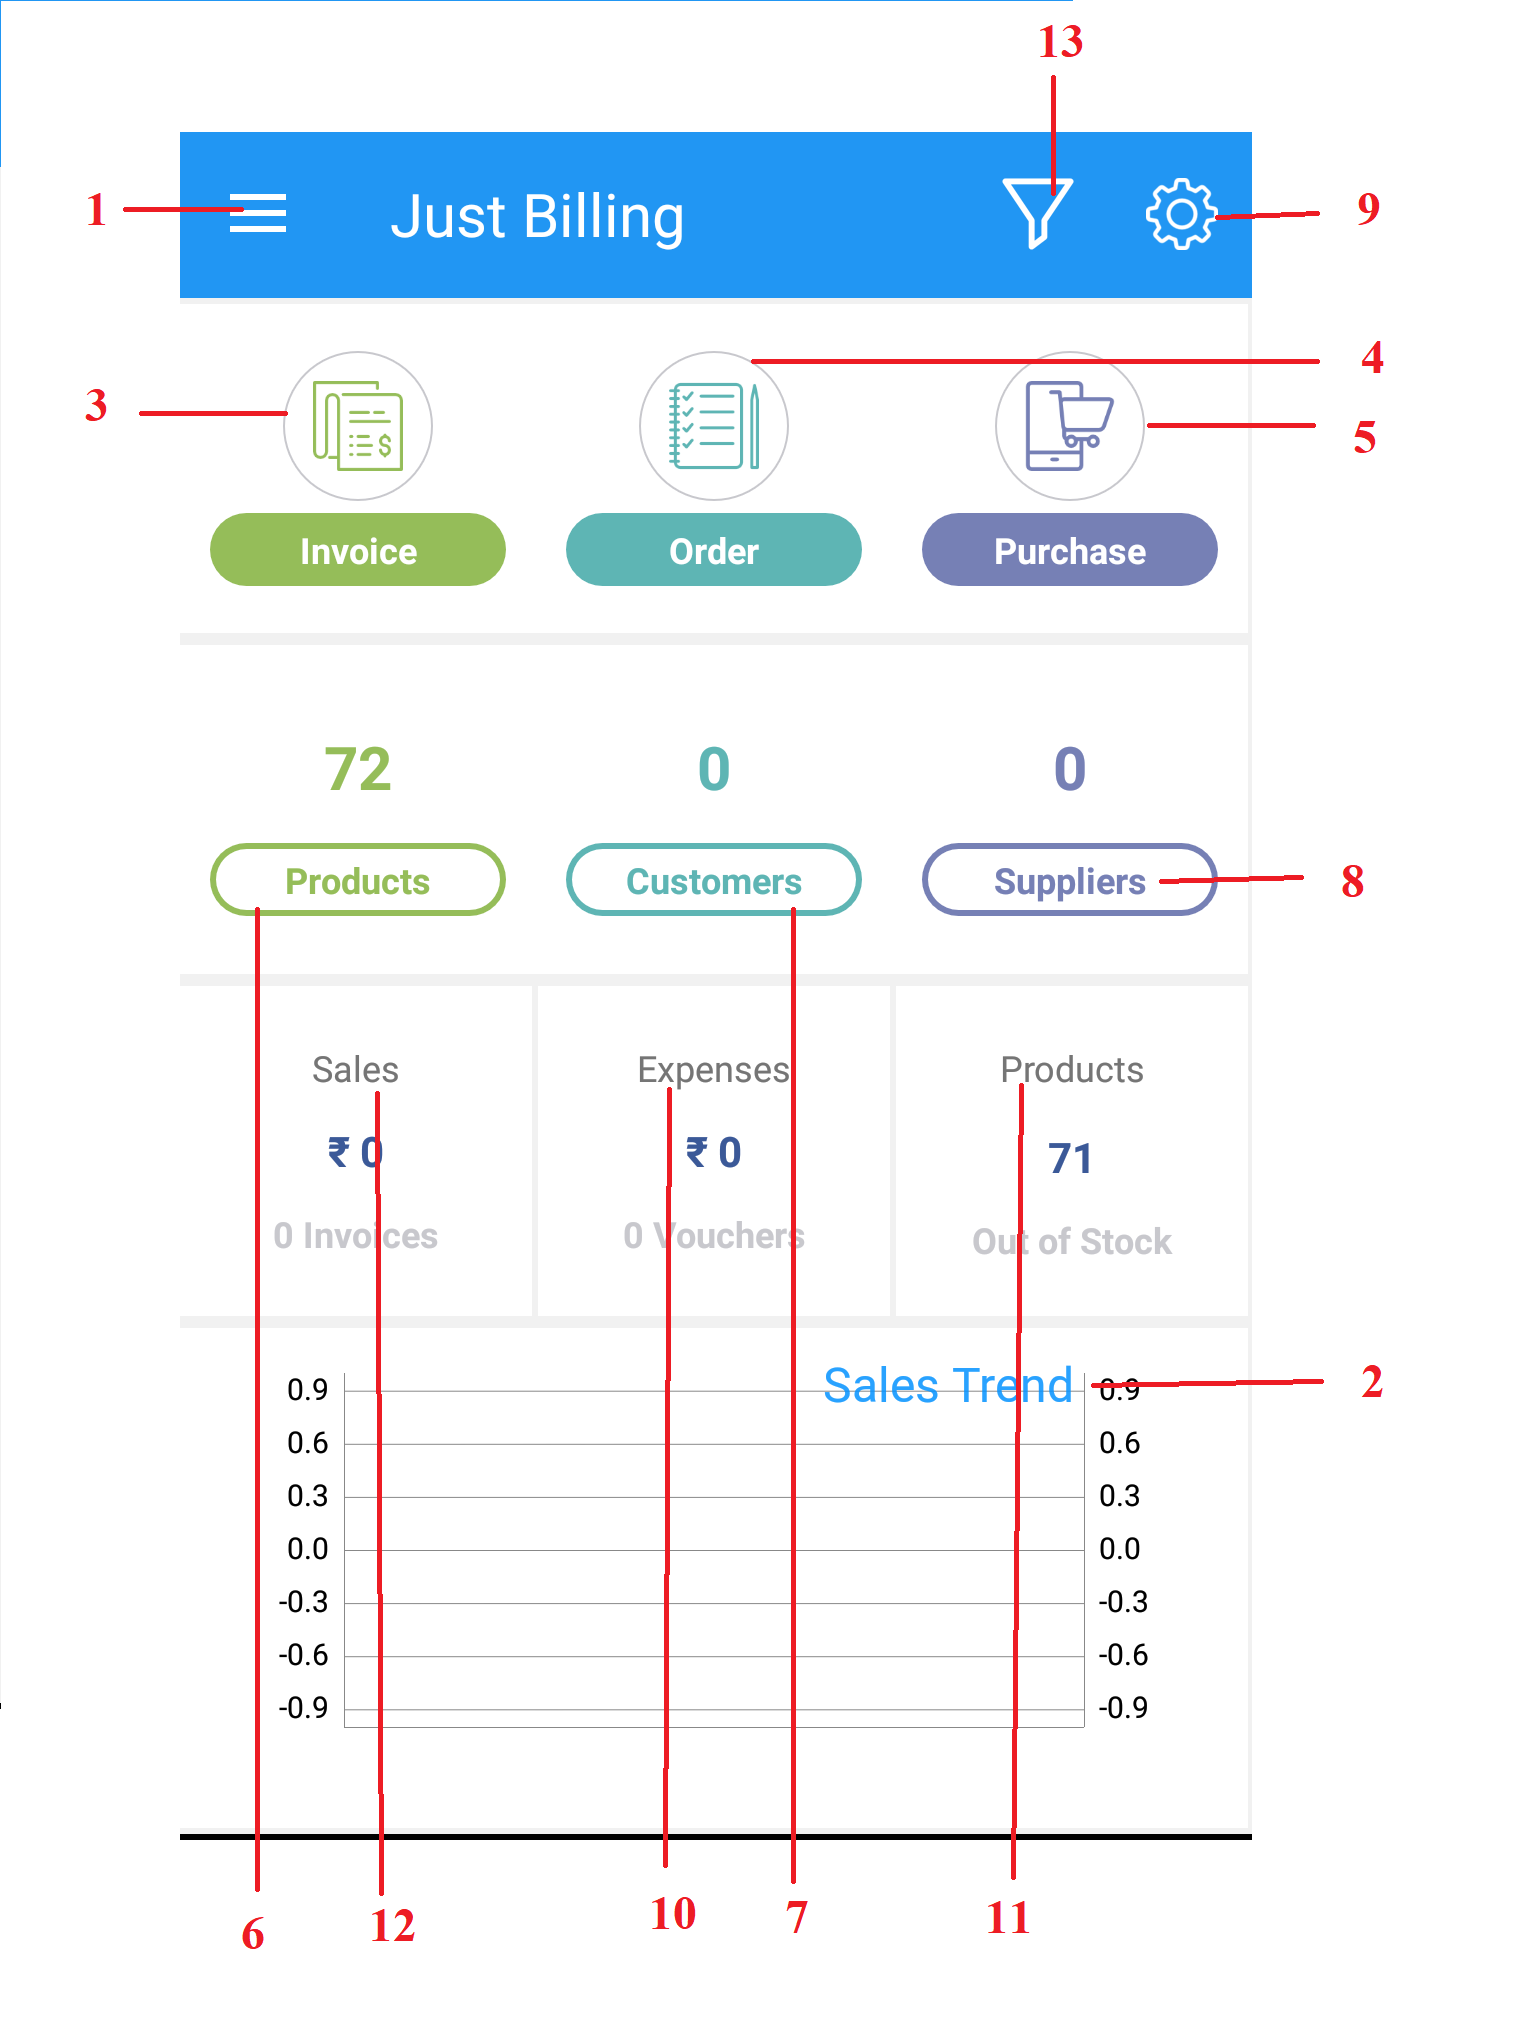
(Figure 1 - Dashboard)
- Navigator: Tap on Navigator Icon
 From the app navigator you can access the following application level menus :
- Transaction - From Transaction, you can do billing, generate quotations, view bill and quotation history, do inventory adjustments, expenses, manage customer feedback and promotions. To know more on how you can do the above said tasks, please refer Transaction page.
- Masters - From Masters, you can add and edit products, categories, brands, prices, customers, loyalty, discount, tax rates, units and tables from Masters. To know more on how you can view the pre-mentioned details, please refer Masters page.
- Reports - From Reports, you can view reports based on sales, payment, customers, products, expenses and stock from Reports. To view the reports, please refer Reports page.
- Settings - From Settings, you can review business details, bill and app settings, define and manage users and save data from Settings To know how you can view the pre-mentioned details and achieve the other actions, please refer Settings page.
- Support - From Support, you can get help, know more about us, check your subscription details, submit feedback on how the app is and invite your friends to use the app from Support. To know how you can add feedback, check subscription and other app details, please refer Support page.
- Sales Trend - From this section of the app you can view graphical representation of your Sales Trend.
- Invoice - Tap on this icon
 to directly navigate to the billing screen. For more details on how to do billing from the app, please refer topic Invoice.
4. Orders - Tap on this icon ![]() to directly navigate to sales orders page. For more details on how to do sales order from the app please refer topic Orders.
to directly navigate to sales orders page. For more details on how to do sales order from the app please refer topic Orders.
5. Purchase - Tap on this icon ![]() to directly navigate to Purchase page. For more details on how to do purchases from the app please refer topic Purchases.
to directly navigate to Purchase page. For more details on how to do purchases from the app please refer topic Purchases.
6. Products - Tap on this icon ![]() to directly navigate to the products master page. To know how to add/edit product, please refer topic Products .
to directly navigate to the products master page. To know how to add/edit product, please refer topic Products .
7. Customers - Tap on this icon ![]() to directly navigate to the customer master page. To know more on how to add customer, please refer topic Customers.
to directly navigate to the customer master page. To know more on how to add customer, please refer topic Customers.
8. Suppliers - Tap on this icon ![]() to directly navigate to the Suppliers page. To know more on how to add suppliers , please refer topic Suppliers.
to directly navigate to the Suppliers page. To know more on how to add suppliers , please refer topic Suppliers.
9. Settings - Tap on icon ![]() Settings, you can review business details, bill and app settings, define and manage users and save data from Settings To know how you can view the pre-mentioned details and achieve the other actions, please refer Settings page.
Settings, you can review business details, bill and app settings, define and manage users and save data from Settings To know how you can view the pre-mentioned details and achieve the other actions, please refer Settings page.
10. Expenses - Tap on this icon ![]() to directly navigate to the expenses page. For more details on expense management, please refer topic Expenses.
to directly navigate to the expenses page. For more details on expense management, please refer topic Expenses.
11. Inventory adjustments - Tap on this icon ![]() to directly navigate to the inventory adjustments page. For more details on how to do inventory adjustments, please topic Inventory Adjustments page.
to directly navigate to the inventory adjustments page. For more details on how to do inventory adjustments, please topic Inventory Adjustments page.
12. Sales - Tap on this icon ![]() to directly navigate to the Sales Invoices Page where you can be able to see last one week Sales History from this option with latest transaction at the top.
to directly navigate to the Sales Invoices Page where you can be able to see last one week Sales History from this option with latest transaction at the top.
13. Sort - Tap on this icon ![]() to directly navigate to the sort page where you need to select the Date range to filter the transaction records.
to directly navigate to the sort page where you need to select the Date range to filter the transaction records.