Wera foods
Werafoods Integration
1. Overview
Werafoods integration allows merchants to:
- Receive and manage online orders from aggregators (Swiggy, Zomato, etc.) directly in POS.
- Accept or reject incoming orders in real time.
- Automatically generate KOT, invoices, and dispatch updates.
- Map POS menu items to aggregators and push menus with pricing, availability, and time slots.
2. Pre-Requisites
Before using Werafoods features, ensure:
- Branch is registered with Werafoods.
- Active Werafoods subscription is available.
- Aggregators (Swiggy/Zomato) are integrated and active.
- POS menu (categories, items, variants, prices) is already configured.
- User has access to Order Confirmation and Werafoods Configuration screens.
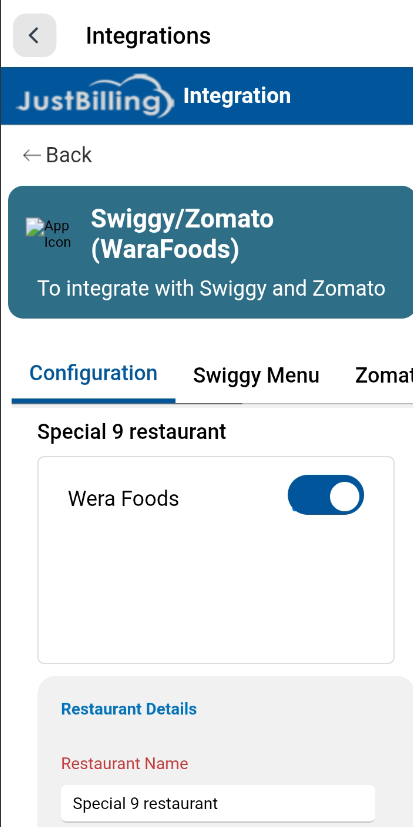
( Figure-1-Werafoods Integration)
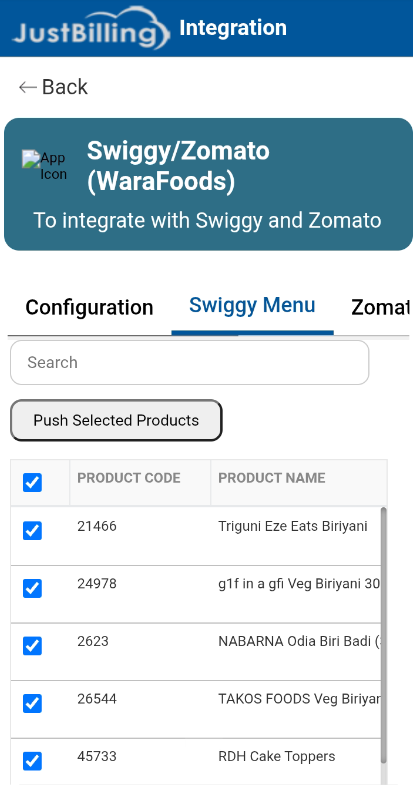
( Figure-2-Werafoods Integration-Swiggy Menu)
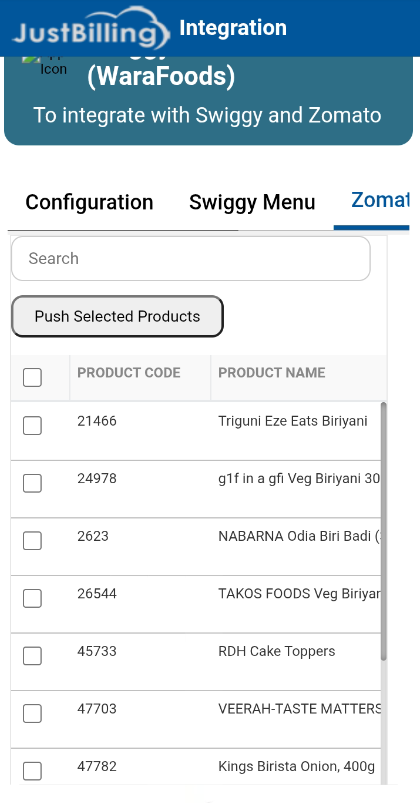
( Figure-3-Werafoods Integration-Swiggy Menu)
3. Order Acceptance & Rejection Workflow
3.1 Accessing Order Confirmation Screen
- Login to POS.
- Navigate to Orders → Order Confirmation.
- Incoming aggregator orders appear in real time.
3.2 Viewing Aggregator Orders
Each incoming order displays the following mandatory details:
- Aggregator Name (Swiggy / Zomato / etc.)
- Aggregator Order ID
- Order Date & Time
- Customer Name
- Delivery Address
- Payment Type (Prepaid / COD)
- Ordered Items & Quantities
- Total Bill Amount (including taxes)
Note: All aggregator orders are treated as Paid Online, even COD orders
3.3 Accepting an Order
- Click Accept on the order.
- System shows confirmation:
- “Order accepted successfully and updated to [Aggregator Name].”
- System actions:
- KOT is automatically generated.
- Order moves to Dispatch Module.
3.4 Rejecting an Order
- Click Reject on the order.
- Select a valid rejection reason.
- Order rejection is sent to the aggregator immediately.
- Order is removed from active order flow.
3.5 Dispatch Process
- Open Dispatch Screen.
- Click Dispatch for the order.
- Confirmation popup appears:
“Ready for delivery will be sent to [Aggregator Name].”
- Options:
- Yes → Dispatch update sent to aggregator.
- No → Popup closes, no action taken.
3.6 Post-Dispatch Actions
- Invoice is automatically generated.
- Payment settlement is recorded in POS.
- Order status is marked as Completed.
4. Menu Mapping for Aggregators
4.1 Accessing Werafoods Configuration
- Navigate to Integrations → Werafoods → Configuration.
- Available tabs:
- Configuration
- Swiggy Menu
- Zomato Menu
- Settings & Control
5. Aggregator-Specific Menu Tabs
5.1 Independent Tabs
- Each aggregator (Swiggy / Zomato) has its own tab.
- Menu mapping and publishing is independent per aggregator.
5.2 Branch Selection
- Use Branch Filter at the top.
- Select the branch to configure menu.
- System behavior:
- Displays branch-specific items.
- If branch is not registered:
- “Branch not registered with Werafoods. Please complete registration to proceed.”
6. Menu Item List View
6.1 Item Display Format
Items are displayed in a table/list view with the following columns:
- Select (Checkbox)
- Product Code
- Product Name
- Category
- Variant (or “–” if not applicable)
- Slot (From – To)
- Price
- GST Liability
- Available (Toggle)
6.2 Search & Pagination
- Search using:
- Product Code
- Product Name
- Category
- Variant
- Pagination:
- Default: 10 items per page
- Supports page navigation
7. GST Liability Configuration
- GST Liability is mandatory for each product.
- Options:
- Swiggy
- Zomato
- Vendor
- If GST Liability is not selected:
“Select at least any of the GST liability.”
8. Time Slot Management
- Each product can have:
- Start Time
- End Time
- Products without time slots:
- Available all day by default.
9. Pushing Menu to Aggregator
9.1 Push Selected Products
- Select one or more products using checkboxes.
- Click Push Selected Products.
- Validation:
- If no product selected:
“Please select at least one product to push to [Aggregator Name].”
9.2 Publishing Outcome
- Success Message:
“Selected products have been successfully updated and shared with [Aggregator Name].”
- Partial Failure:
“Some products failed to update. Please review highlighted rows and try again.”
- Last pushed Date & Time is displayed.
10. Error Handling & Alerts
|
Scenario |
System Message |
|
Branch not registered |
“Branch not registered with Werafoods.” |
|
Subscription expired |
“Subscription expired. Renew to continue.” |
|
Push failed |
“Menu update failed for [Aggregator Name].” |
|
No selection |
“Please select at least one product.” |
11. Settings & Control
- Configure:
- Aggregator-specific settings
- Availability rules
- Pricing controls
- Controls apply independently for each aggregator.
12. Post-Conditions
- Aggregator orders are fully managed from POS.
- Menu, pricing, and availability remain synchronized.
- GST responsibility is enforced consistently.
- KOT, dispatch, and invoicing are automated.
- No need to access separate aggregator dashboards.