Inventory setup wizard
Set up inventory steps
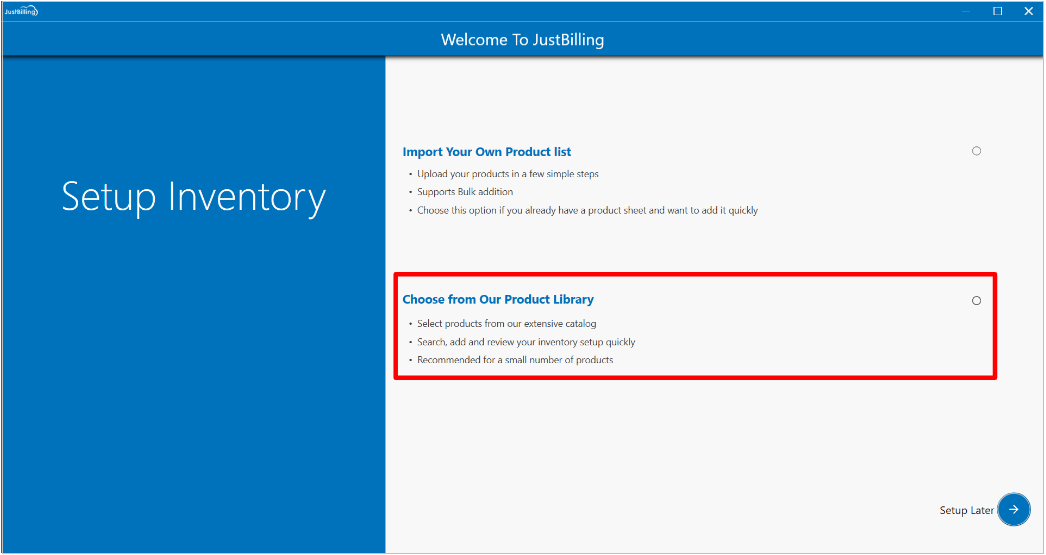
From this screen, you will be able to add your inventory with two options: 1.Import your own product list 2.Choose from our product library.
How to setup your inventory?
After the screen is initialized by default, there are two inventory setup options available in the application - Import your own product list and choose from our product library. Select your inventory setup type. (see figure 1)
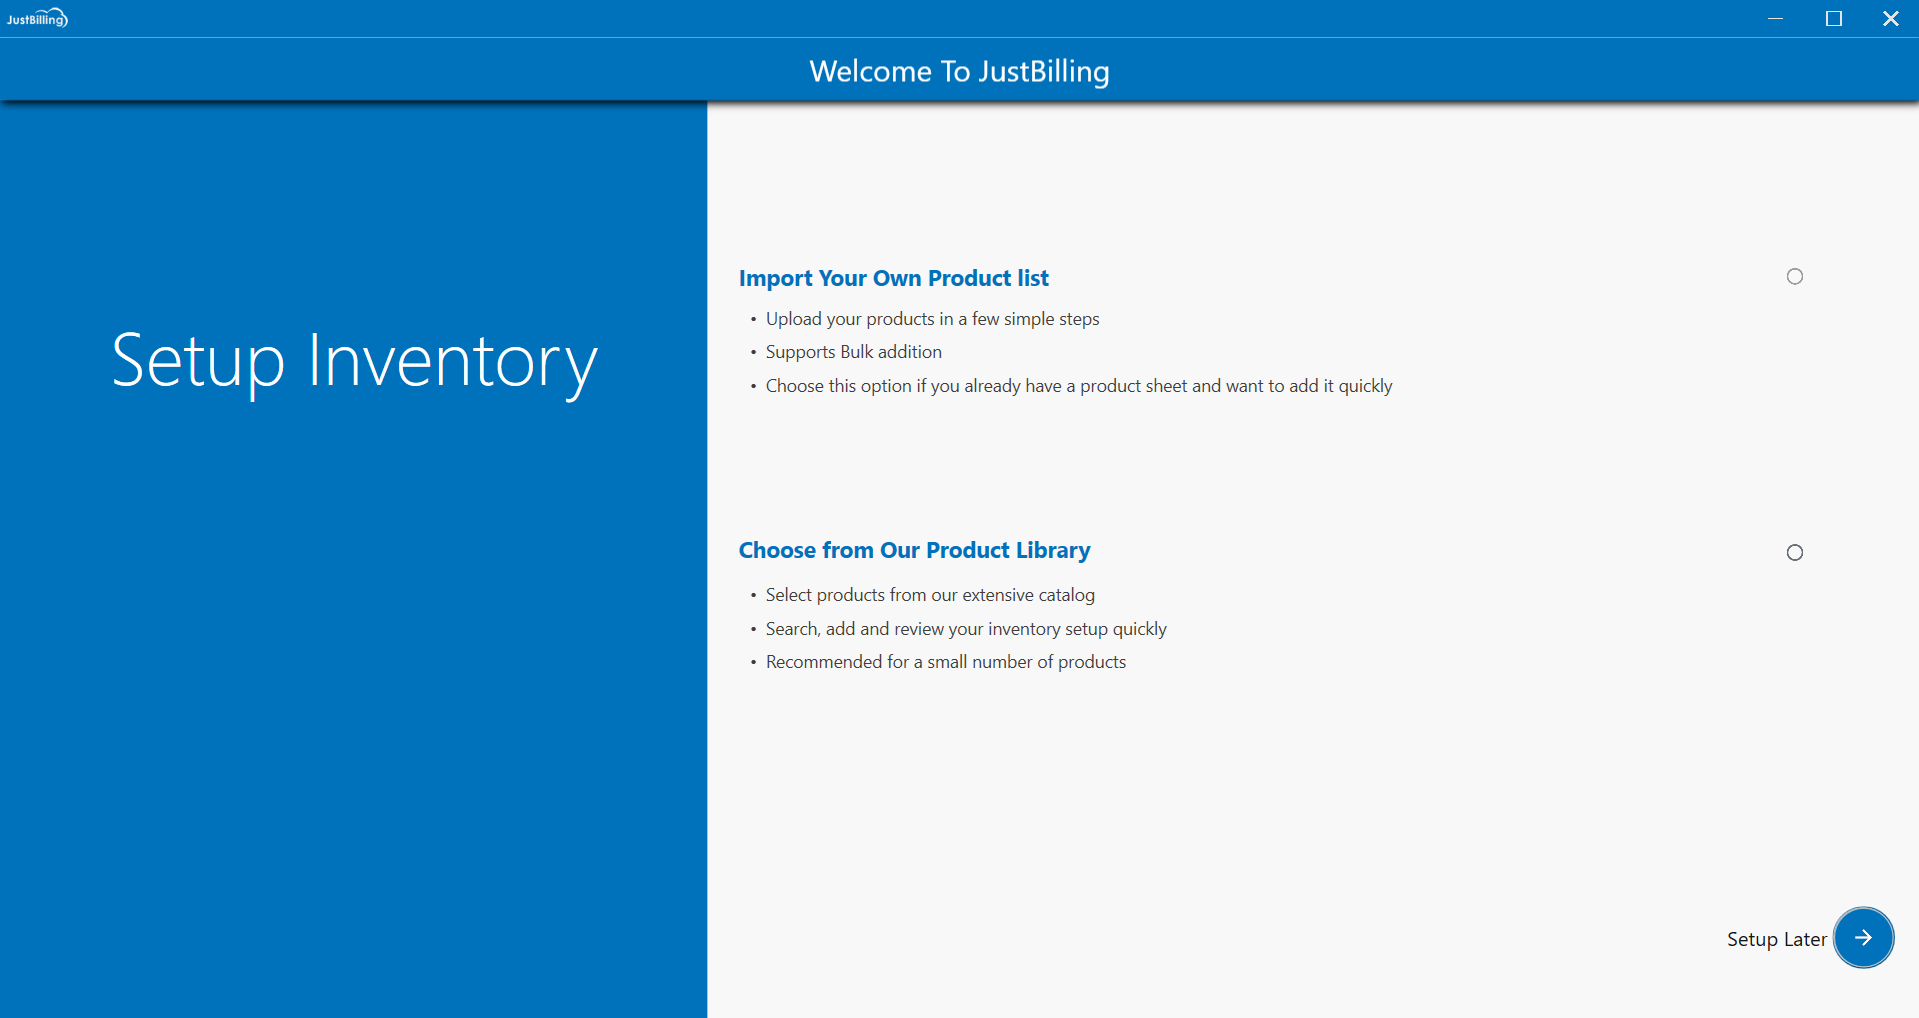
(figure 1 - Setup inventory screen)
1. Import Your Own Product list
Step 1 : Click on the Import your own product list to begin the inventory setup process by importing data (see figure 2).
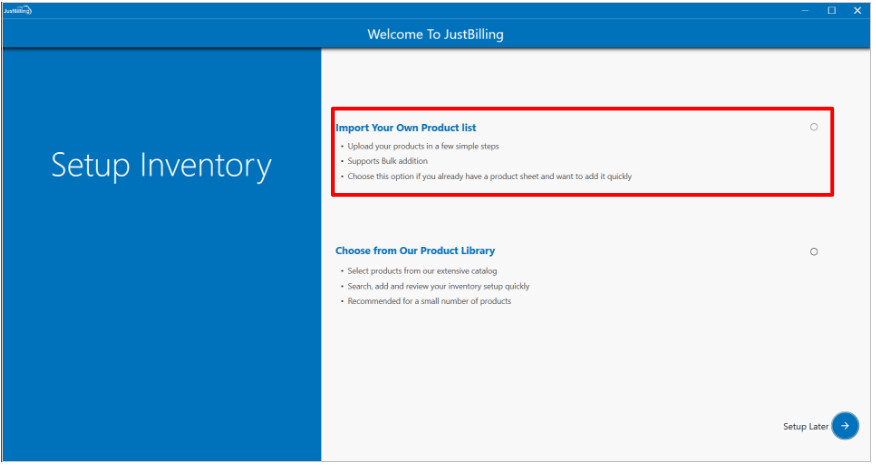
(figure 2 - Import Your Own product list screen)
Step 2: After selecting import your own product list option, you will be directed to import data screen with two options - Multi store import and Single store import. (see figure 3)
Choose between Multi-store import and Single-store import depending on the number of branches and the type of data you have available for import."
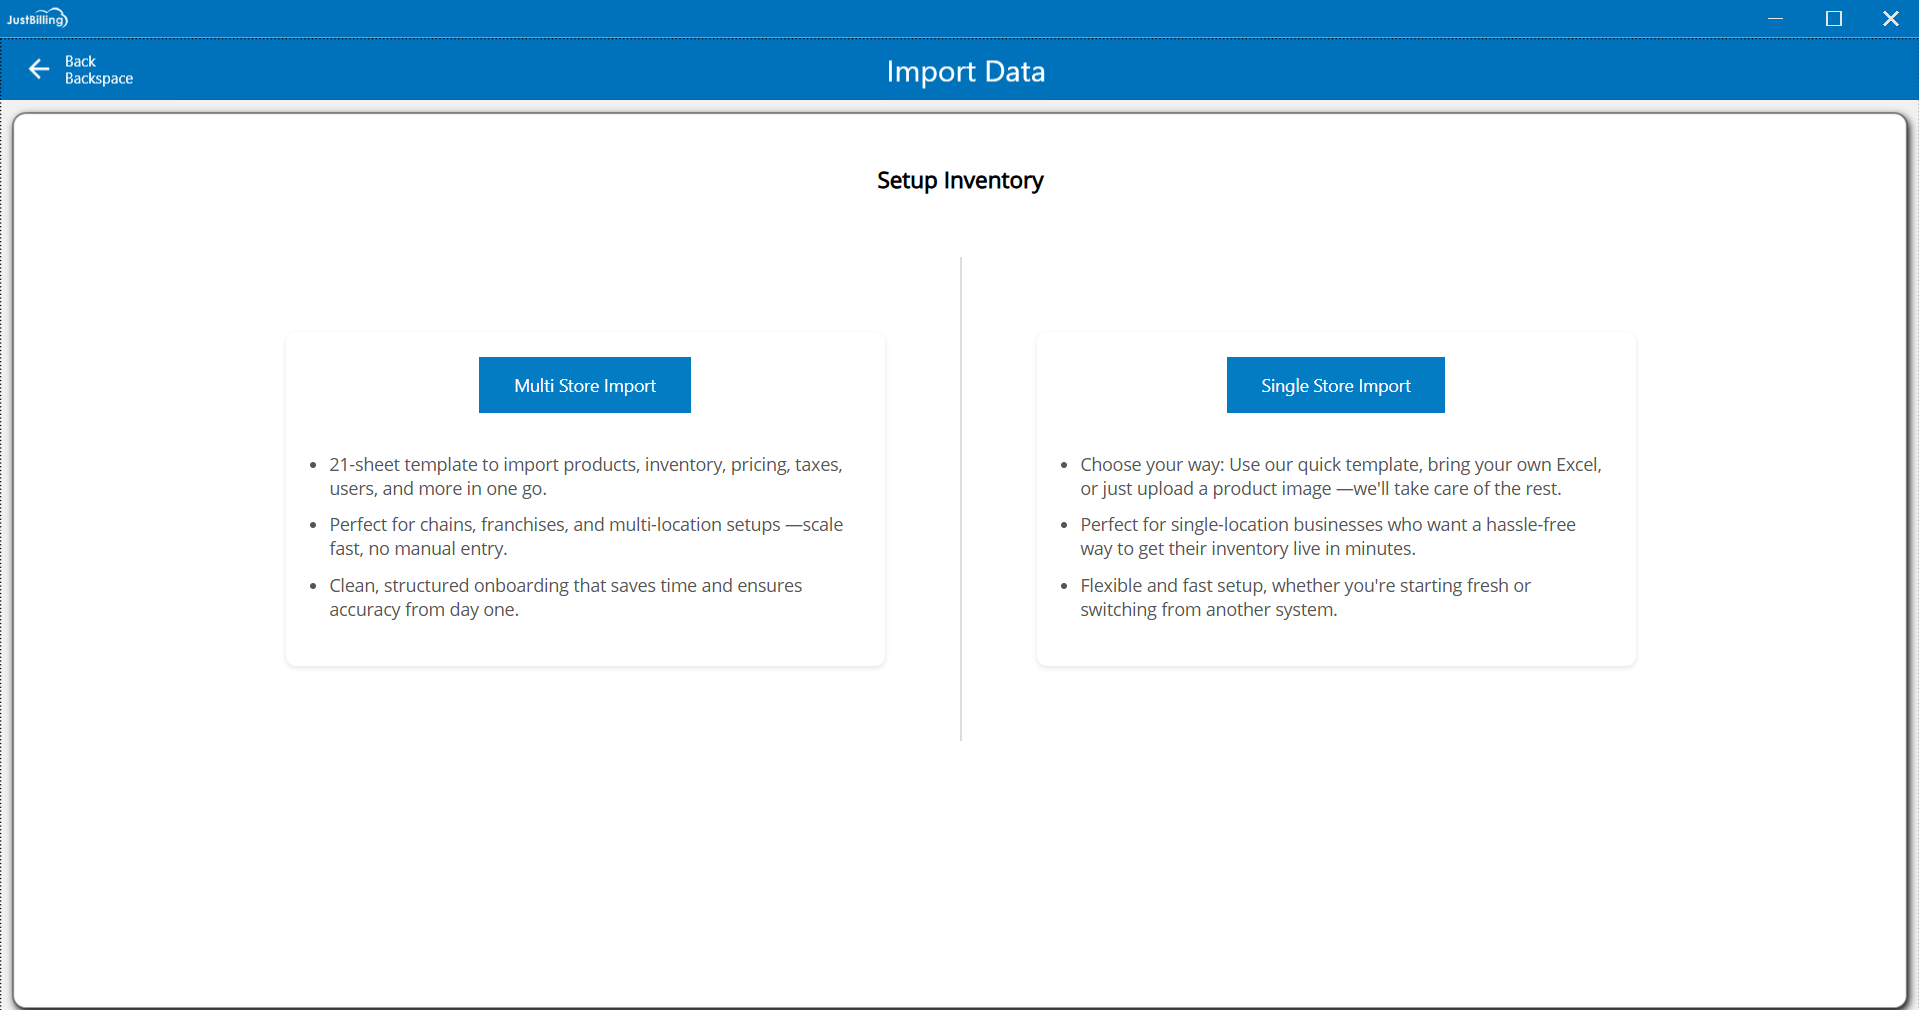
(Figure 3 - Import data)
Multi store Import Data
Step 3: Select the Multi store import if you are having a multiple branches or comprehensive data to import into the application. (see figure 4)
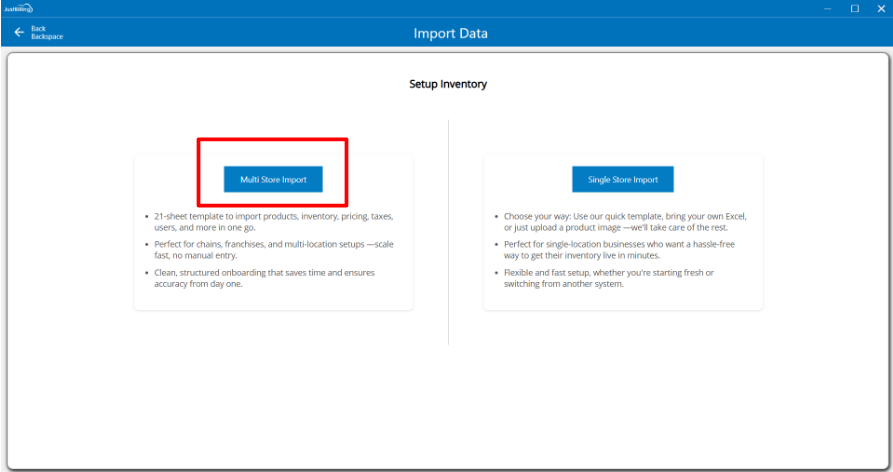
(Figure 4 - Multi store import)
After clicking on Multi store import, you can Import the products data through the excel file.
1. How to Import products data into JustBilling application using Multi store import?
- Tap on the Download template and enter the product details in excel file.
- Save the excel file
- Go to Import data screen in justBilling application
- Now select the Browse option, it directs to the file manager on your system
- Select the excel file to be imported
- All products will be imported into JustBilling application
- Then click on Save button (See figure 1 &2)
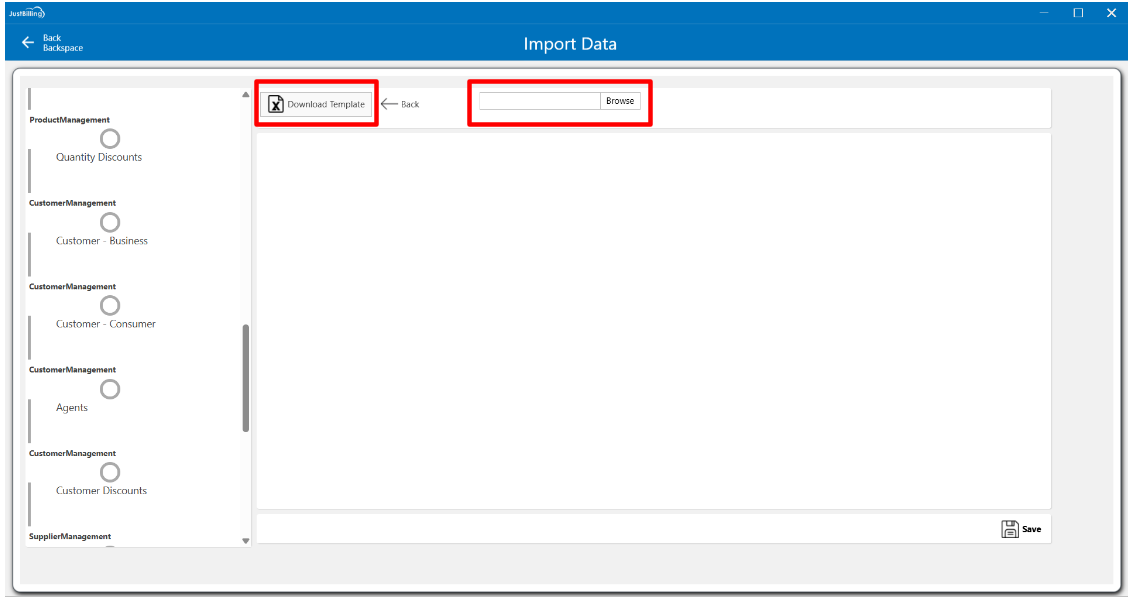
(Figure 5 -import data Page )
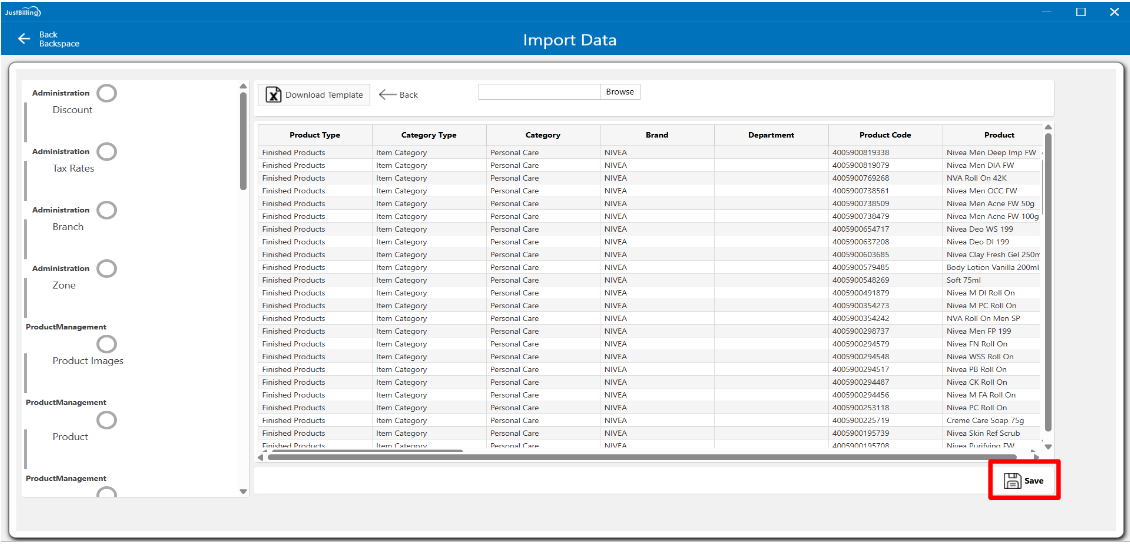
(Figure 6 - Save import data )
2. How to Import products data into JustBilling application using Single store import?
Step 1: Select the Single store import if you are having a single branch or has limited data to import into the application. (see figure 7)
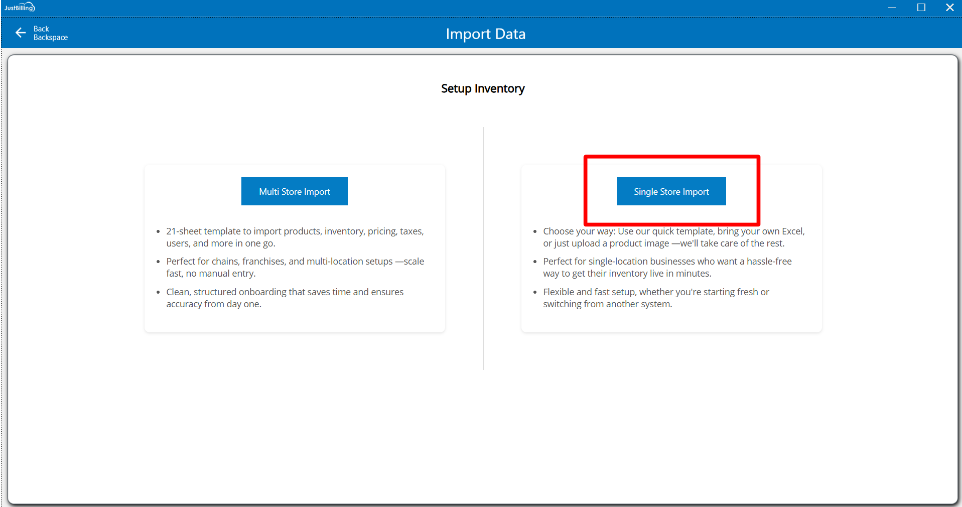
(Figure 7 - Single store import )
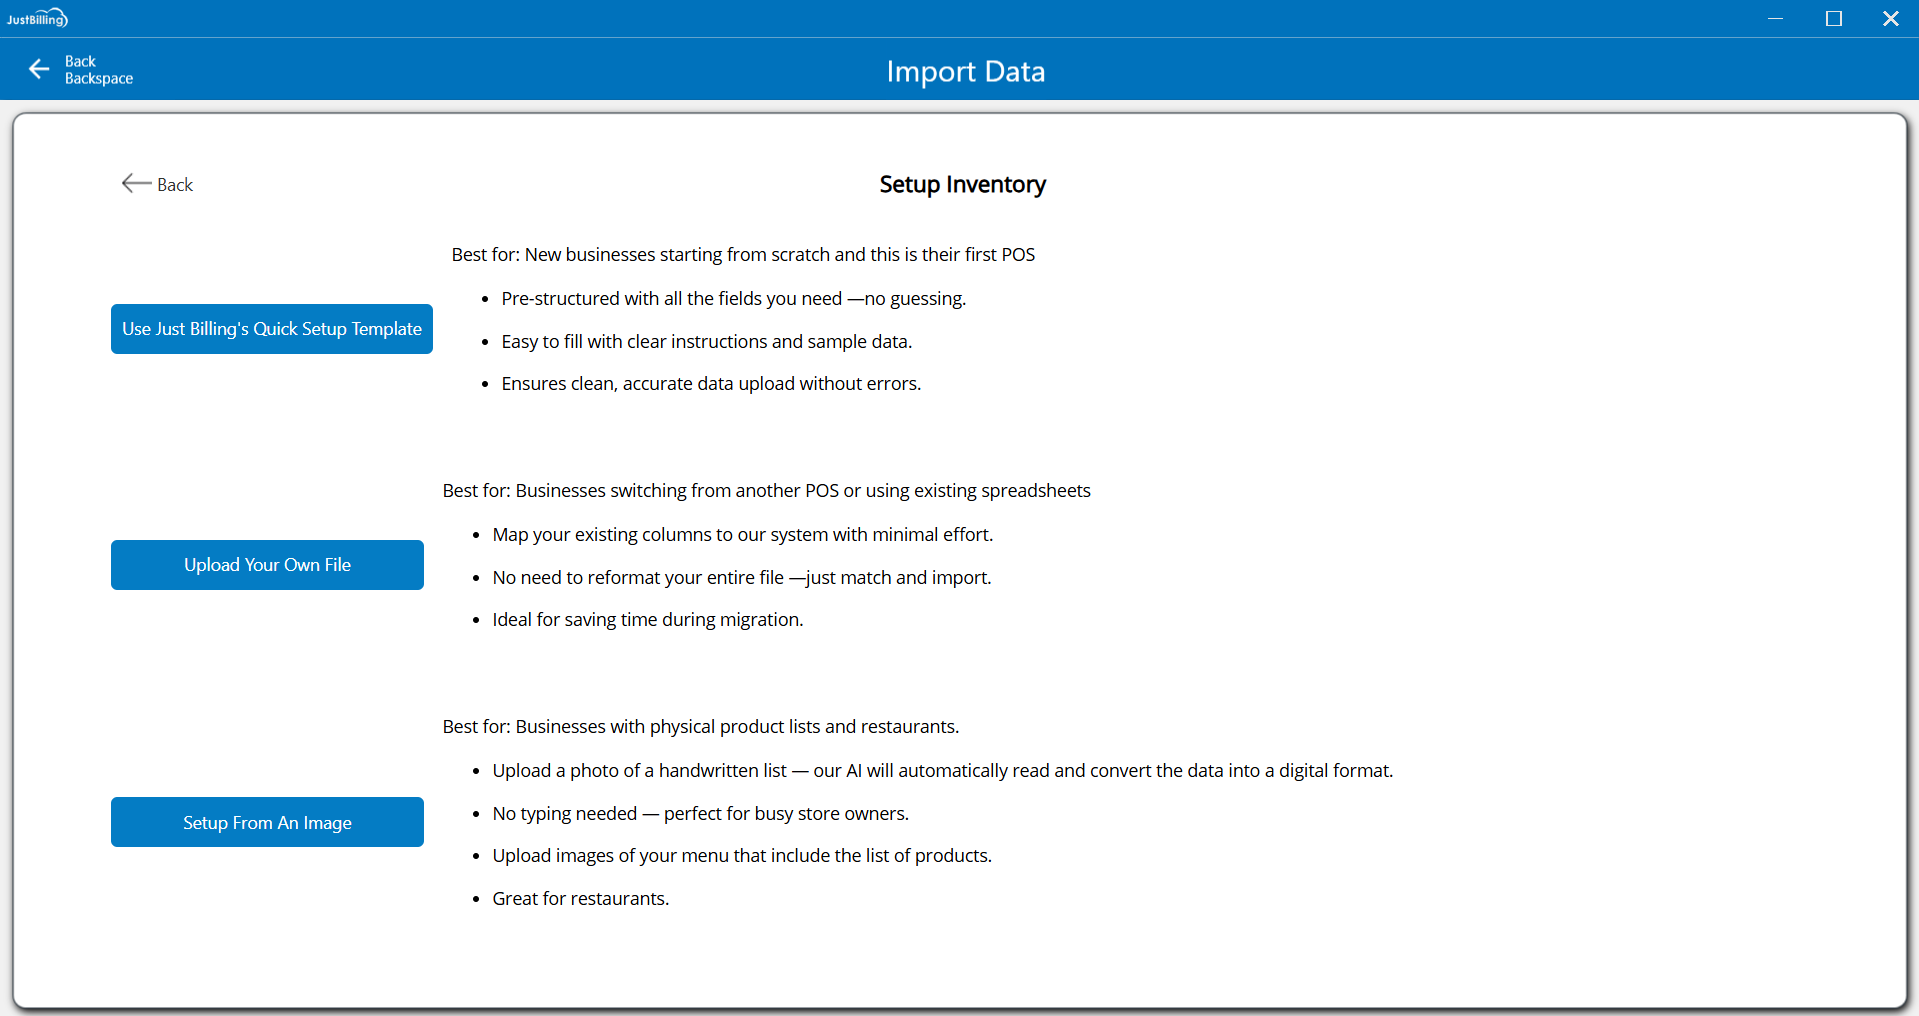
Step 2: After clicking on Single store import option, you will be directed to the screen having multiple options to import the data into your system
You can choose any of the options - Use just billing quick import template, upload your own file and setup from an image.(Figure 8 - Single store import )
(Figure 8 - Single store import )
Setup inventory using Use just Billing Quick setup Template option
Step 3: Select the Use just Billing Quick setup Template option to import data using the predefined Just billing template.
- Click on the Use just Billing Quick setup Template option
- Download the template
- Add product details in the downloaded template file and save
- Upload the excel file by browsing file or by drag and drop.
- After uploading the file you will be directed to the Review screen
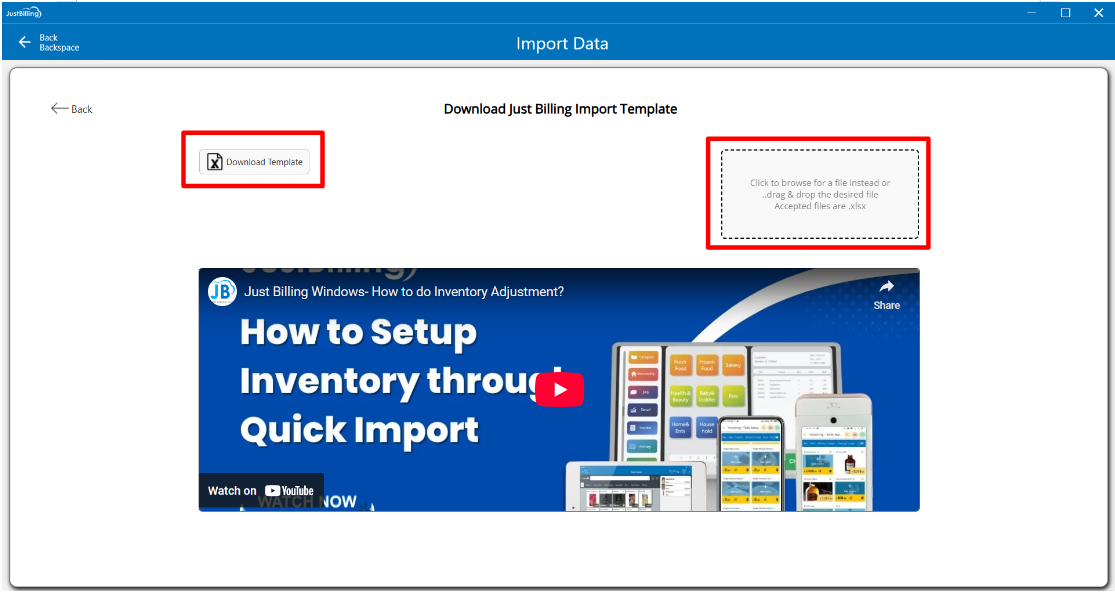
(Figure 9 - Use Just Billing Quick setup template )
Please wait till your data is imported for review

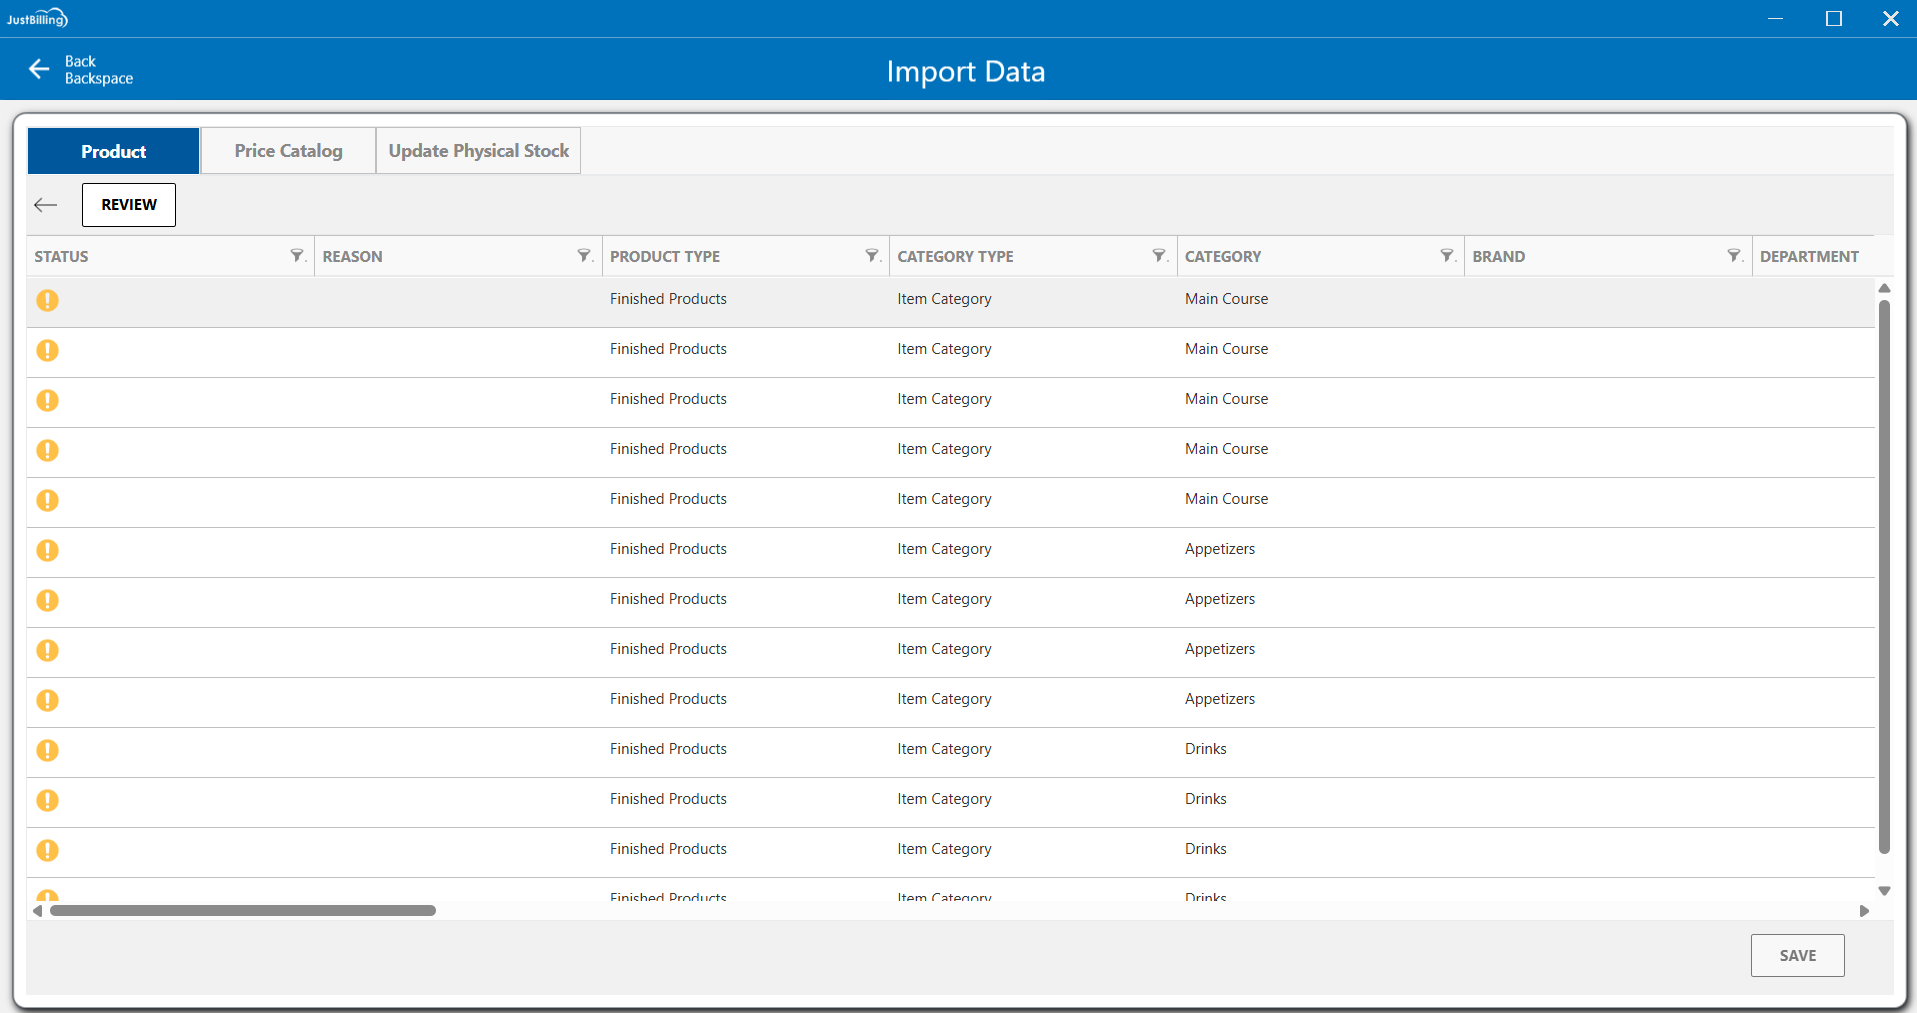
Step 4: After uploading the document, you will be redirected to the review screen with 3 tabs such as Product, Price catalog and Update physical stock (see figure 10)
Soon after uploading the data, the status will be in review mode indicating yellow '!' icon

(Figure 10 - Review screen )
In product, price catalog and update physical stock tabs you can add and edit the details of the products. Once the product details are updated, you need to click on review button provided below the product tab.
The application will validate the data in the products tab.
If there are any errors or missing mandatory details, the application will show the error message in the Reason column. (see figure 11)

(Figure 11 - Validating upload data)
After updating the mandatory details once again you need to click on the Review button to validate the data. The product tab and status column will be transitioned to Green.(see figure 12)

(Figure 12 - Review product data)
Step 4: After Reviewing the product tab click on the Price catalog tab to validate the details in the sheet, update the required details and click on the Review button to validate the Price catalog sheet (see figure 13)

(Figure 13 - Review Price catalog data)
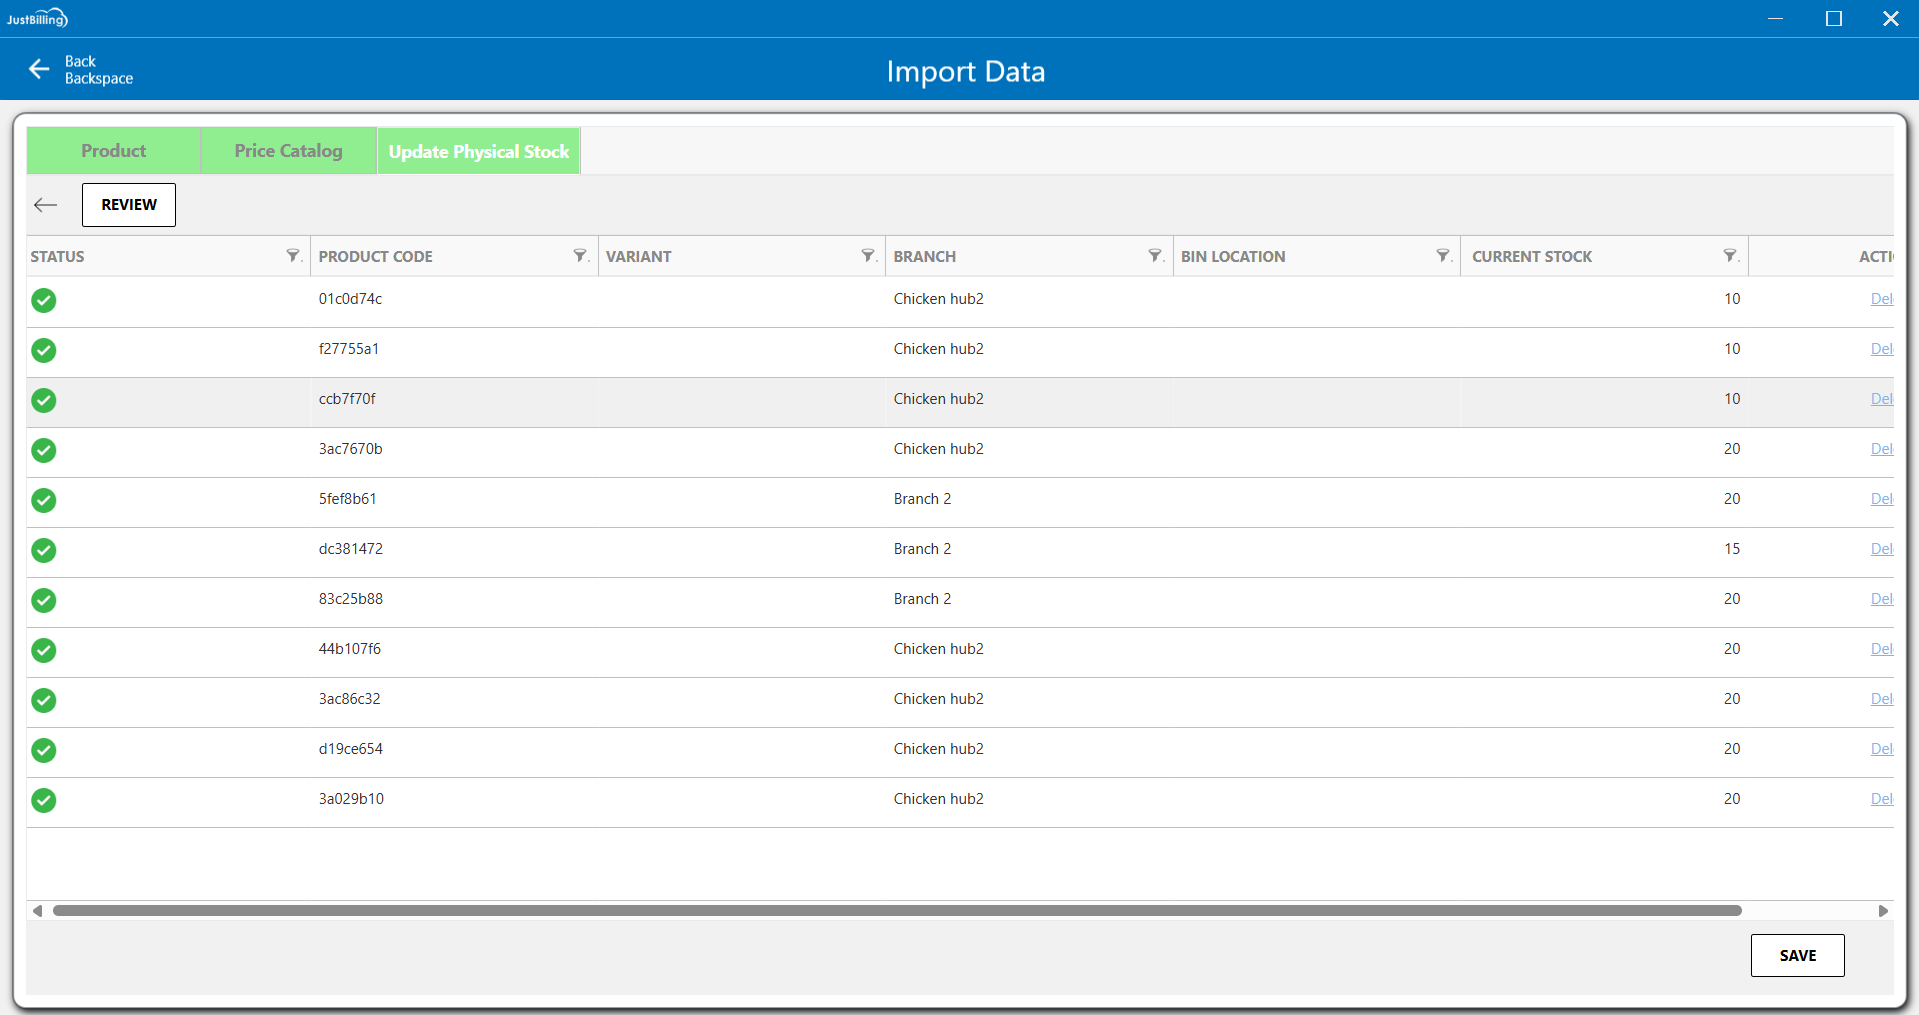
Step 5: After reviewing the Price Catalog tab, proceed to the Update Physical Stock tab. If your account is linked to multiple stores, select the appropriate branch from the drop down menu where you wish to update the stock. For single-store accounts, the branch will be auto-filled. Then, enter the stock quantities in the Current Stock column accordingly.
After adding the details click on Review button to validate the data.(see figure 13)

(Figure 13 - Review Update physical stock data)
After all the 3 tabs are verified the save button will be enabled to import your data.
Click on the save button to start the import process. (see figure 14)
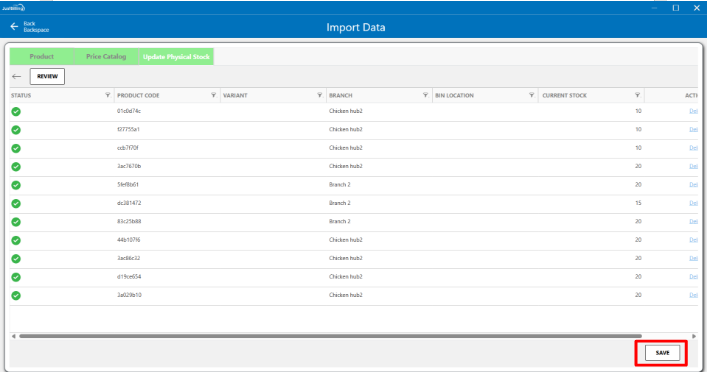
(Figure 14 - Save data)
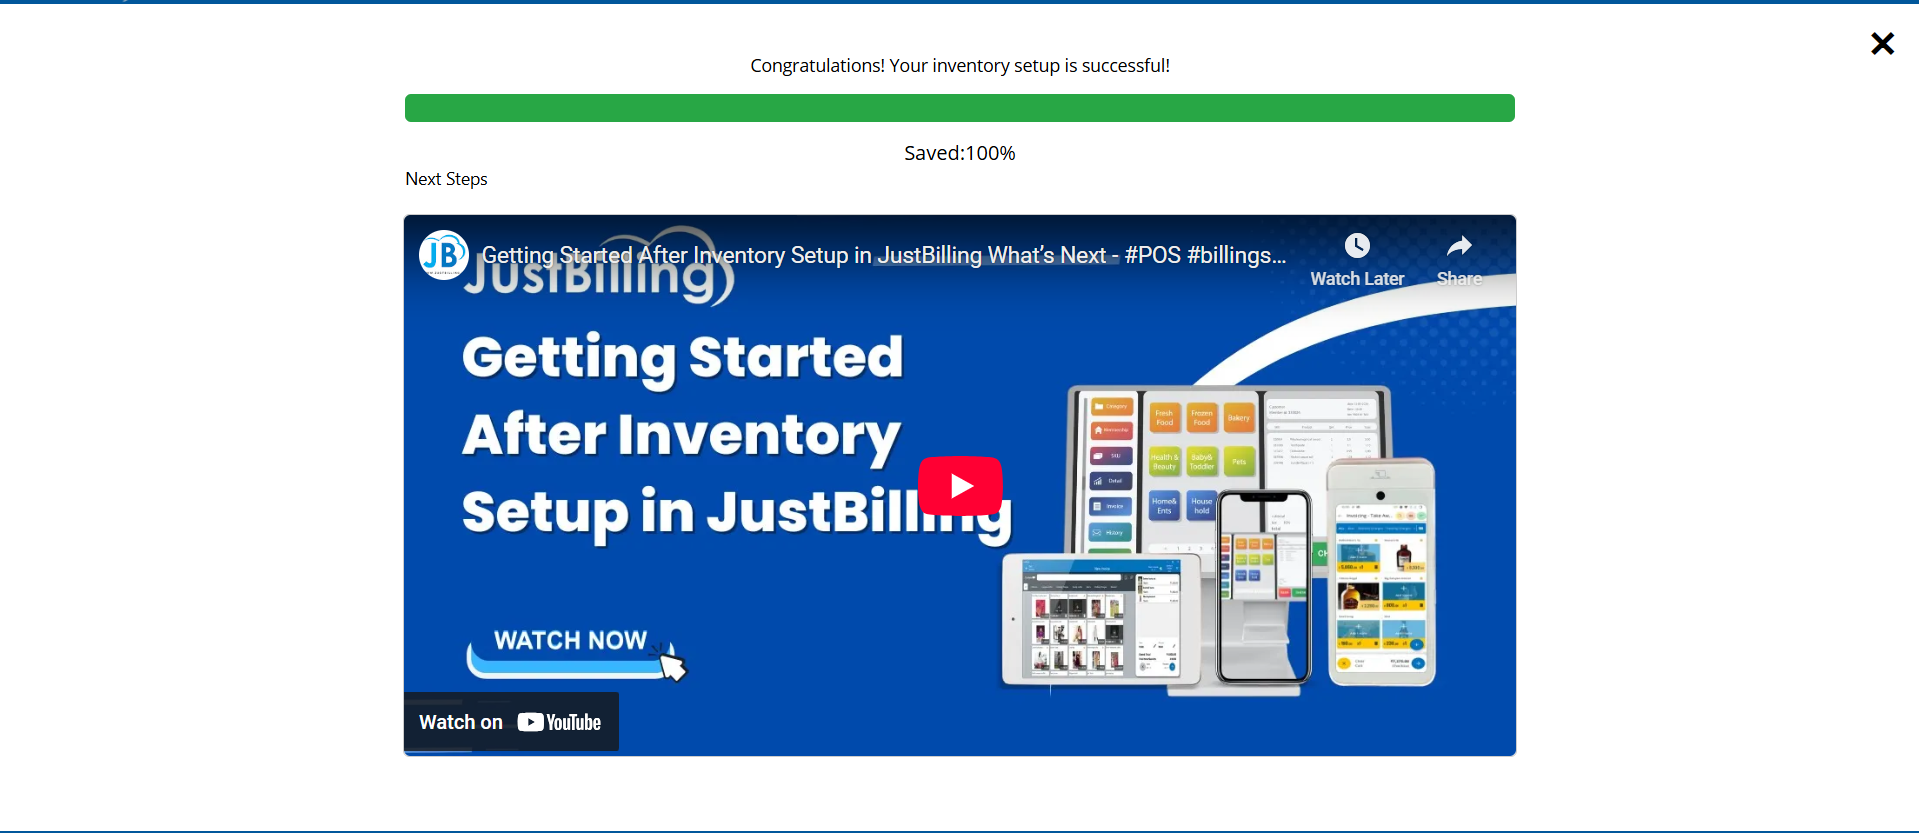
Step 6: After clicking the Save button, you will be taken to the Import Progress screen, where you can track the percentage of products being imported into the application. Once the import reaches 100%, you will be automatically redirected to the Dashboard screen to begin billing operations.(see figure 15)
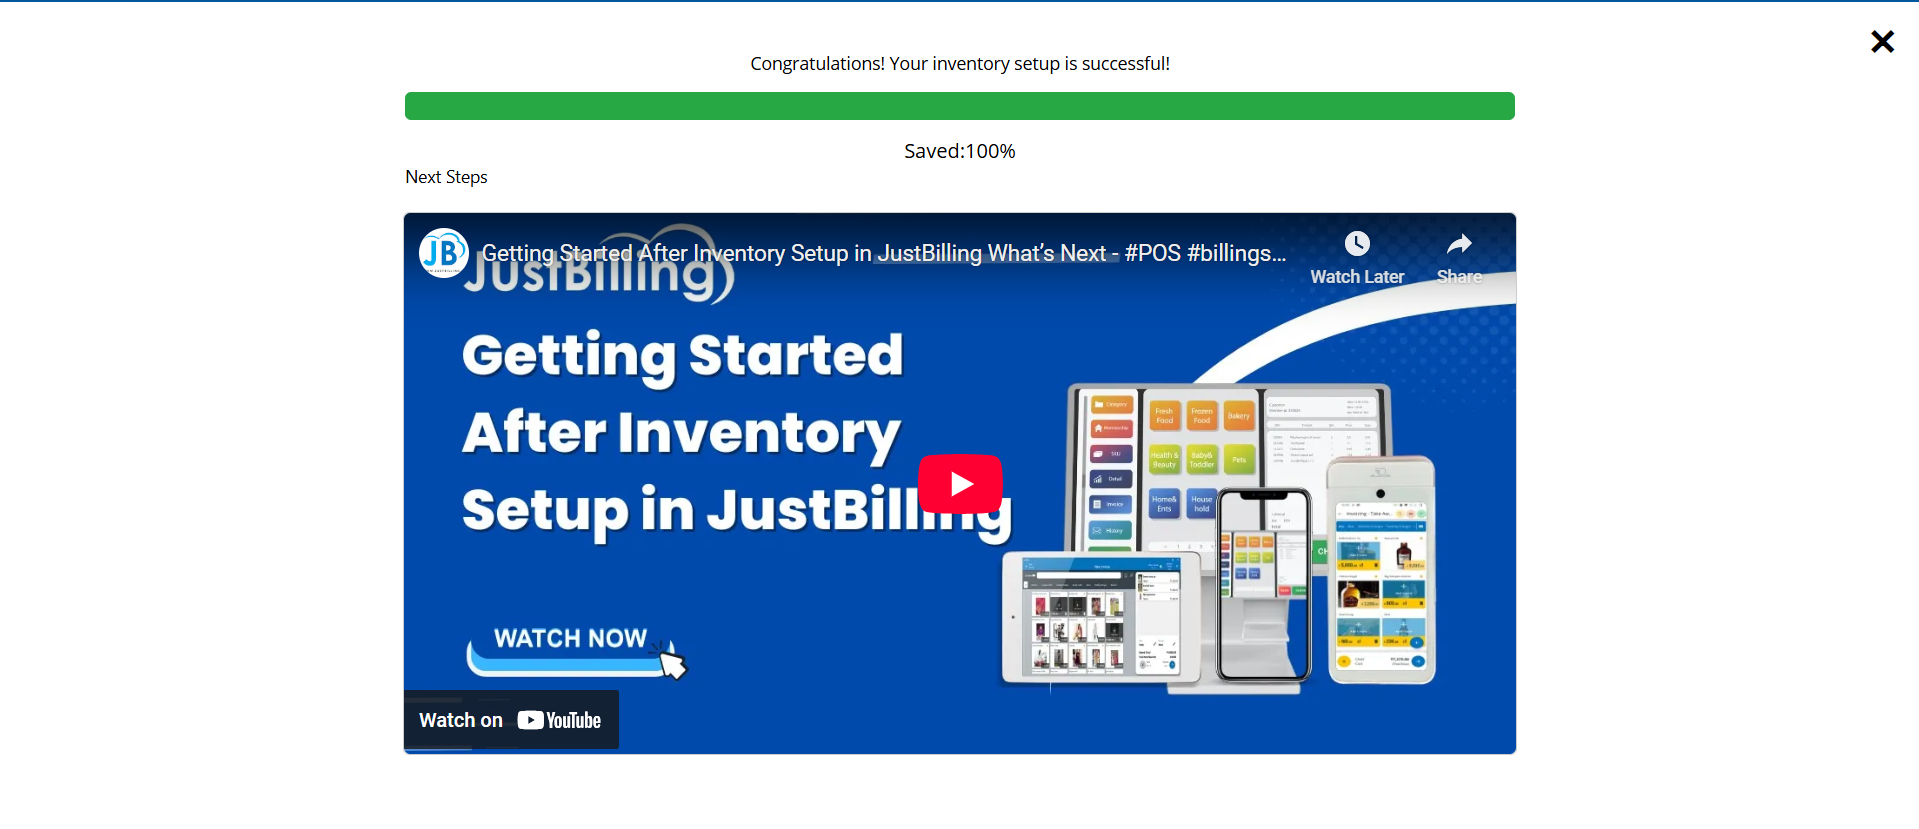
(Figure 15 - Importing your data)
Setup inventory using Upload your own file option
Step 1: Select the Upload your own file option to import data using your existing import file.
- Click on the Upload your own file option
- Upload the excel file by browsing file or by drag and drop.
- After uploading the file you will be directed to the Review screen
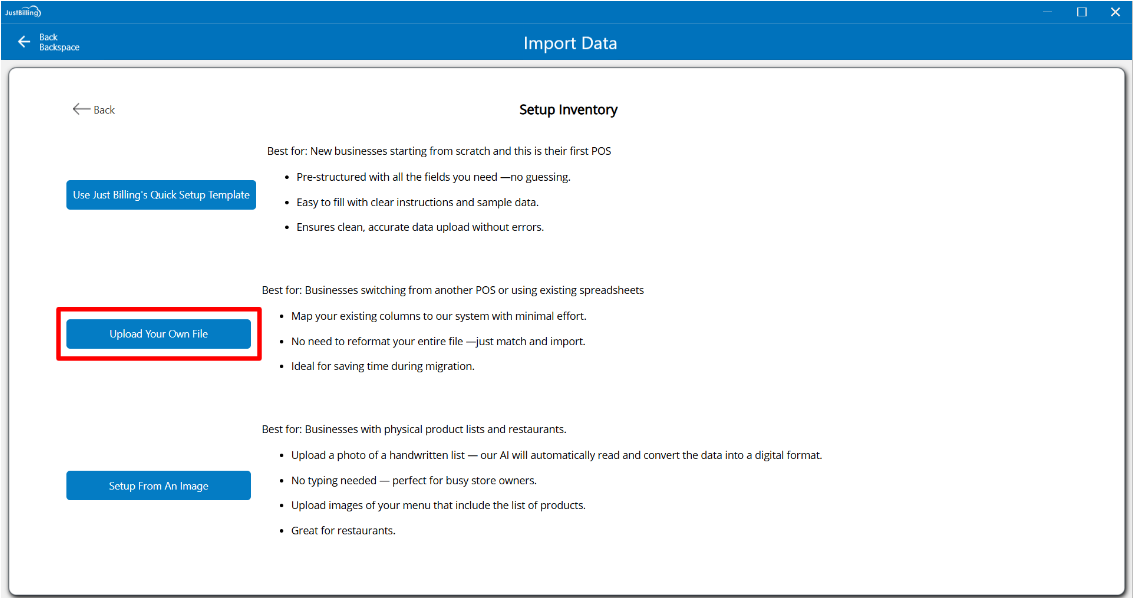
(Figure 16 - Upload your own file)
Step 1: Select the upload option to import data from the system (see figure 17, 18)
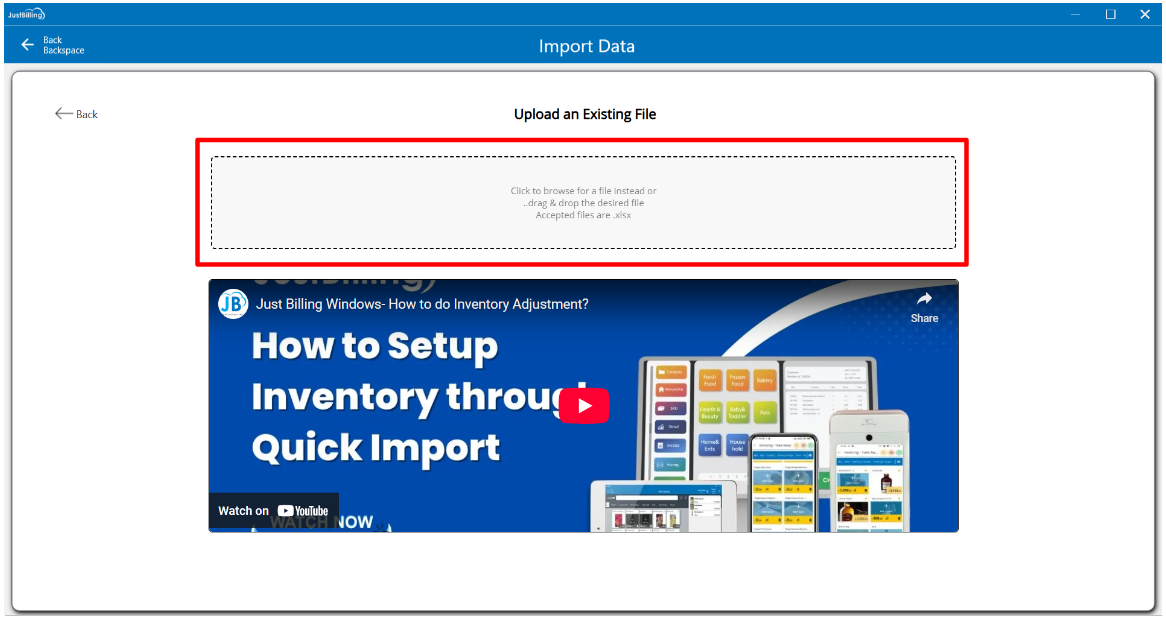
(Figure 17 - Upload import file)
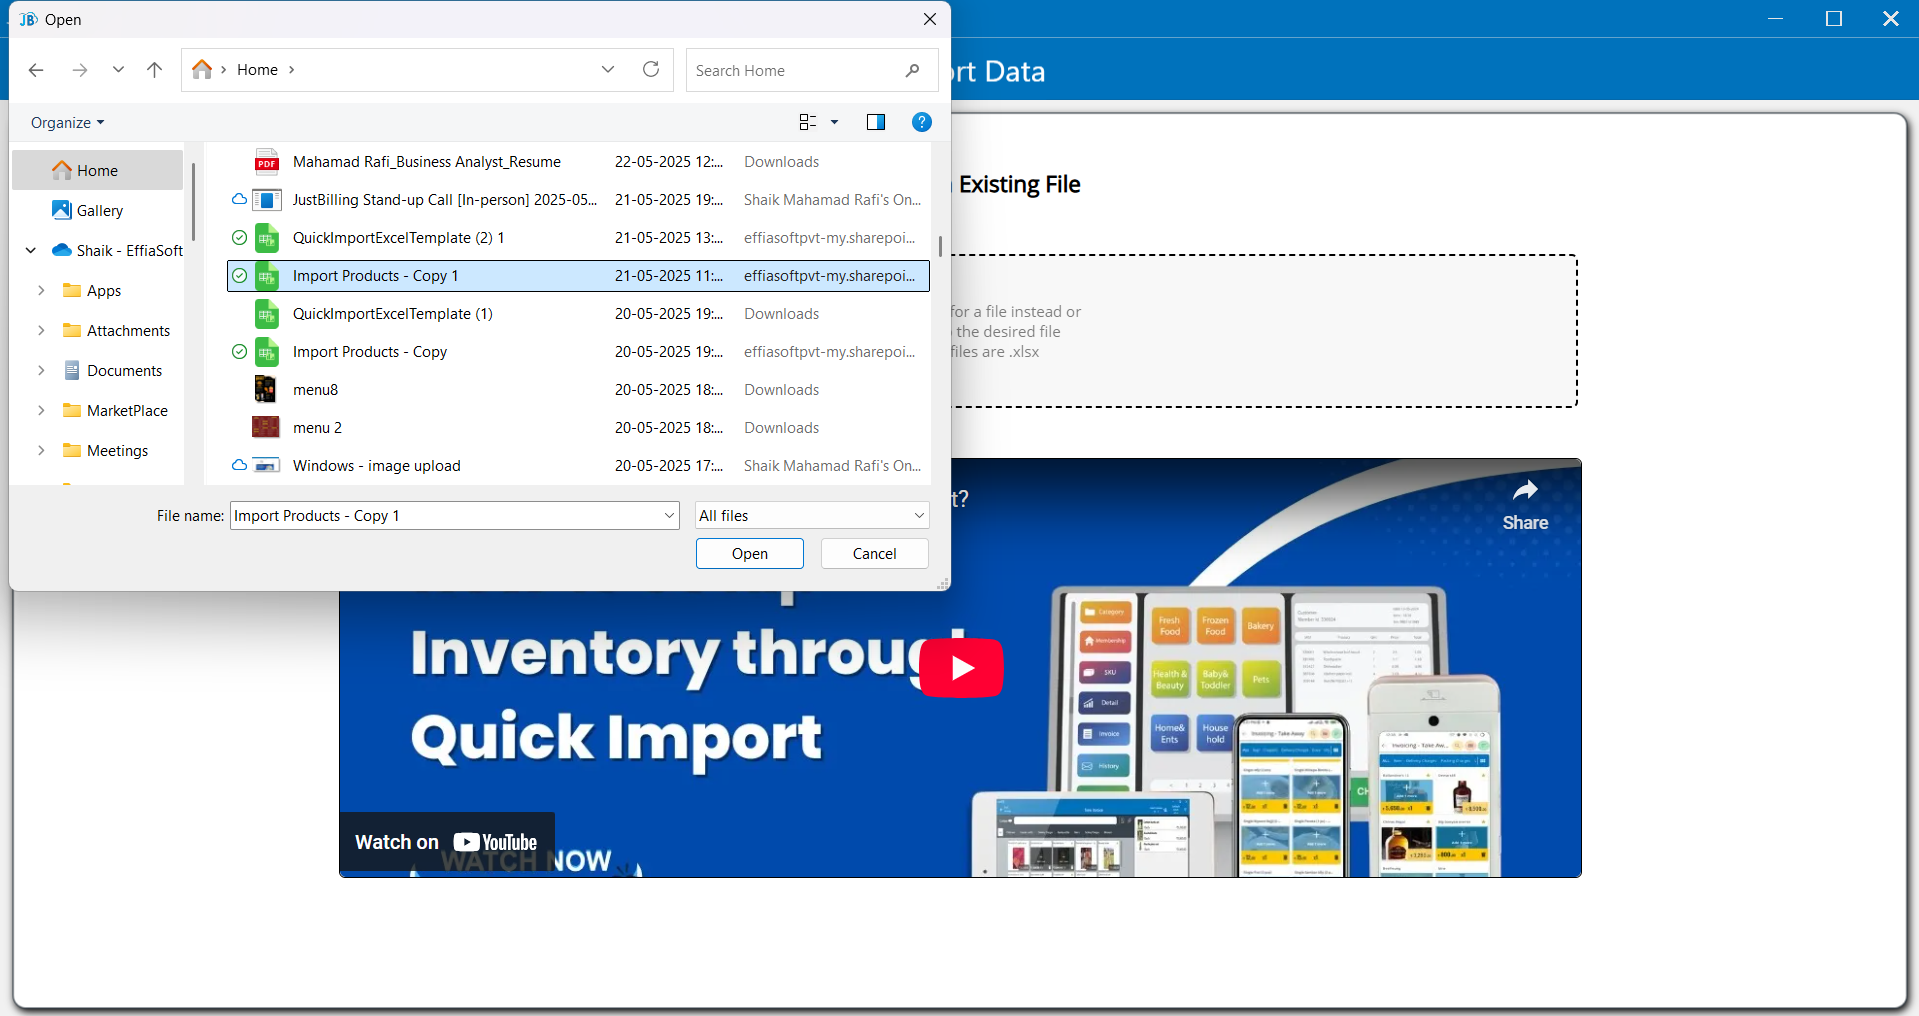
(Figure 18 - Select import file)
Please wait till your data is imported for review

Step 2: After uploading the document, you will be redirected to the review screen with 3 tabs such as Product, Price catalog and Update physical stock (see figure 19)
Soon after uploading the data, the status will be in review mode indicating yellow '!' icon

(Figure 19 - Review screen )
In product, price catalog and update physical stock tabs you can add and edit the details of the products. Once the product details are updated, you need to click on review button provided below the product tab.
The application will validate the data in the products tab.
If there are any errors or missing mandatory details, the application will show the error message in the Reason column. (see figure 20)

(Figure 20 - Validating upload data)
After updating the mandatory details once again you need to click on the Review button to validate the data. The product tab and status column will be transitioned to Green.(see figure 21)

(Figure 21 - Review product data)
Step 3: After Reviewing the product tab click on the Price catalog tab to validate the details in the sheet, update the required details and click on the Review button to validate the Price catalog sheet (see figure 22)
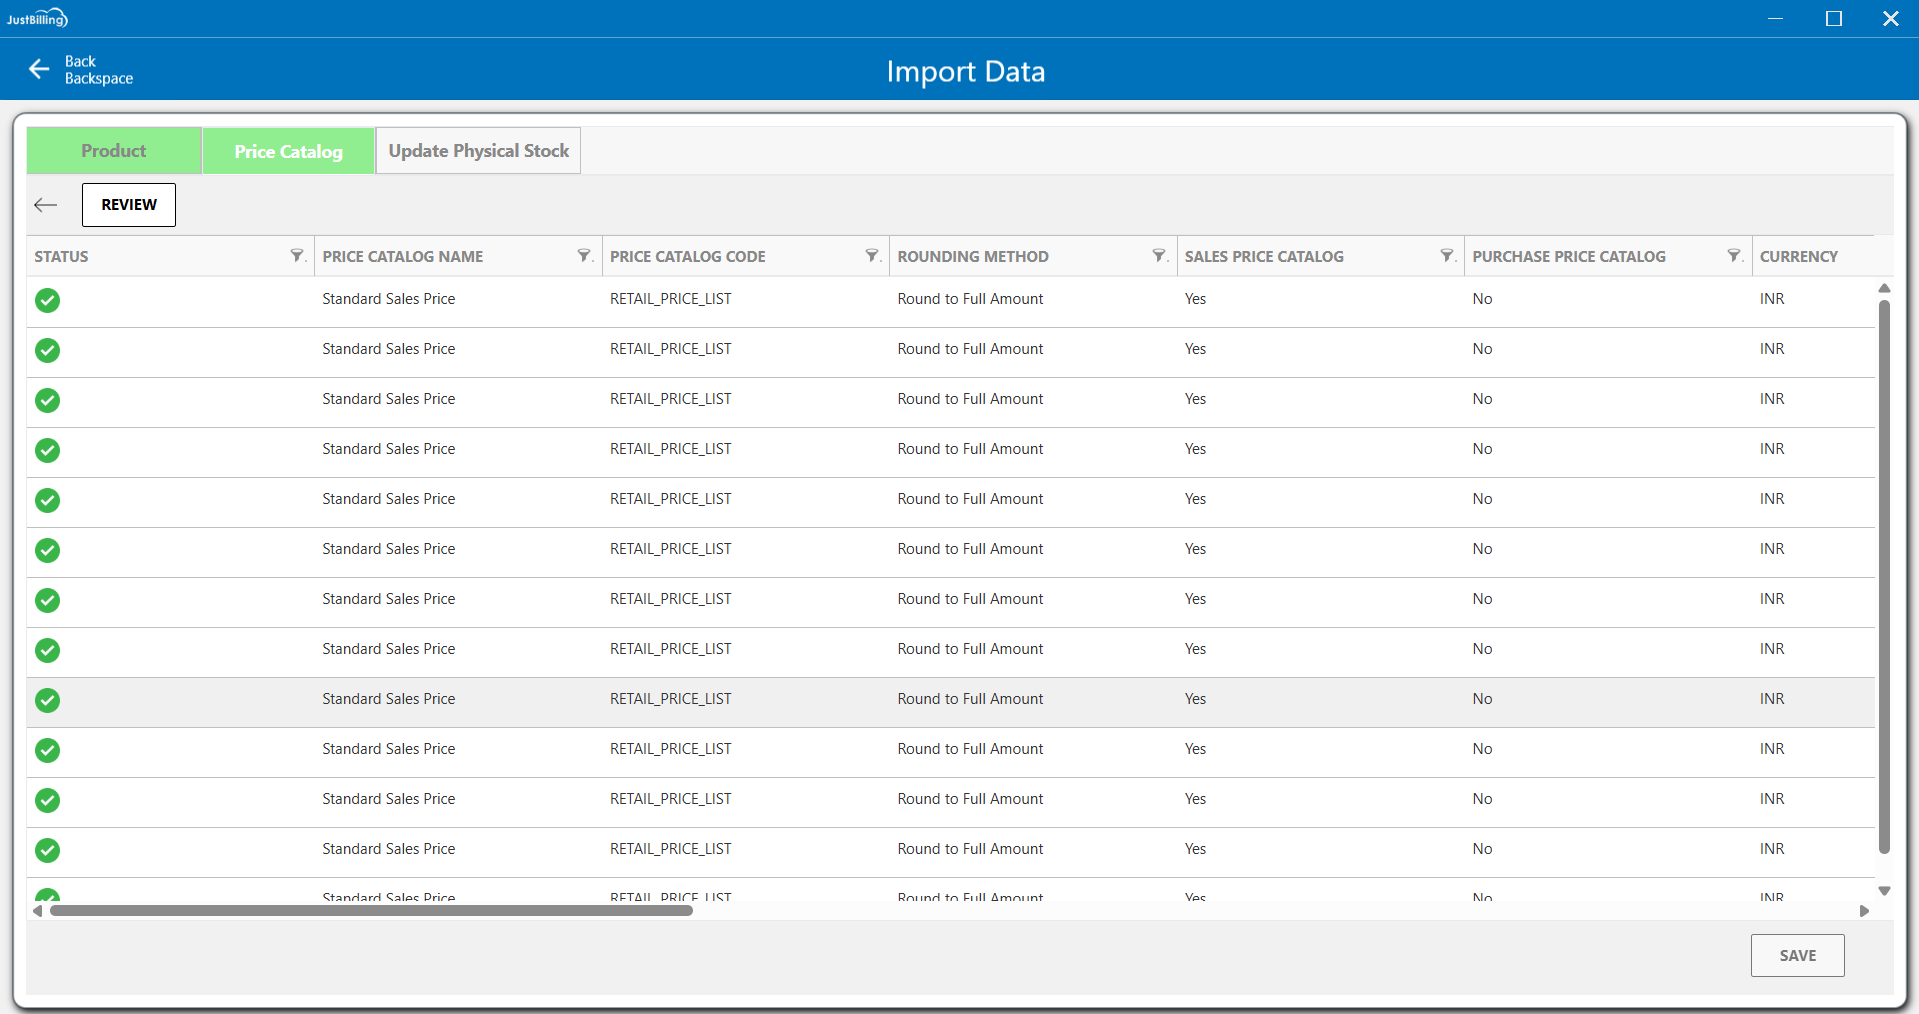
(Figure 22 - Review Price catalog data)
Step 4: After reviewing the Price Catalog tab, proceed to the Update Physical Stock tab. If your account is linked to multiple stores, select the appropriate branch from the drop down menu where you wish to update the stock. For single-store accounts, the branch will be auto-filled. Then, enter the stock quantities in the Current Stock column accordingly.
After adding the details click on Review button to validate the data.(see figure 23)

(Figure 23 - Review Update physical stock data)
After all the 3 tabs are verified the save button will be enabled to import your data.
Click on the save button to start the import process. (see figure 24)

(Figure 24 - Save data)
Step 5: After clicking the Save button, you will be taken to the Import Progress screen, where you can track the percentage of products being imported into the application. Once the import reaches 100%, you will be automatically redirected to the Dashboard screen to begin billing operations.(see figure 25)

(Figure 25 - Importing your data)
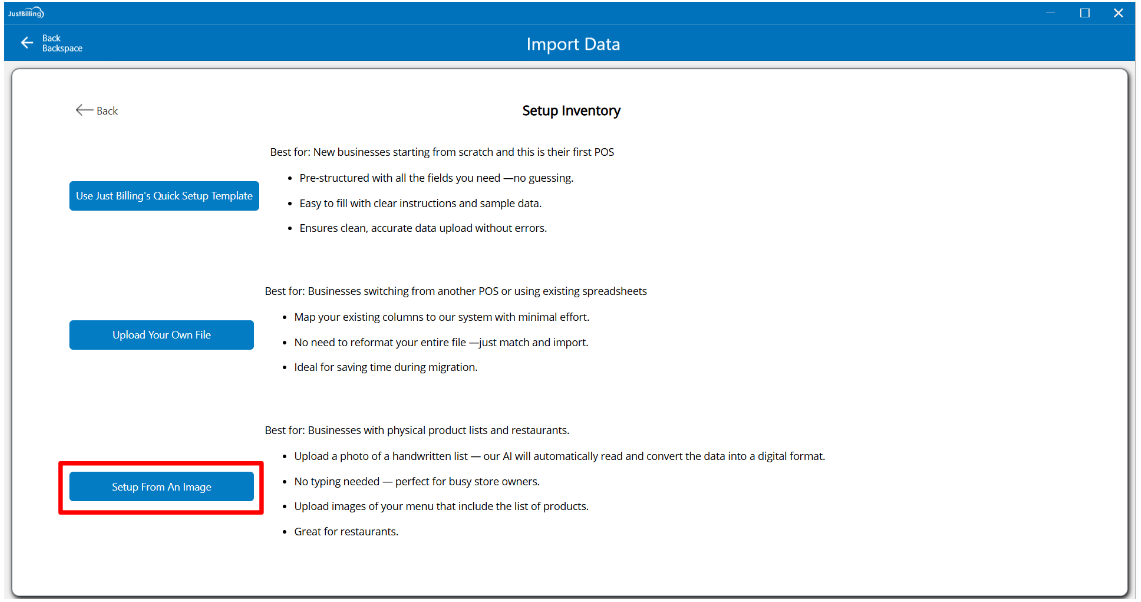
Setup inventory using Setup from an image option
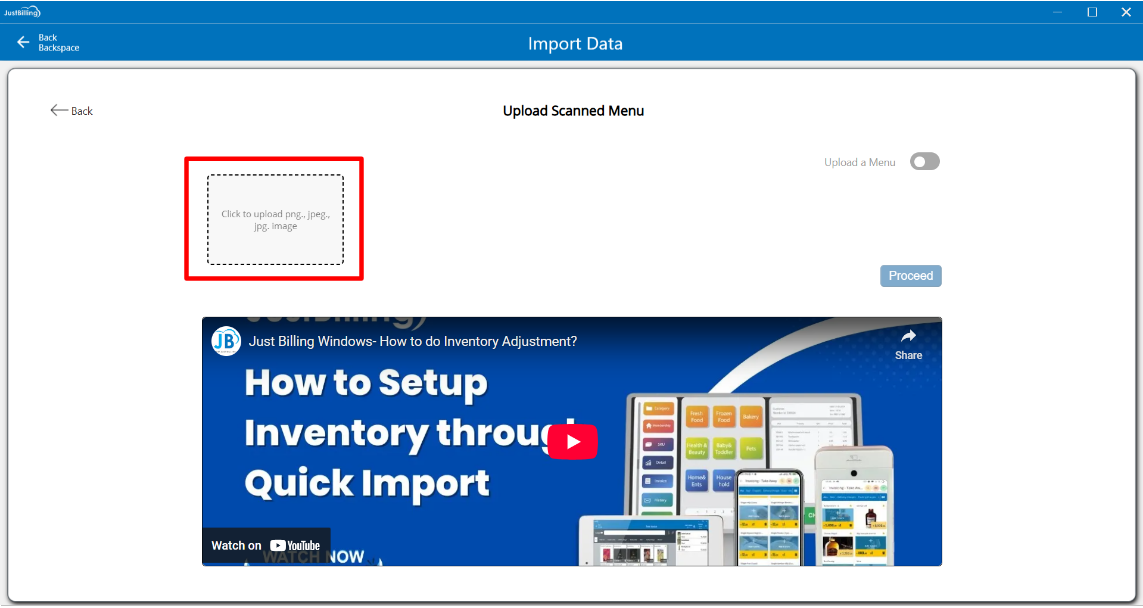
1.Click on the “Setup from An Image” option. On this screen, you will find two options for uploading images: Upload Scanned Menu and Upload Handwritten List.
You can choose the appropriate option based on your requirement by using the toggle button provided. This toggle allows you to easily switch between uploading scanned menu images or a handwritten product list.
By default, the “Upload Scanned Menu” option will be selected, allowing you to import product data by uploading menu images. (Refer to Figure 26)
2.To proceed, click on the “Upload Your Own File” option.
3.Upload image files in .jpg, .jpeg, or .png formats by either browsing from your device or using the drag-and-drop feature.
4.You can upload a maximum of 9 images at a time.
5.Once the images are successfully uploaded, click on proceed button to redirect you to the Review Screen, where you can verify and finalize the extracted product data.
(Figure 26 - select setup from an image option)
(Figure 27 - upload menu images)
After selecting the scan menu option, you will be directed to upload menu images to import the data (You can select upto 9 images to import data) (see figure 28, 29)
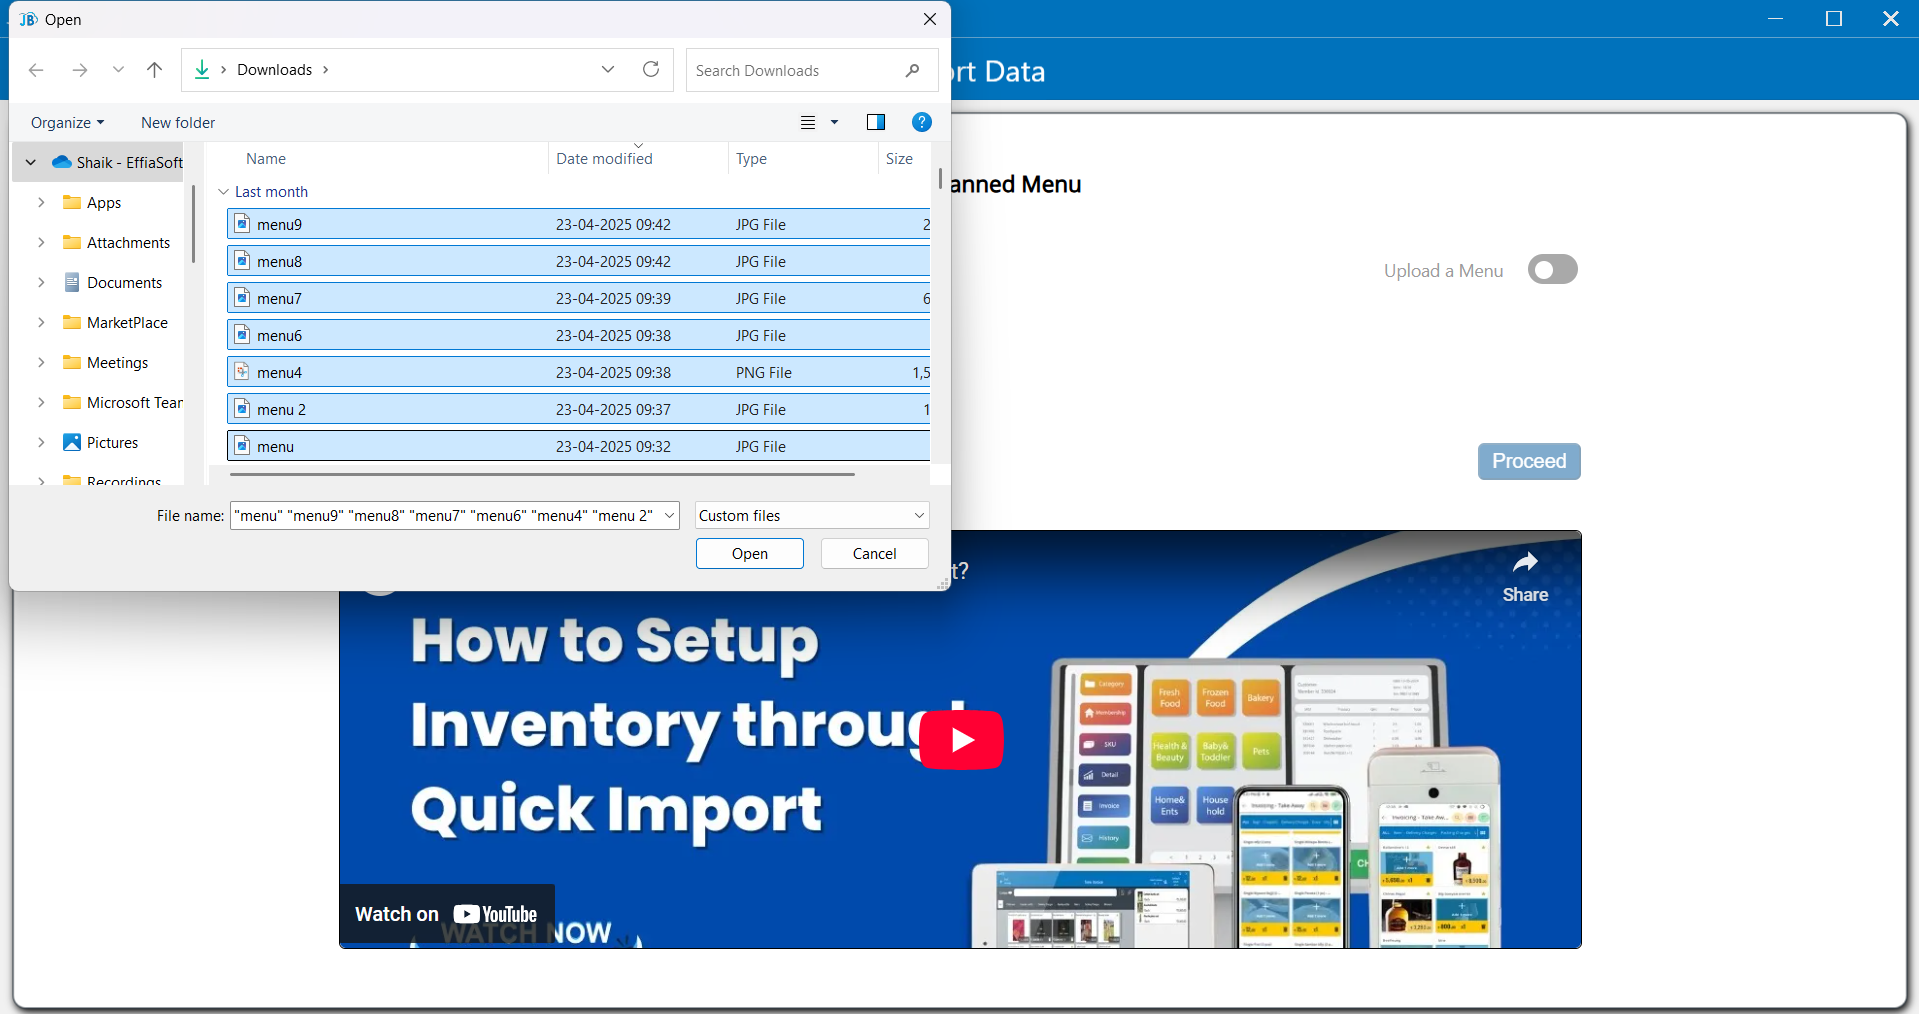
(Figure 28 - Select menu images)
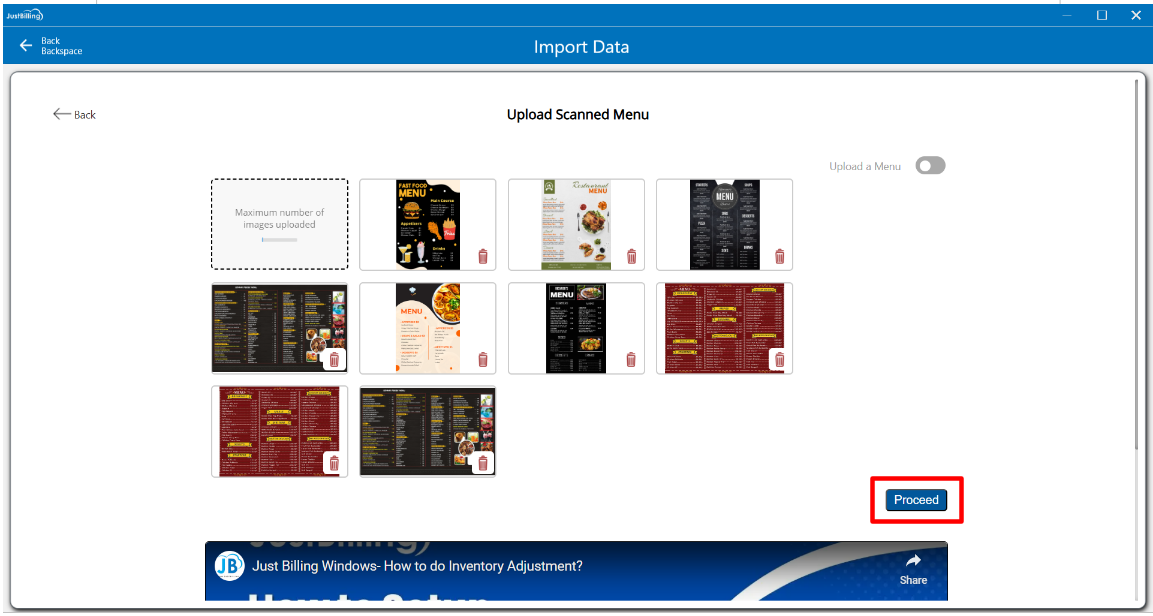
(Figure 29 -Proceed to review)
After uploading images, Please wait till your data is imported for review.

Step 2: After uploading the image, you will be redirected to the review screen with 3 tabs such as Product, Price catalog and Update physical stock (see figure 30)
Soon after uploading the data, the status will be in review mode indicating yellow '!' icon

(Figure 30 - Review screen )
In product, price catalog and update physical stock tabs you can add and edit the details of the products. Once the product details are updated, you need to click on review button provided below the product tab.
The application will validate the data in the products tab.
If there are any errors or missing mandatory details, the application will show the error message in the Reason column. (see figure 31)
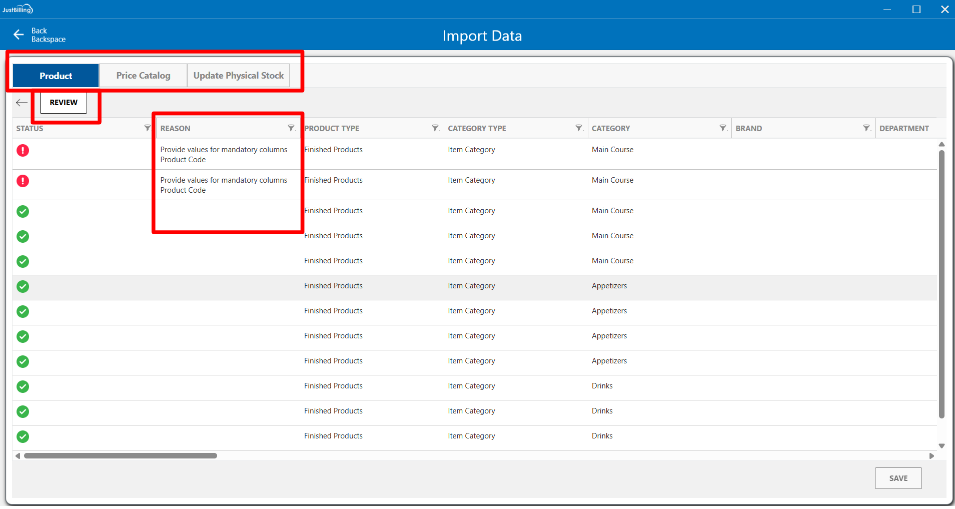
(Figure 31 - Validating upload data)
After updating the mandatory details once again you need to click on the Review button to validate the data. The product tab and status column will be transitioned to Green.(see figure 32)

(Figure 32 - Review product data)
Step 3: After Reviewing the product tab click on the Price catalog tab to validate the details in the sheet, update the required details and click on the Review button to validate the Price catalog sheet (see figure 33)

(Figure 33 - Review Price catalog data)
Step 4: After reviewing the Price Catalog tab, proceed to the Update Physical Stock tab. If your account is linked to multiple stores, select the appropriate branch from the drop down menu where you wish to update the stock. For single-store accounts, the branch will be auto-filled. Then, enter the stock quantities in the Current Stock column accordingly.
After adding the details click on Review button to validate the data.(see figure 34)

(Figure 34 - Review Update physical stock data)
After all the 3 tabs are verified the save button will be enabled to import your data.
Click on the save button to start the import process. (see figure 35)

(Figure 35 - Save data)
Step 5: After clicking the Save button, you will be taken to the Import Progress screen, where you can track the percentage of products being imported into the application. Once the import reaches 100%, you will be automatically redirected to the Dashboard screen to begin billing operations.(see figure 36)

(Figure 36 - Importing your data)
Setup inventory using Upload Hand written list option
Step 1: Now switch the toggle button to upload the hand written images, Select the Scan Menu option to import data by uploading the menu images.(see figure 37, 38)
- Click on the Setup from an image option
- Upload the .jpg, .jpeg and .png file by browsing file or by drag and drop.
- After uploading the images you will be directed to the Review screen.
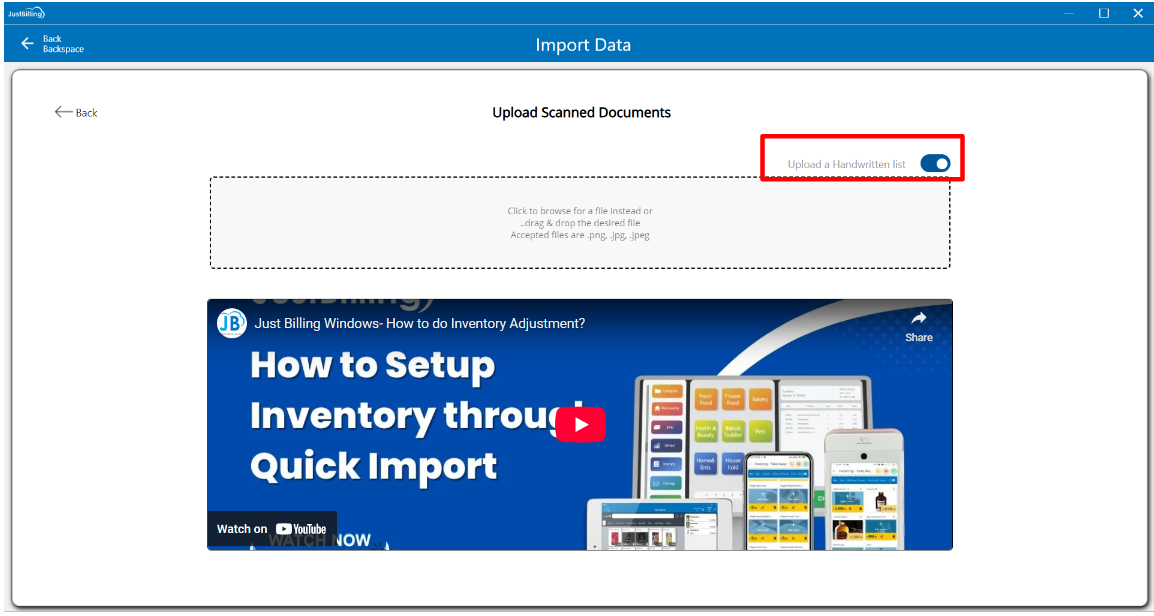
(Figure 37 - Switch to Upload Hand written list option)
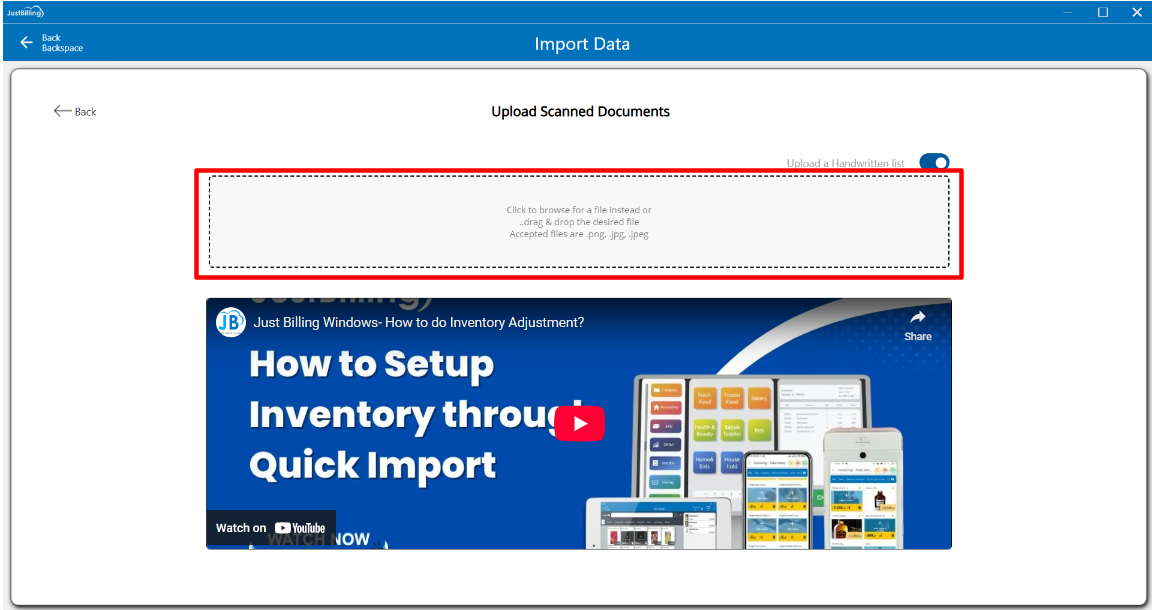
(Figure 38 - Browse image)
Select the image to be uploaded (see figure 39)
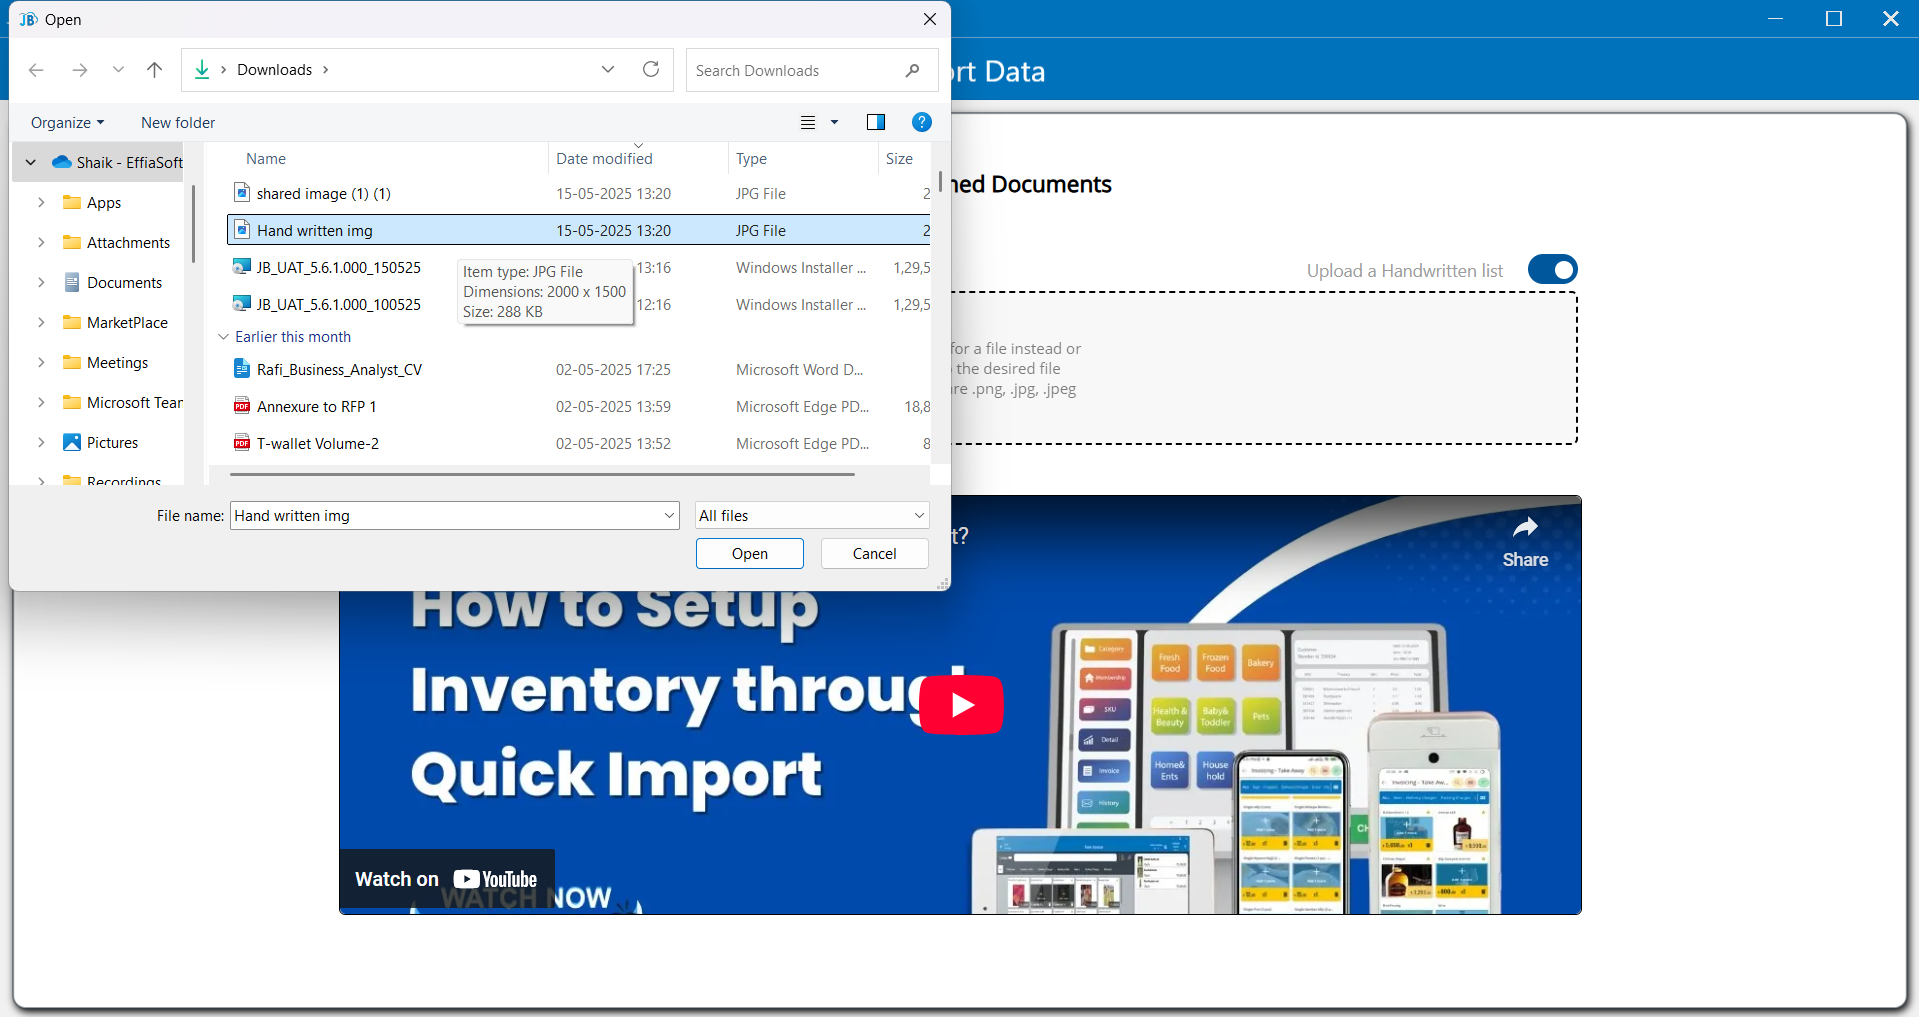
(Figure 39 - Uploading hand written images)
After uploading image, Please wait till your data is imported for review.(see figure 40)
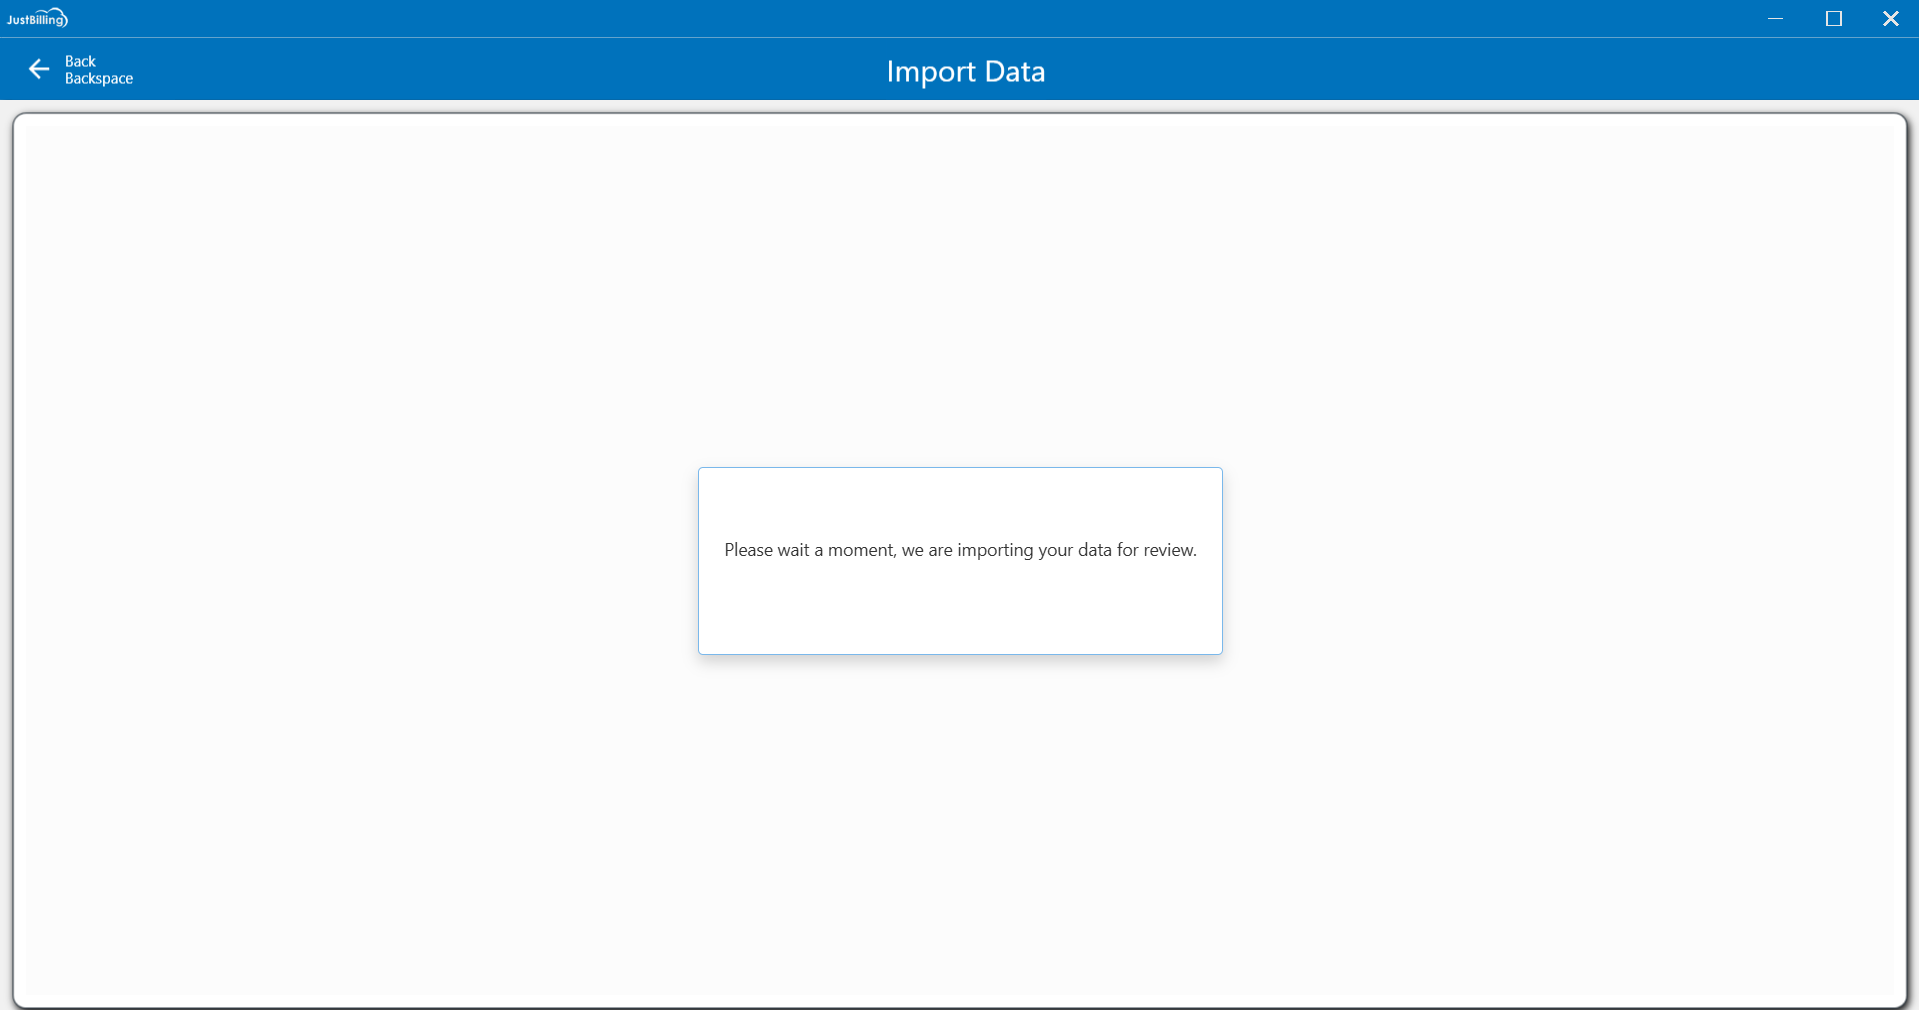
(Figure 40 - Processing your data)
Step 2: After uploading the image, you will be redirected to the review screen with 3 tabs such as Product, Price catalog and Update physical stock (see figure 41)
Soon after uploading the data, the status will be in review mode indicating yellow '!' icon
(Figure 41 - Review screen )
In product, price catalog and update physical stock tabs you can add and edit the details of the products. Once the product details are updated, you need to click on review button provided below the product tab.
The application will validate the data in the products tab.
If there are any errors or missing mandatory details, the application will show the error message in the Reason column. (see figure 42)

(Figure 42 - Validating upload data)
After updating the mandatory details once again you need to click on the Review button to validate the data. The product tab and status column will be transitioned to Green.(see figure 43)

(Figure 43 - Review product data)
Step 3: After Reviewing the product tab click on the Price catalog tab to validate the details in the sheet, update the required details and click on the Review button to validate the Price catalog sheet (see figure 44)

(Figure 44 - Review Price catalog data)
Step 4: After reviewing the Price Catalog tab, proceed to the Update Physical Stock tab. If your account is linked to multiple stores, select the appropriate branch from the drop down menu where you wish to update the stock. For single-store accounts, the branch will be auto-filled. Then, enter the stock quantities in the Current Stock column accordingly.
After adding the details click on Review button to validate the data.(see figure 45)
(Figure 45 - Review Update physical stock data)
After all the 3 tabs are verified the save button will be enabled to import your data.
Click on the save button to start the import process. (see figure 46)

(Figure 46 - Save data)
Step 5: After clicking the Save button, you will be taken to the Import Progress screen, where you can track the percentage of products being imported into the application. Once the import reaches 100%, you will be automatically redirected to the Dashboard screen to begin billing operations.(see figure 47)
(Figure 47 - Importing your data)
2. Choose From Our Product Library
Step 1 : Click on the Choose from our product library to begin the inventory setup process by adding products (see figure 1).
(Figure 1 - Choose from our product library)
Step 2: After selecting the Product Library option, you will be directed to the Search Products screen. To find a product, enter at least three characters of the product name in the search bar.(see figure 2)
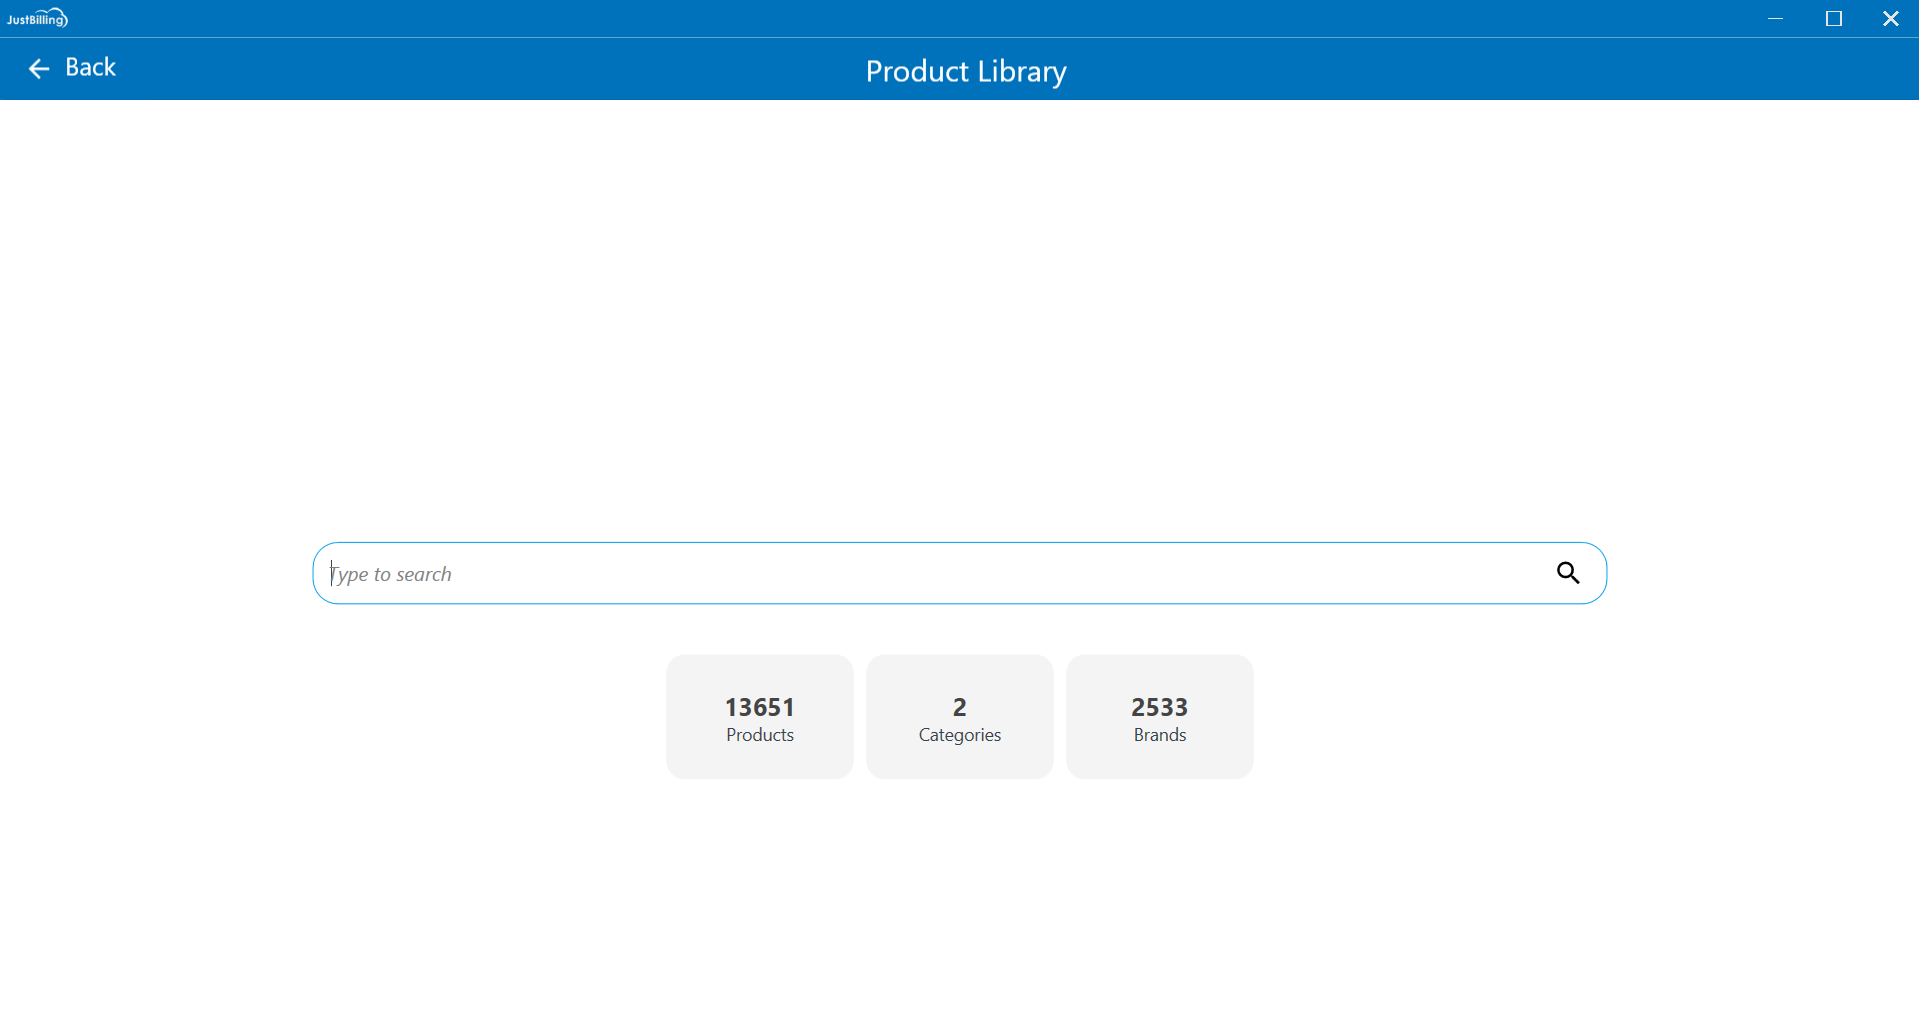
(Figure 2 - Product library search screen)
Step 3: Once you enter the product name in the search bar, the application will display a list of matching products. On this screen, you can view details such as the product name, category, description, and price. You will also find options to clear the search and apply filters to refine the product list.(see figure 3)
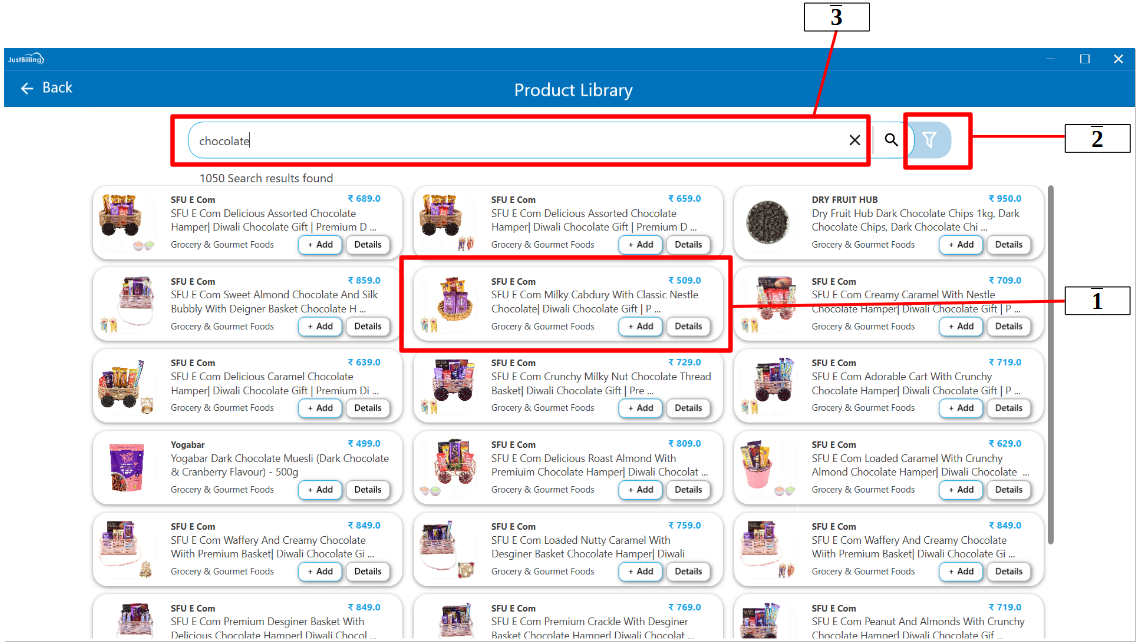
(Figure 3 - Search results screen)
1. Product details
2. Filter option
3. Search bar with clear option
Step 3: When you click on the Filter option, a popup window will appear, allowing you to filter products by Brand and Category. Use the Brand filter to view products from a specific brand, and the Category filter to display products belonging to a selected category. This helps you narrow down the product list based on your preferences.(see figure 4,5)
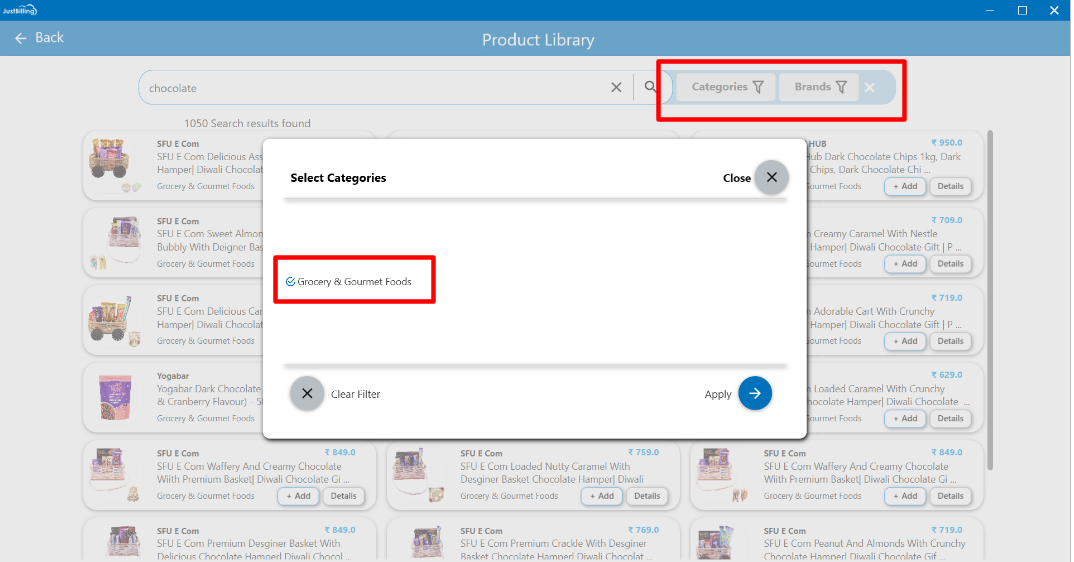
(Figure 4 - Filter categories screen)
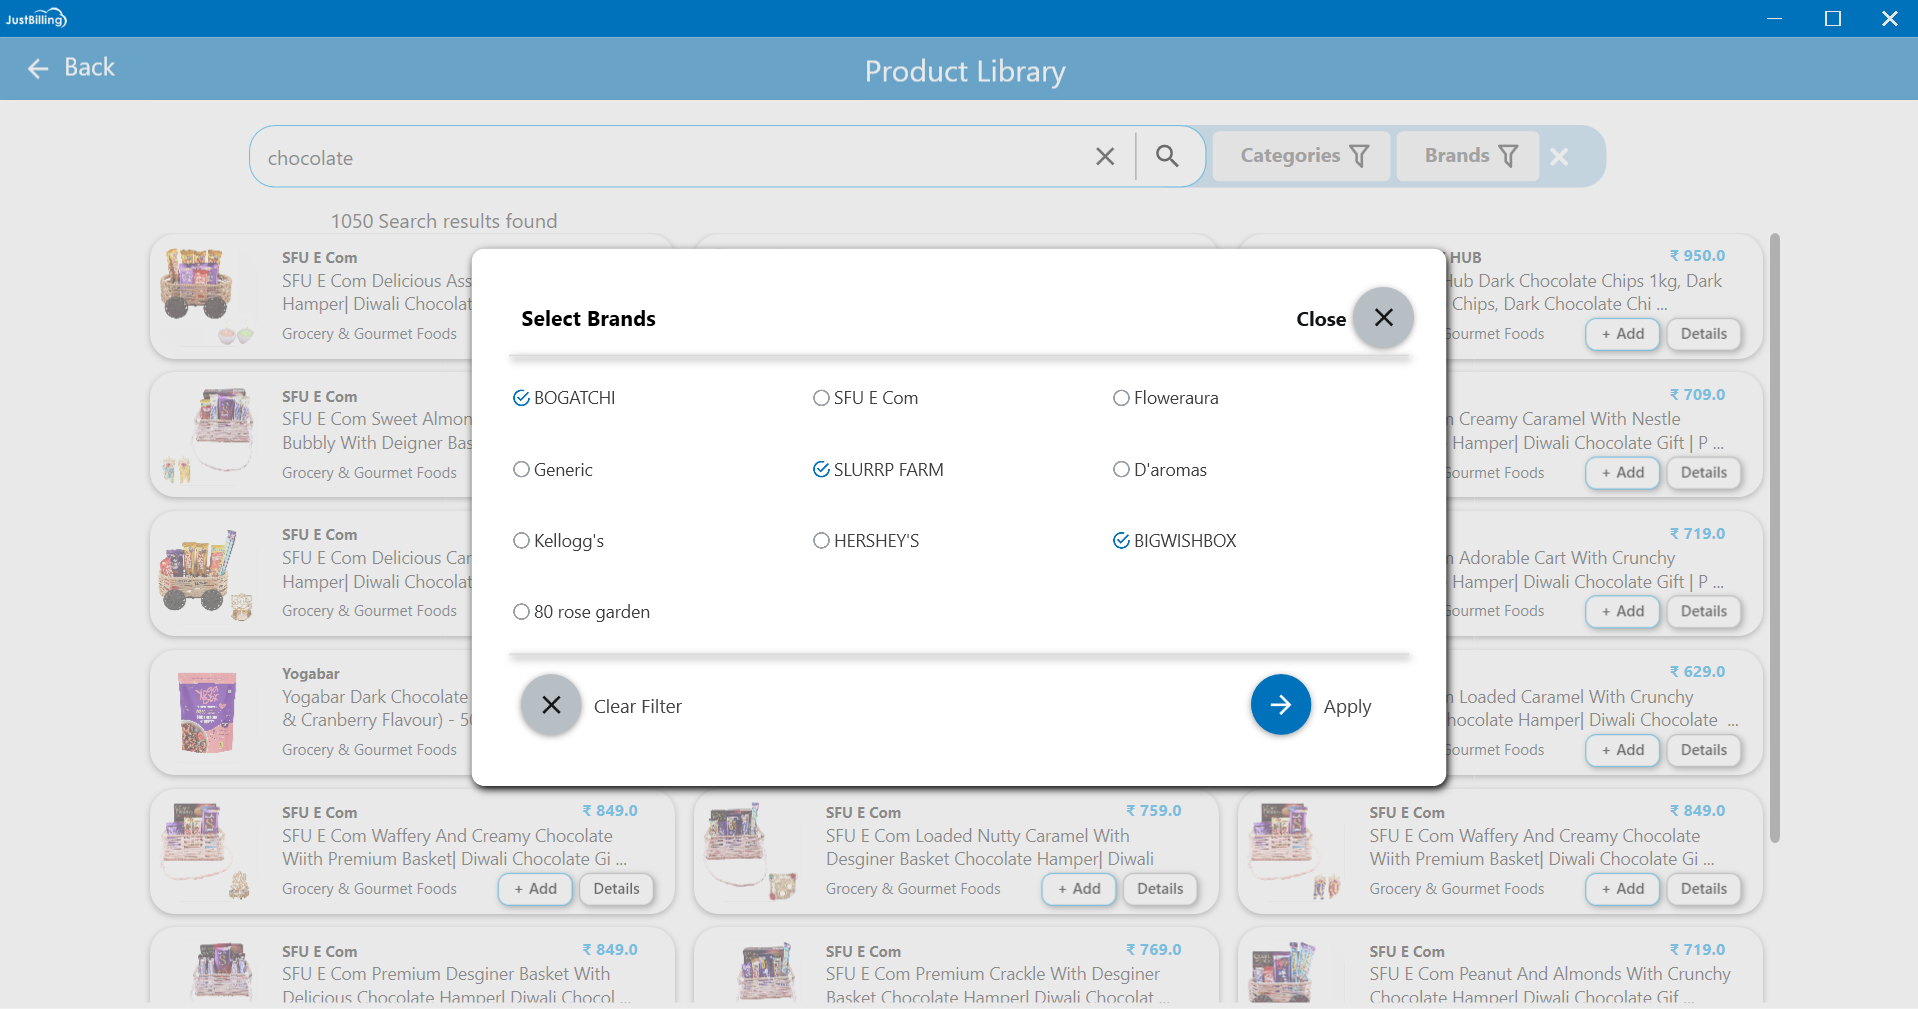
(Figure 5 - Filter brands screen)
Click on Apply Filter to display products based on the selected category or brand. To remove the applied filters, click on Clear Filter within the filter popup. This will reset the product list to show all available items.(see figure 6)
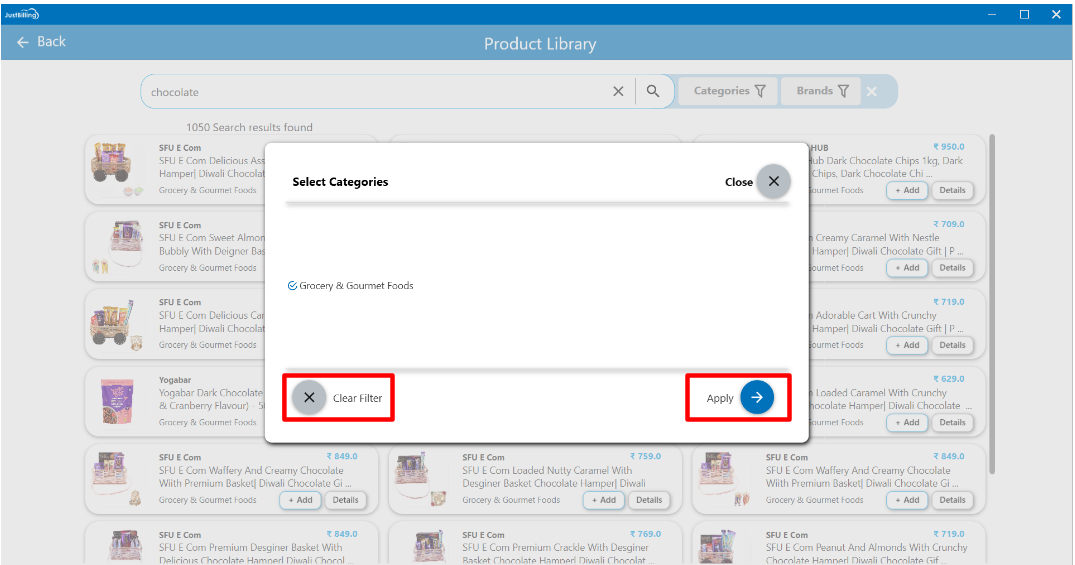
(Figure 6 - Apply and clear filters)
After clicking on apply option, the application will display filtered products list
Step 4: On the Products screen, you can browse through the available items and add selected products for import into the application. To view more information about a specific product, click the Details button located next to the product. This will open a popup displaying detailed information such as the product name, description, price, brand, category and other attributes. This allows you to review the product specifications before adding it to your inventory. (see figure 6, 7)
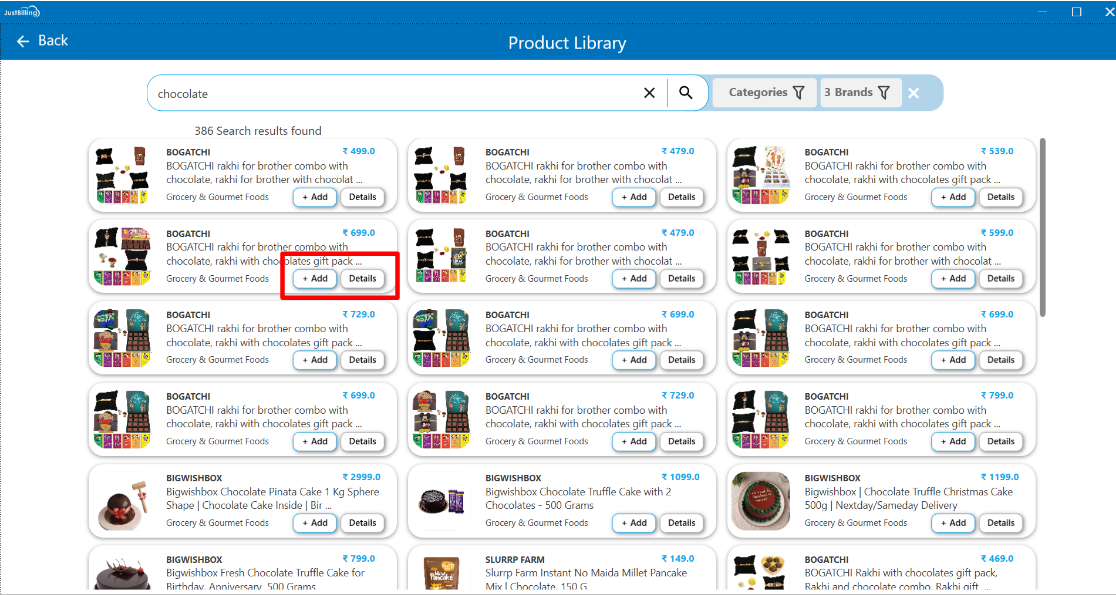
(Figure 6 - Add product and view product details)
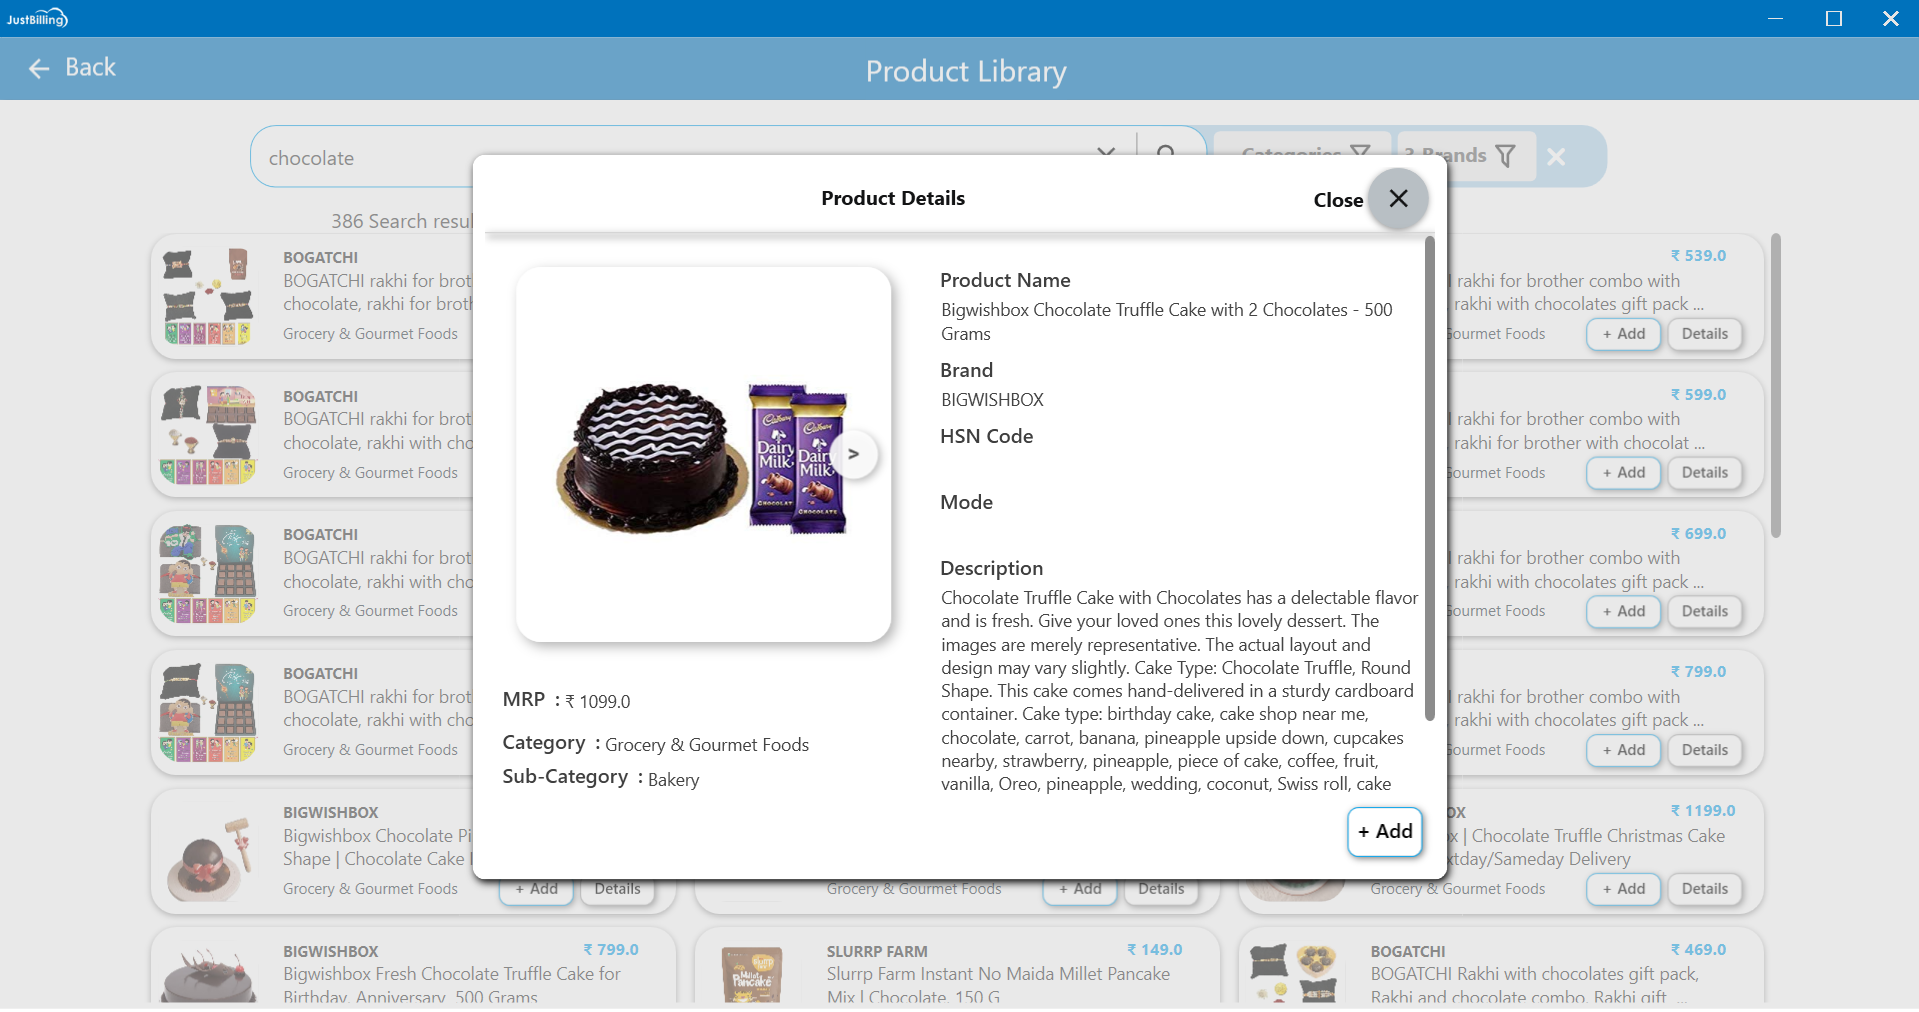
(Figure 7 - view product details)
When you click on the Add button, the selected item will be added to the Review List. A button will appear at the bottom of the screen indicating the total number of products currently added for review (e.g., “Review setup (8)”).
After a product is added, the Add button will change to a Remove button for that specific item. You can click Remove if you wish to delete the product from the review list. This allows you to easily manage which products should be imported before final confirmation. (see figure 8)
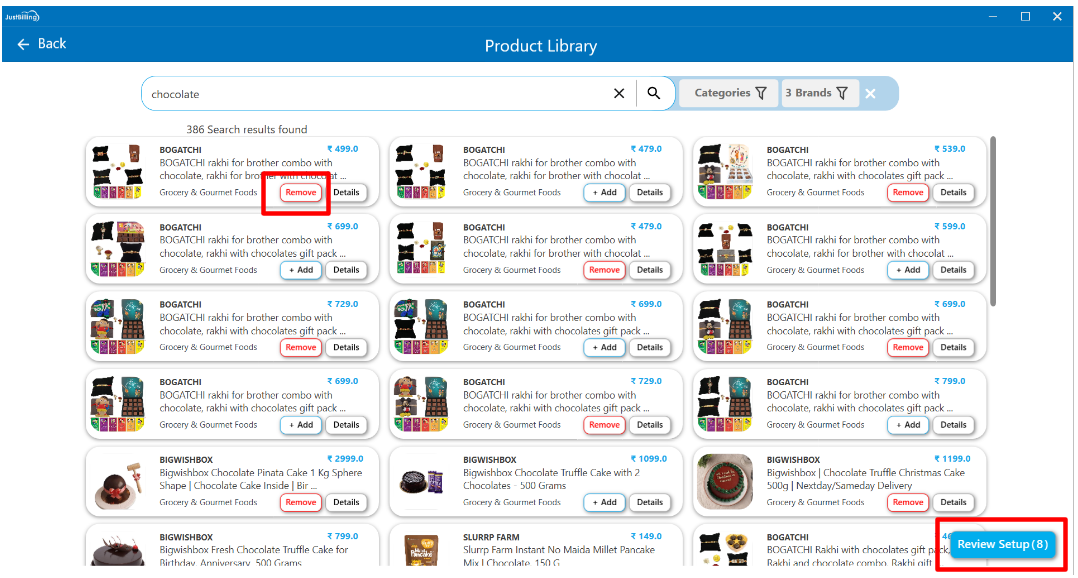
(Figure 8 - Add products)
Step 5: After selecting and adding all the required products, click on the Review Setup button located at the bottom of the screen. This action will take you to the Product Review screen, where you can review the list of selected products in detail.
On the Product Review screen, you will have the option to edit and update product details such as product name, product code, price, quantity, select units, category, sub category and taxes before finalizing the import. This step ensures all product information is accurate and ready for setup in the application. (see figure 9)
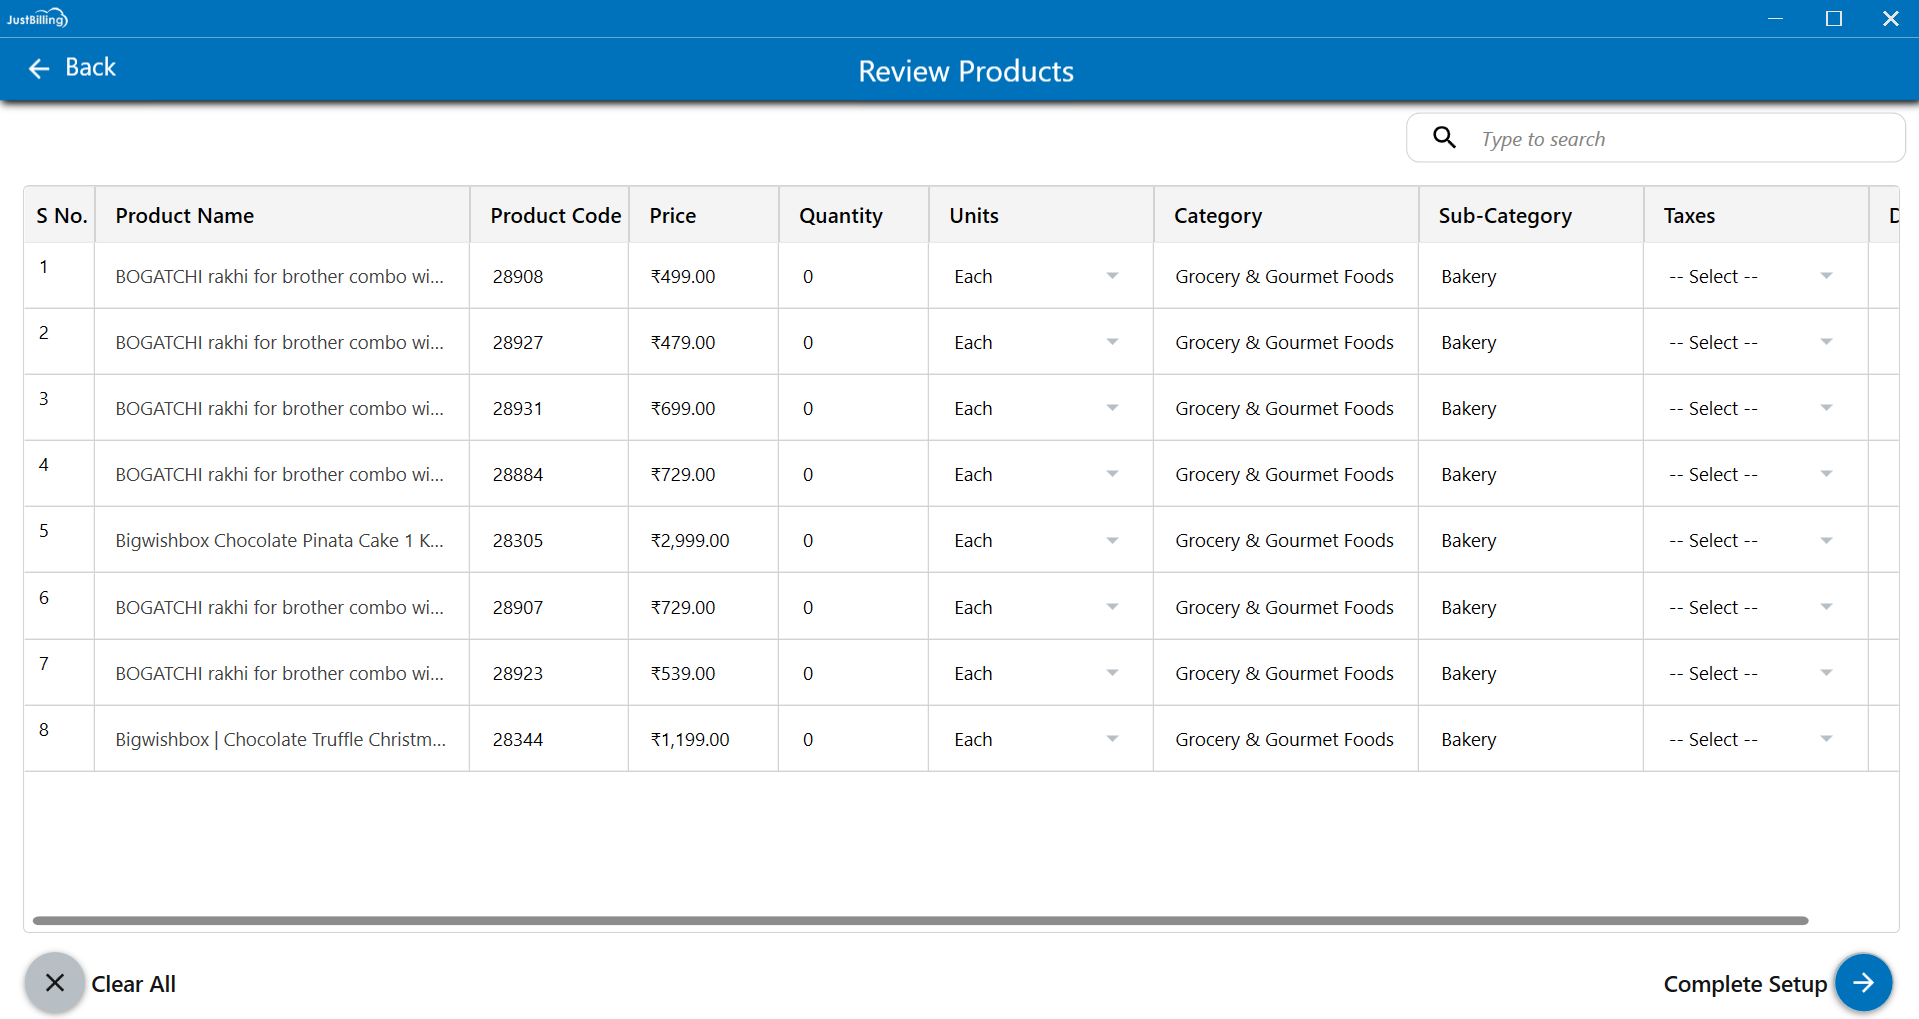
(Figure 9 - Review products)
You can use the search bar located above the product list on the Review screen to search for a specific product by name. This helps you quickly find and update products within the review list. (see figure 10)
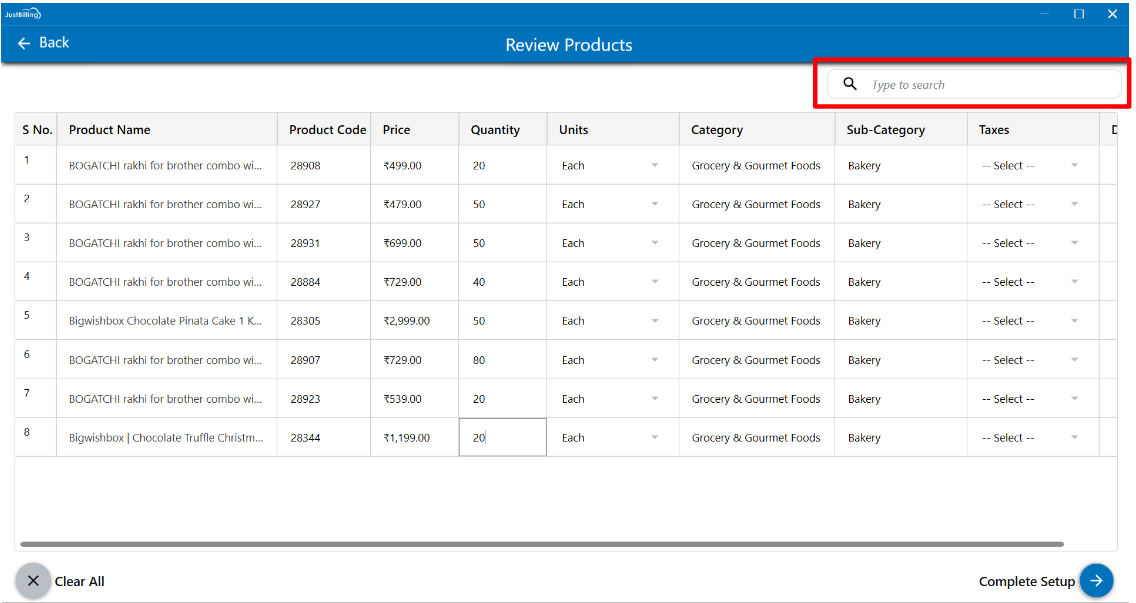
(Figure 10 - search products)
You can delete any unwanted products from the list during the inventory setup process. This allows you to ensure only the necessary items are imported into your inventory. (see figure 11, 12)
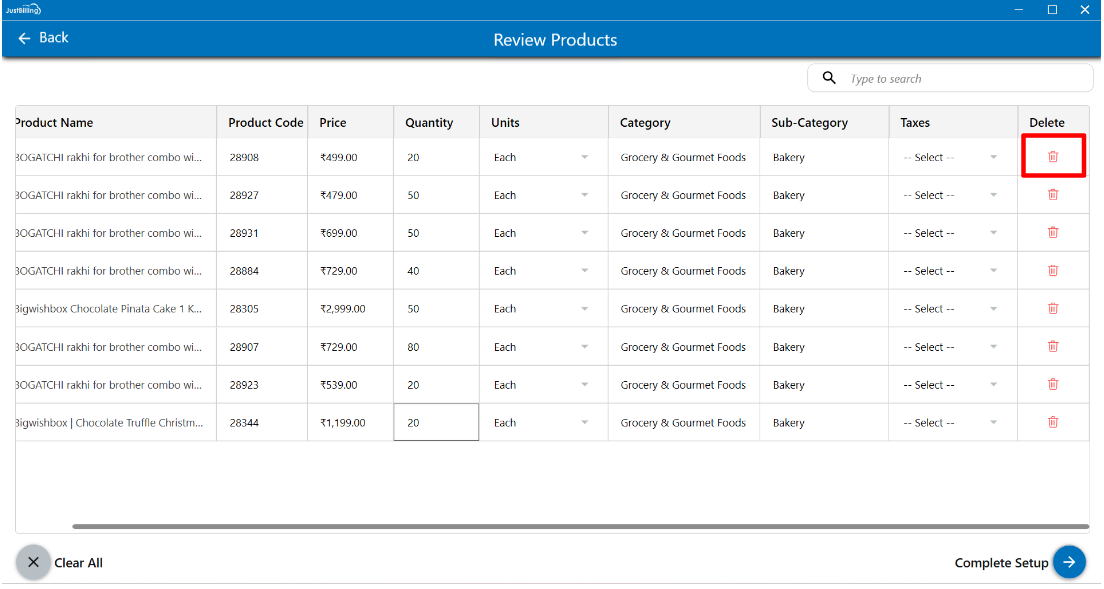
(Figure 11 - Delete product)

(Figure 12 - Confirm Delete product)
Step 6: Once you have finished updating the product details, click the Complete Setup button to begin importing the selected products into your inventory. This action finalizes the setup and adds the products to your application.(see figure 13)
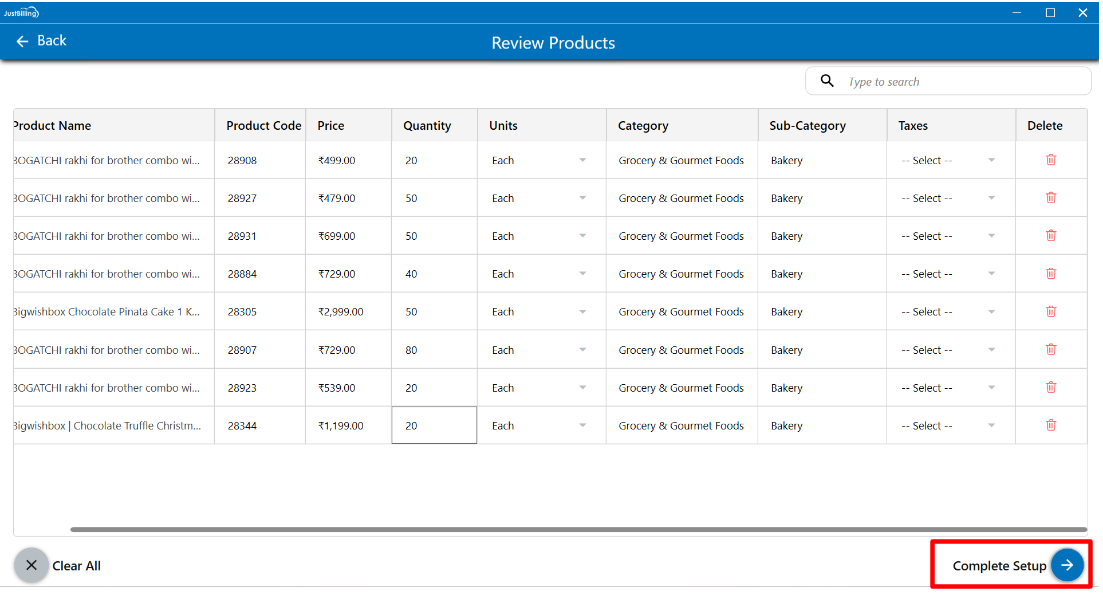
(Figure 13 - Complete setup)
If you decide not to proceed with adding the selected products, you can click on the Clear All button located on the Review screen. This will remove all products currently listed for review.
After clicking Clear All, the system will automatically redirect you back to the Product List screen, where you can search for and select new products to add to your inventory as needed. This feature allows you to reset your selections and start the product setup process from the beginning. (see figure 14)
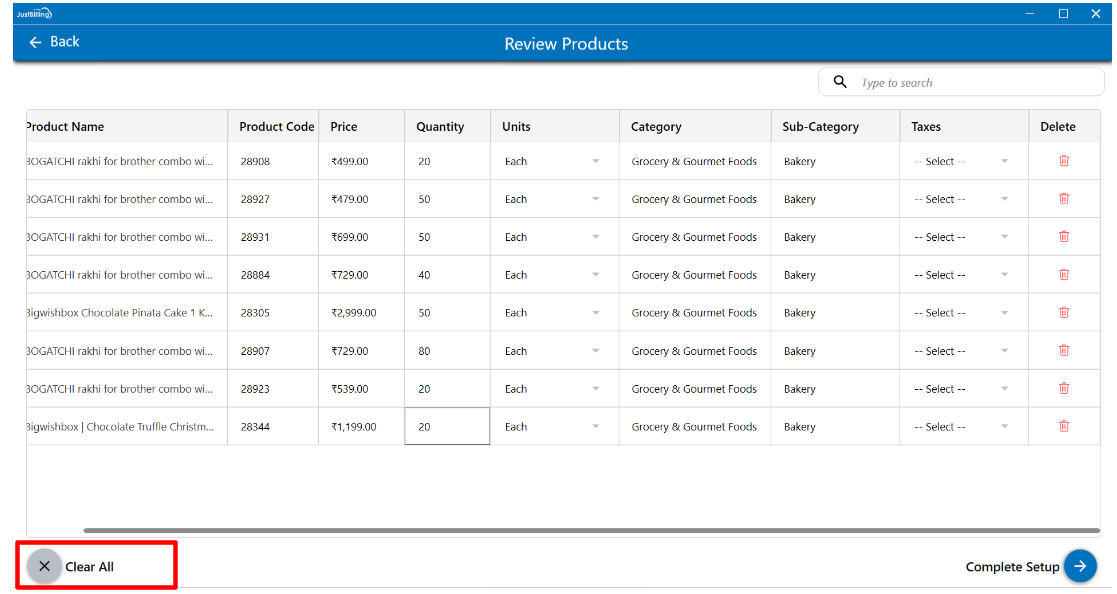
(Figure 14 - Clear all products)
Once you click on the Complete Setup button, the product import process will begin. The system will start adding all the selected products to your inventory.
During the inventory setup process, you will be redirected to the Dashboard screen, where you can monitor the real-time progress of the data being added. Once the products are successfully imported, a confirmation popup will appear stating that your products have been added. Click the OK button on the popup to close it.
Now, you can then begin using the application for billing and other operations, as your inventory setup is now complete. (see figure 15)
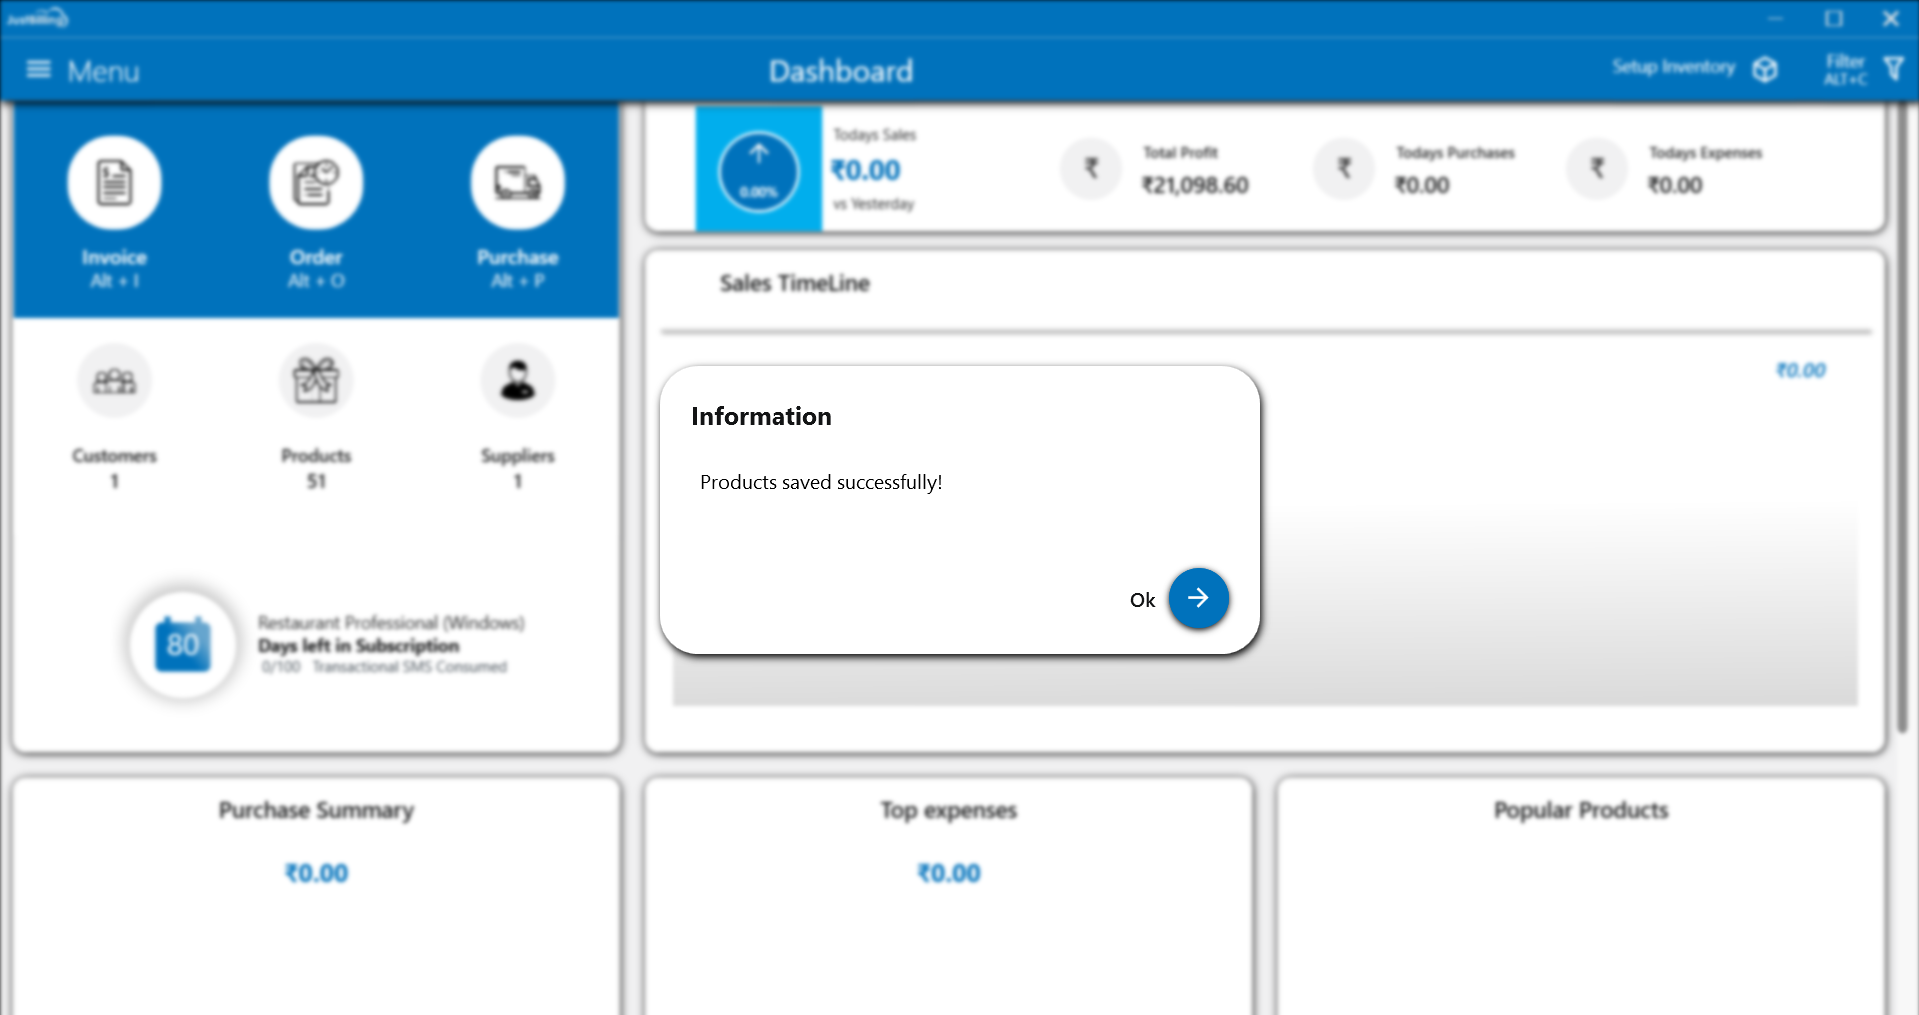
(Figure 15 - Completed inventory setup)