Estimation
Estimation
From this page, you can create an Estimation. (see figure 1).
On Opening Estimation page it will take you to Estimations page.
How to create a Estimation ?
- Navigate to Menu > Transaction > Estimation
- It will take you to Estimations history screen and click on New
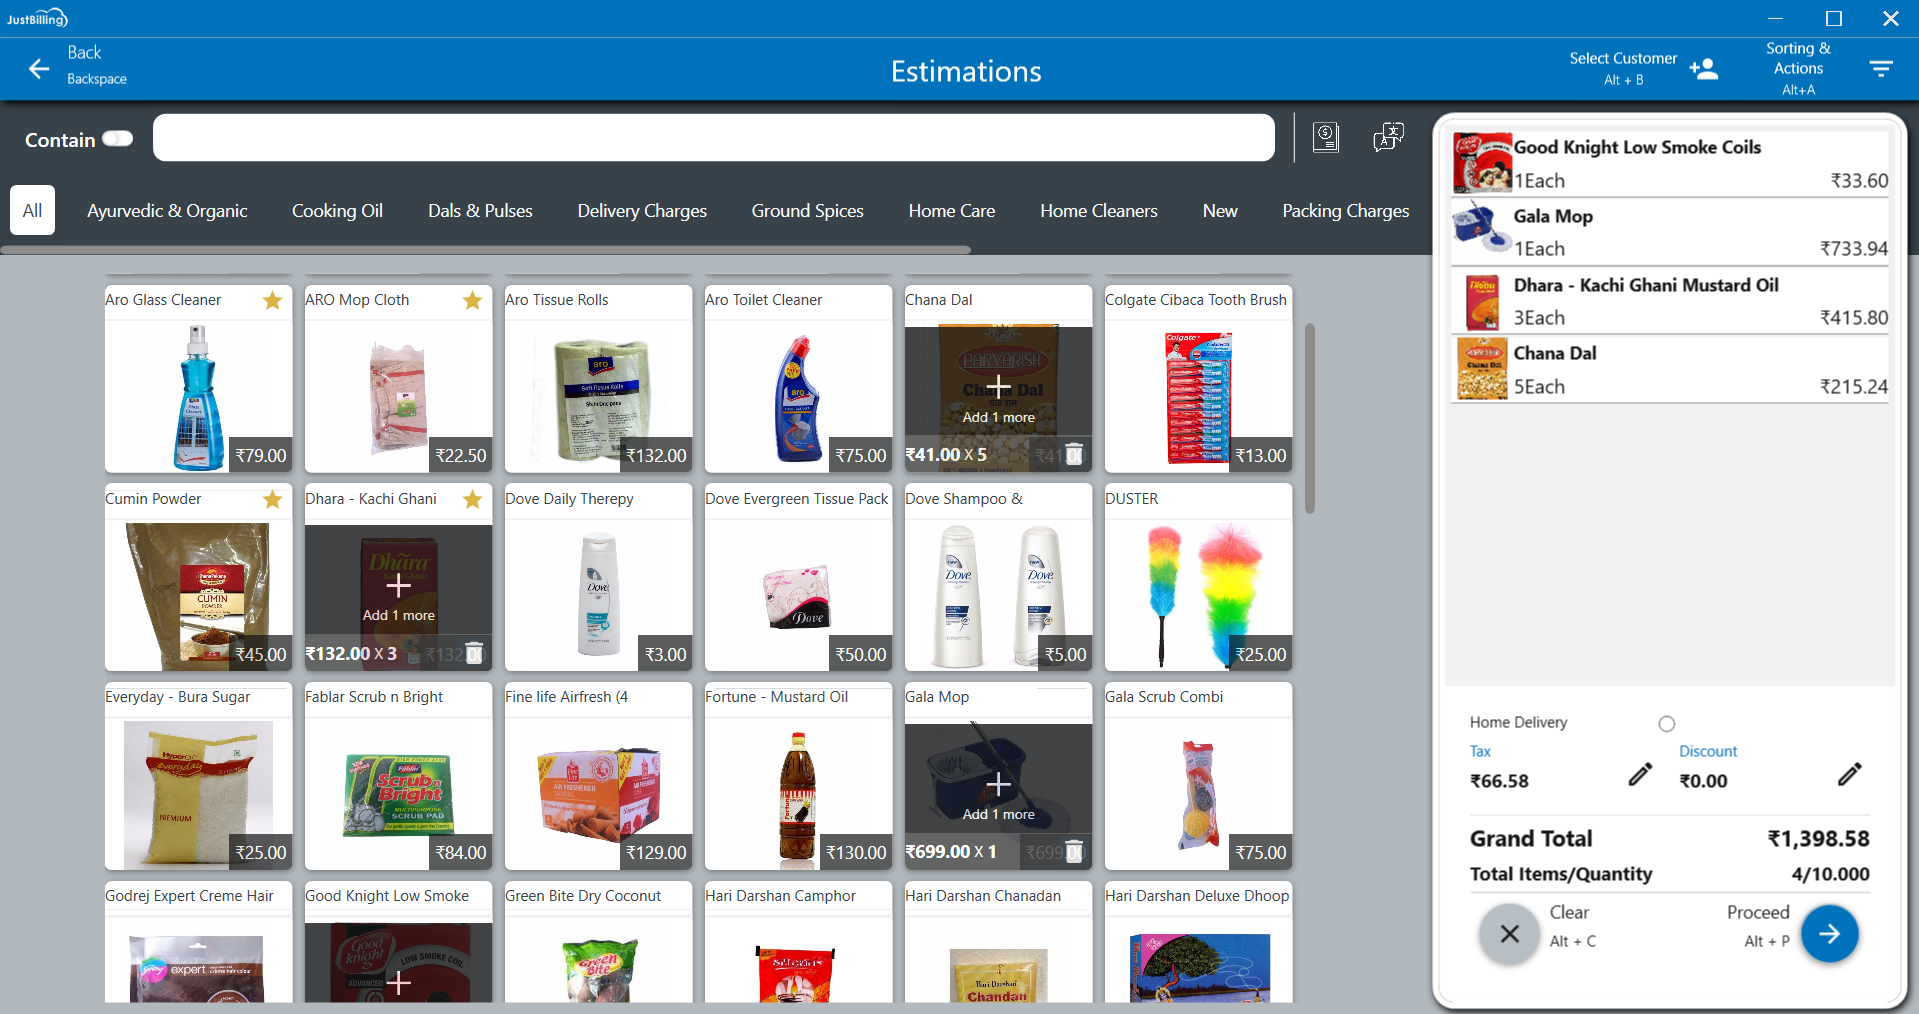
- From Estimation screen Select Order Type from Standard and Home delivery
- Select Customer if the customer information is already saved
- From Categories pane select the Product category
- From Products pane select the Product to send the estimation
- If you want to give specific discount on the product use icon for Tax and Discount
- Then Select on Save Estimation
- Estimation is been created
(Figure 1 - Estimation page)

(Figure 2 - Estimation screen)
Action Buttons
Advance Payment (Alt + A)
- Allows the user to collect partial or advance payment against the estimation.
- Useful when the customer pays before invoice generation.
Invoice (Alt + I)
- Converts the estimation directly into a Sales Invoice.
- All estimated items and amounts are carried forward automatically.
Next Estimation (Alt + N)
- Clears the current estimation context.
- Redirects the user to create a new estimation for the next customer.
Note : It is possible to recall an estimation, and convert the estimation in to an order or Invoice which is explained below.
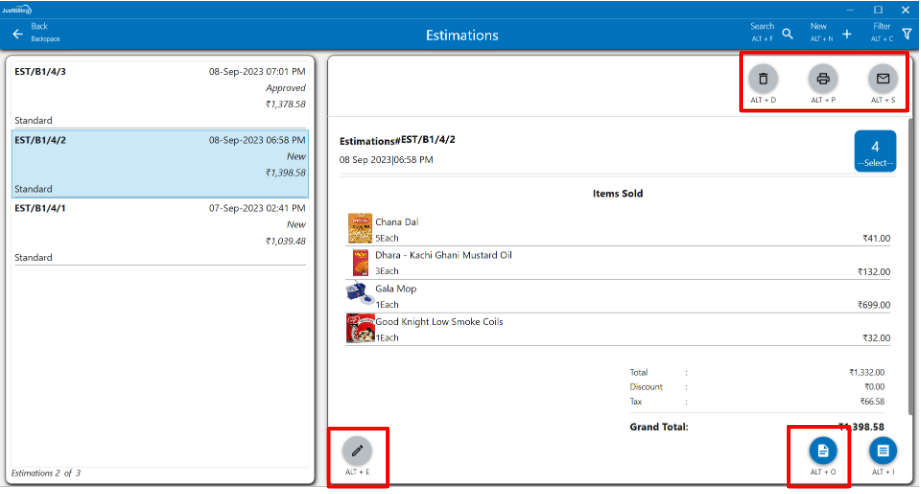
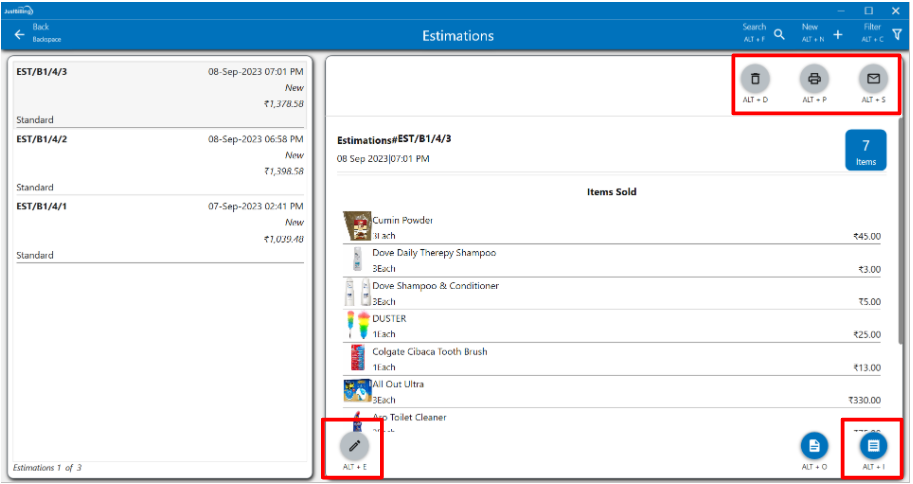
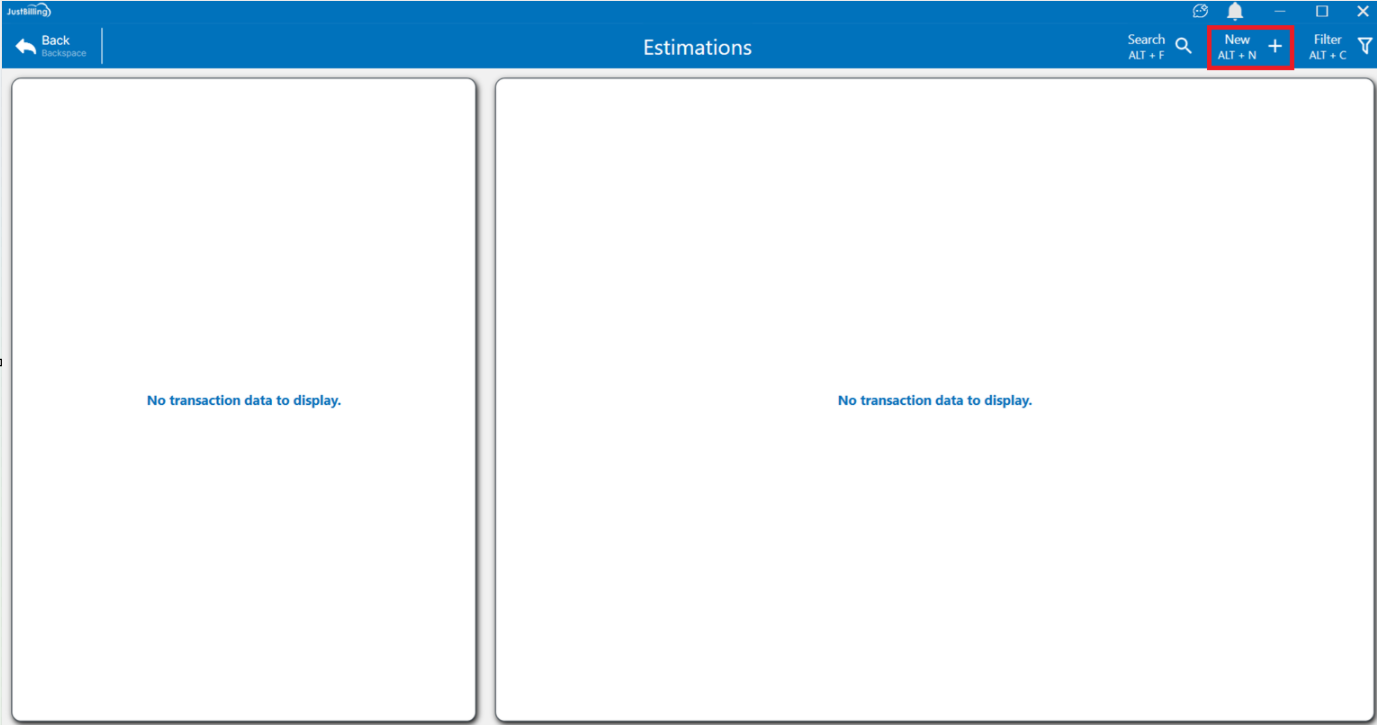
Estimation History
From this page, you can view all Estimations generated. Apart from this it is also possible to Convert to order or invoice of an specific Estimation.
- To view a Estimation directly type the Estimation No. in the search box.
- When the page opens it shows the list of Estimations.
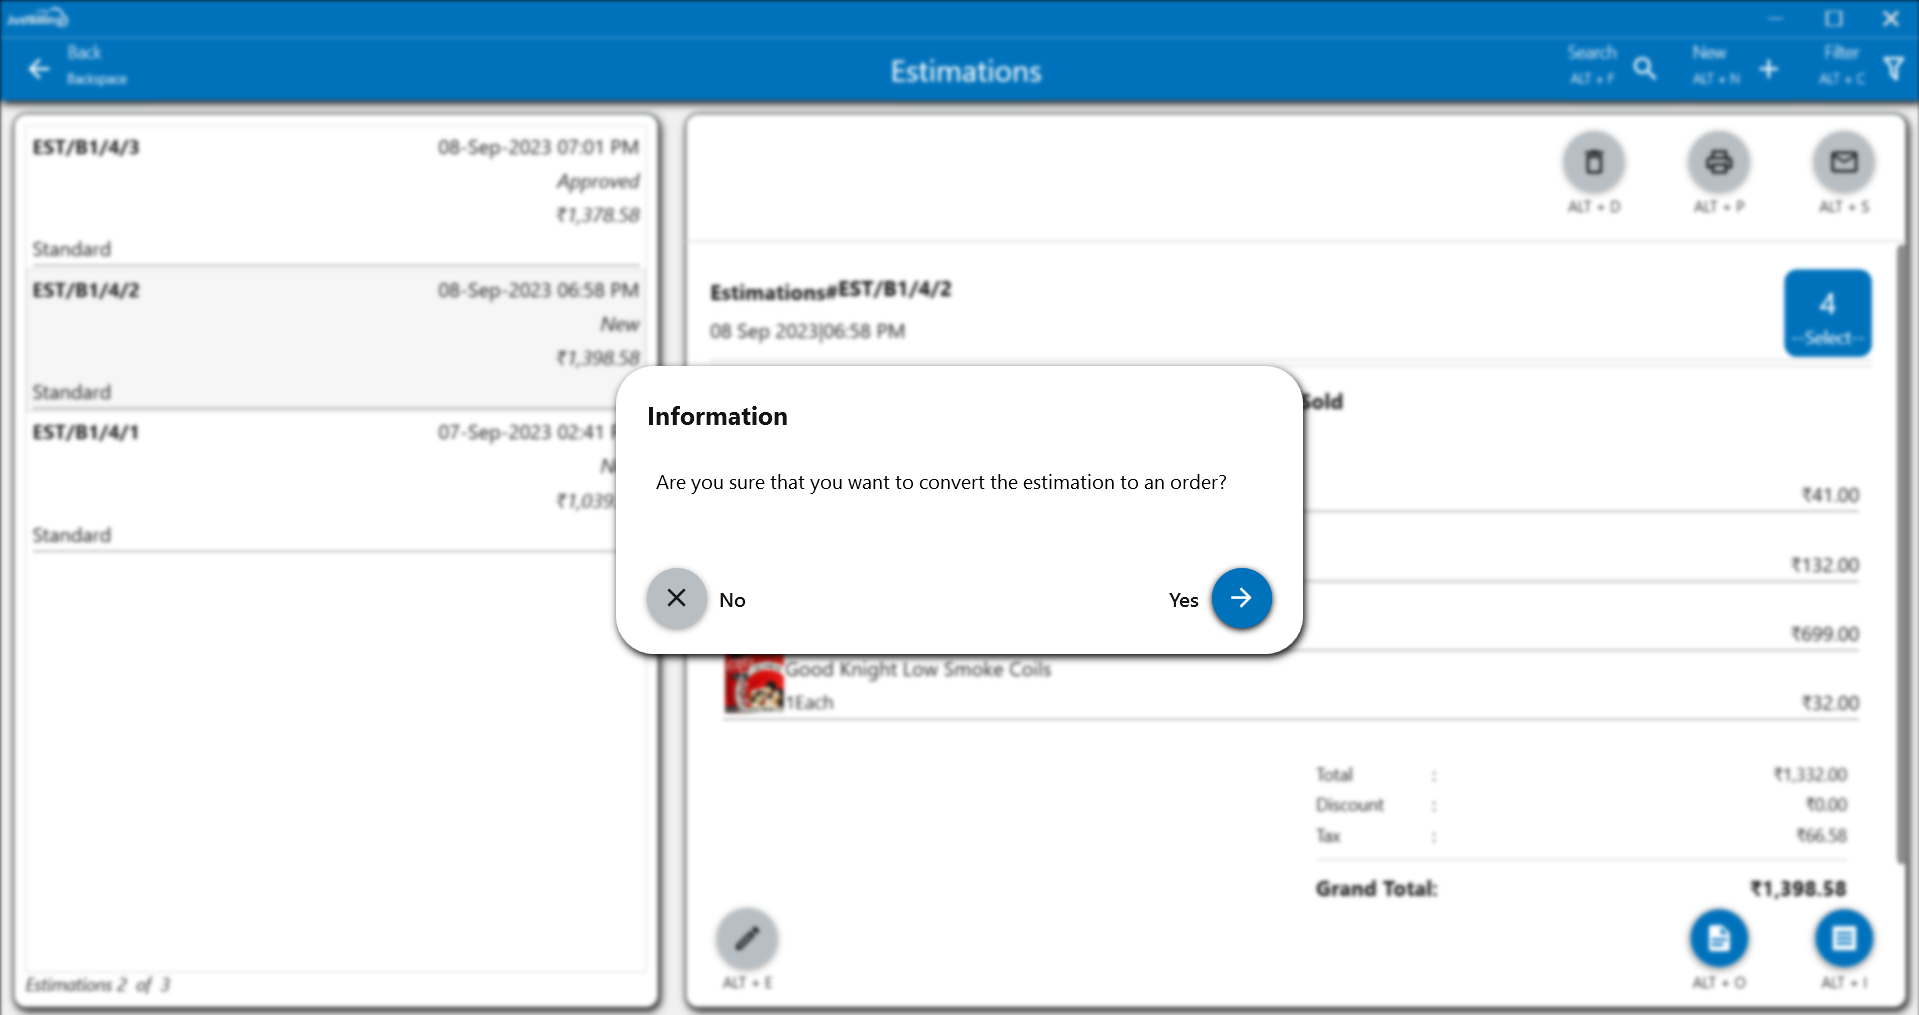
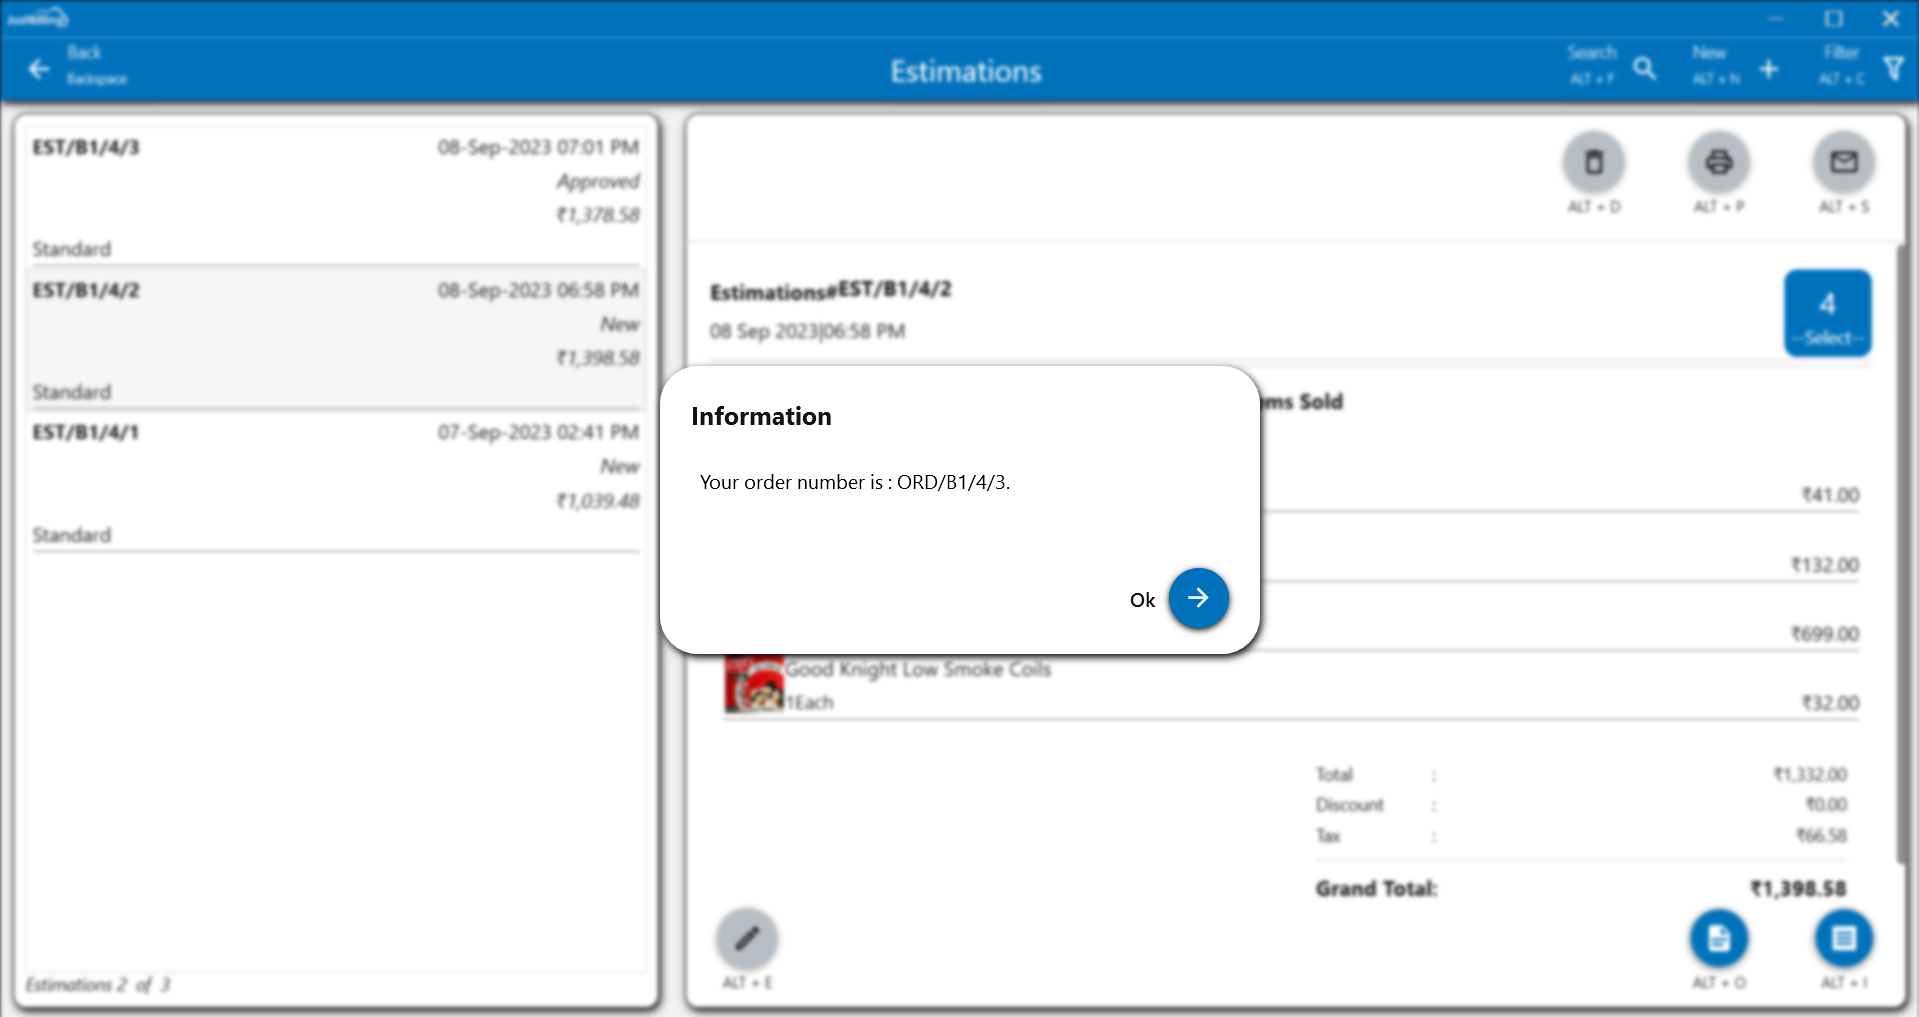
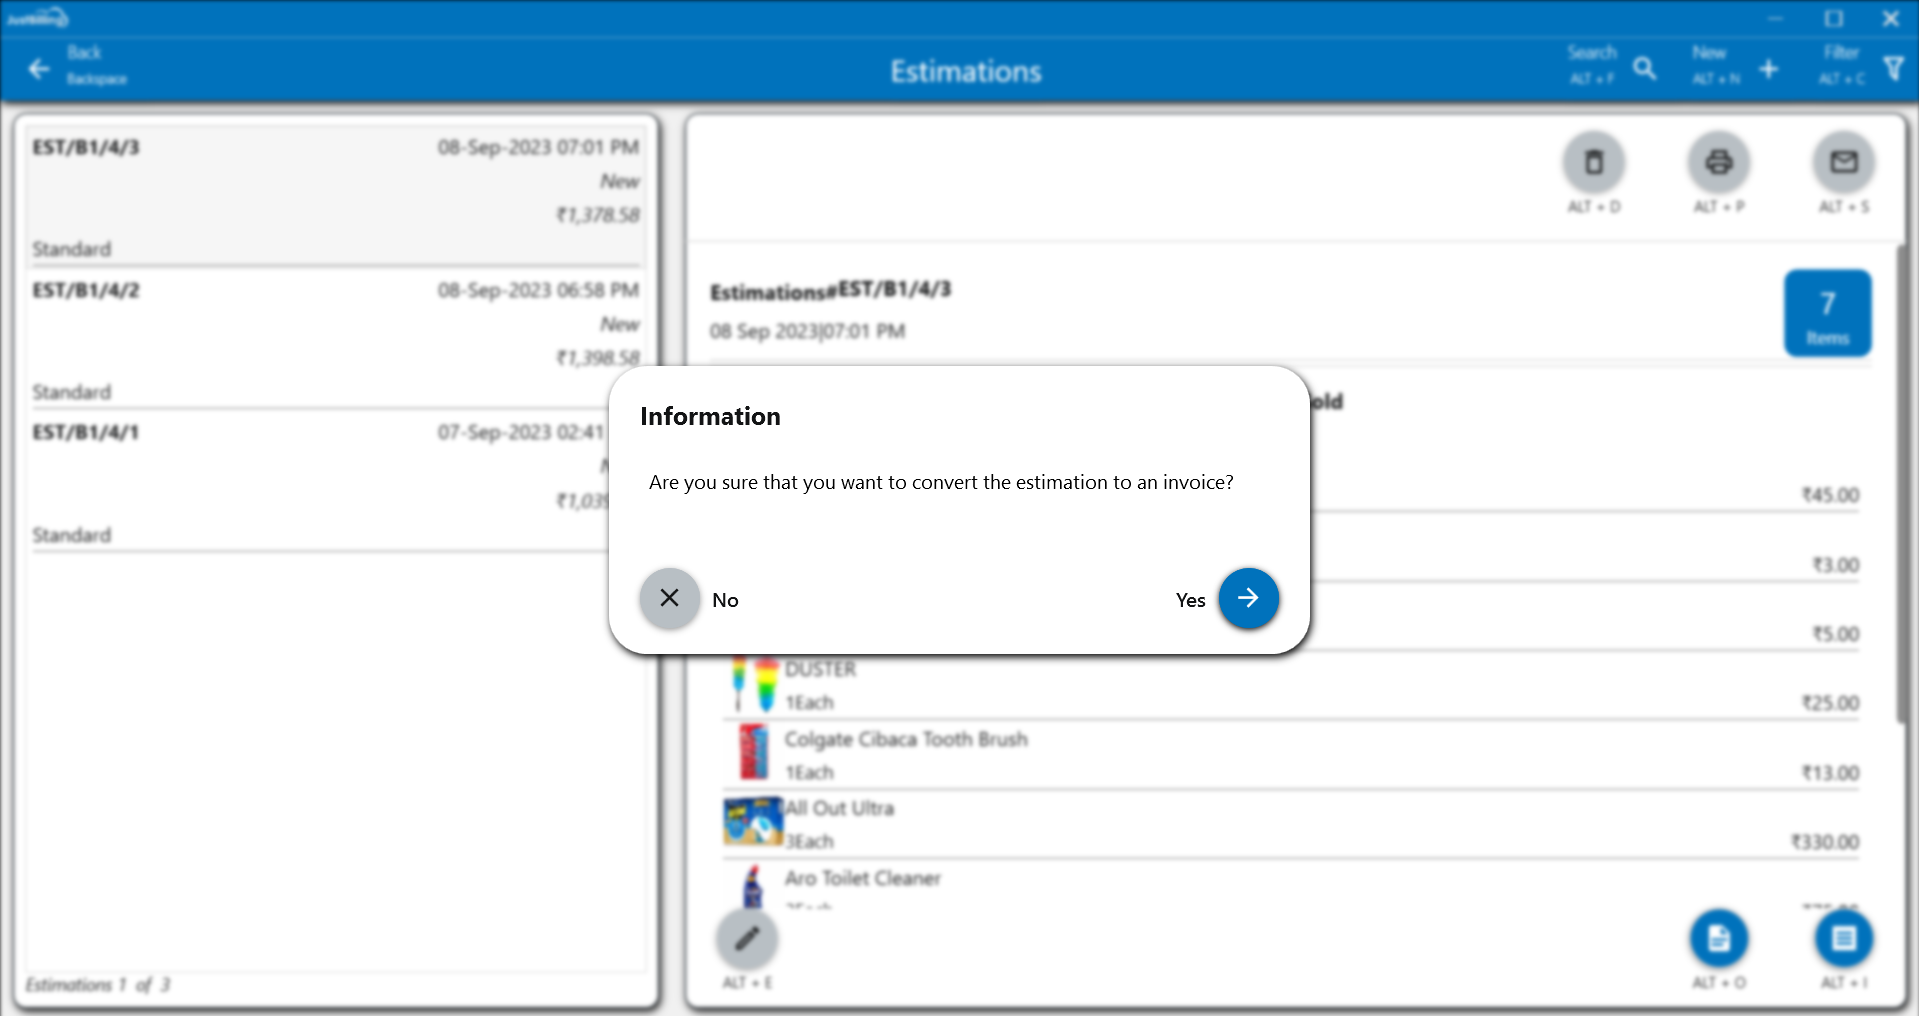
How to convert Estimation in to order ?
1. Navigate to Menu > Transaction > Estimations
2. Select Estimation for which you want to convert to order
3. Click in convert to order Icon
4. Confirm to convert to order by clicking on yes
5. Enter instructions if any in Instruction page
6. Save and finish the flow
(Figure 1 - Estimation - Convert to order)
- The Estimations can also be edited, printed and Shared from the edit, print and share options provided.
(Figure 2 - Confirm convert to order)
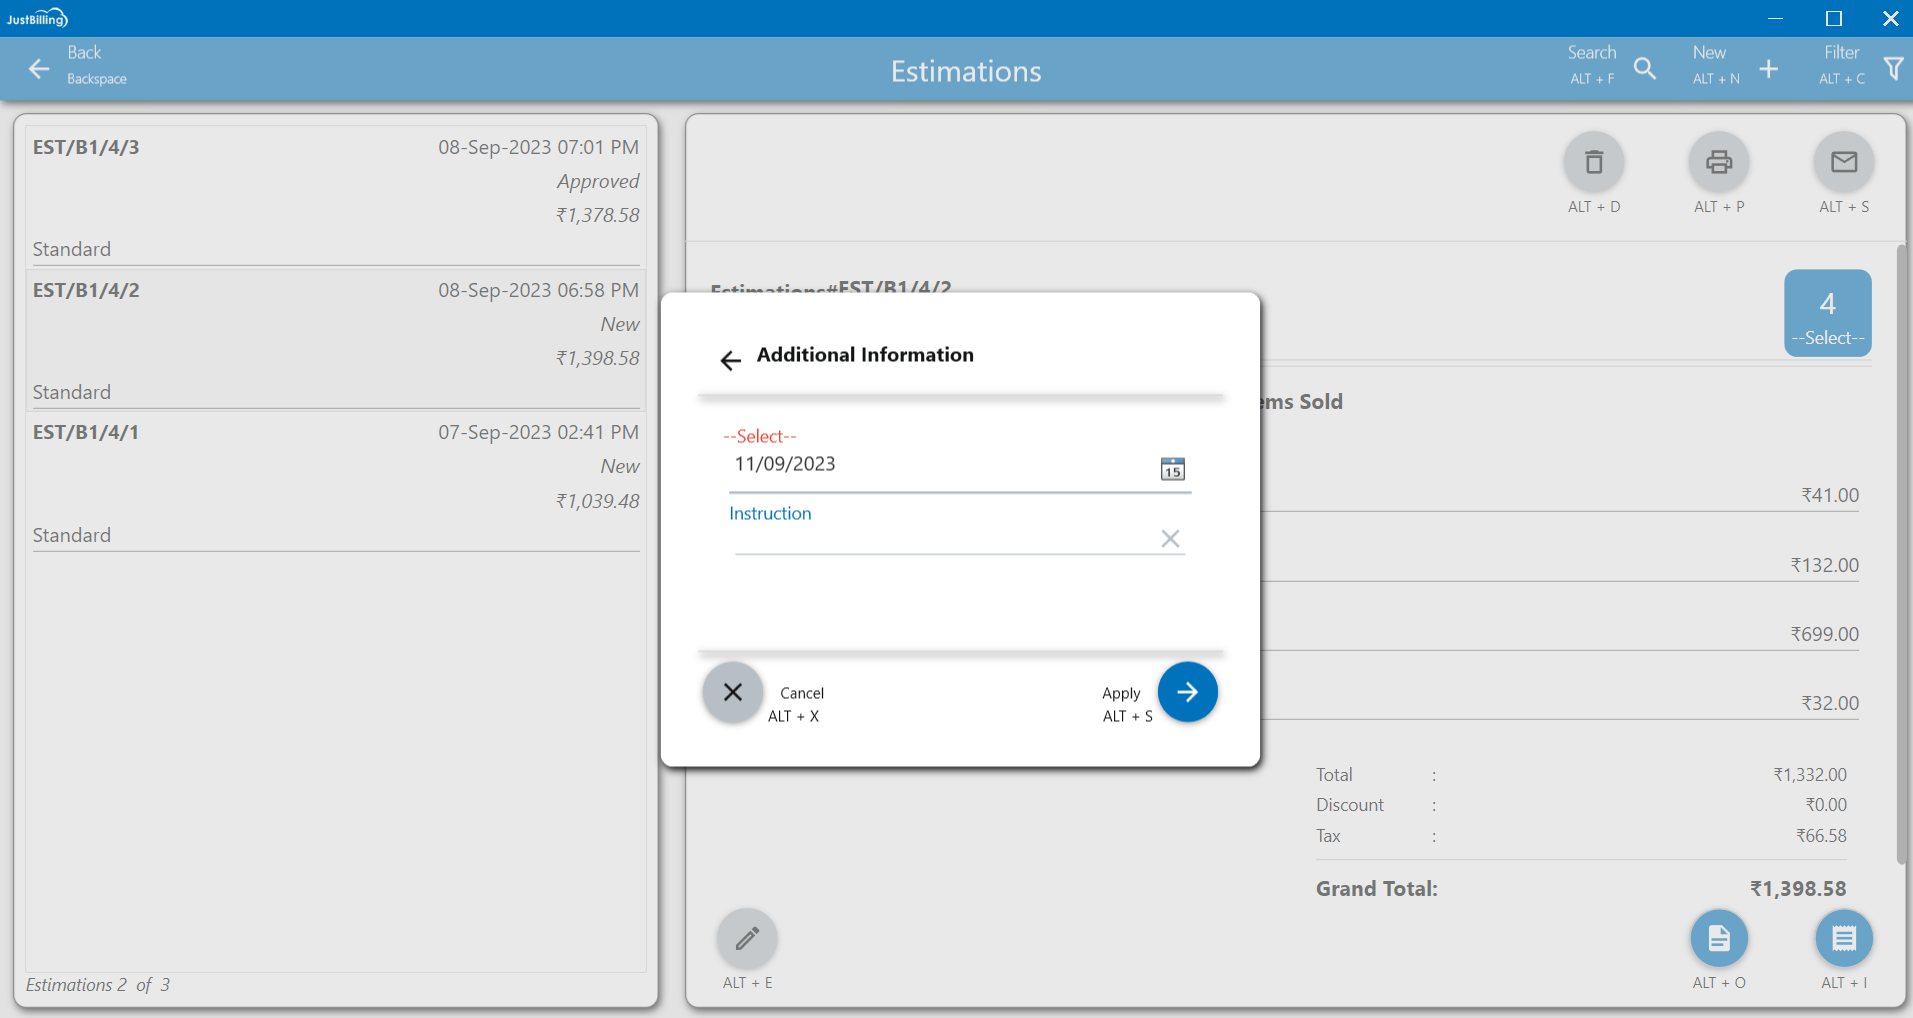
(Figure 3 - Instruction for order)
(Figure 4 - Order is created)
How to convert Estimation in to Invoice ?
1. Navigate to Menu > Transaction > Estimations
2. Select Estimation for which you want to convert to Invoice
3. Click in convert to invoice icon
4. Confirm to convert to Invoice by clicking on yes
5. Enter instructions if any in Instruction page
6. Finish the flow in payments page and Save
(Figure 4 - Estimation - Edit or Convert to invoice)
- The Estimations can also be edited, printed and Shared from the edit, print and share options provided.
(Figure 5 - Confirmation to Convert to invoice)
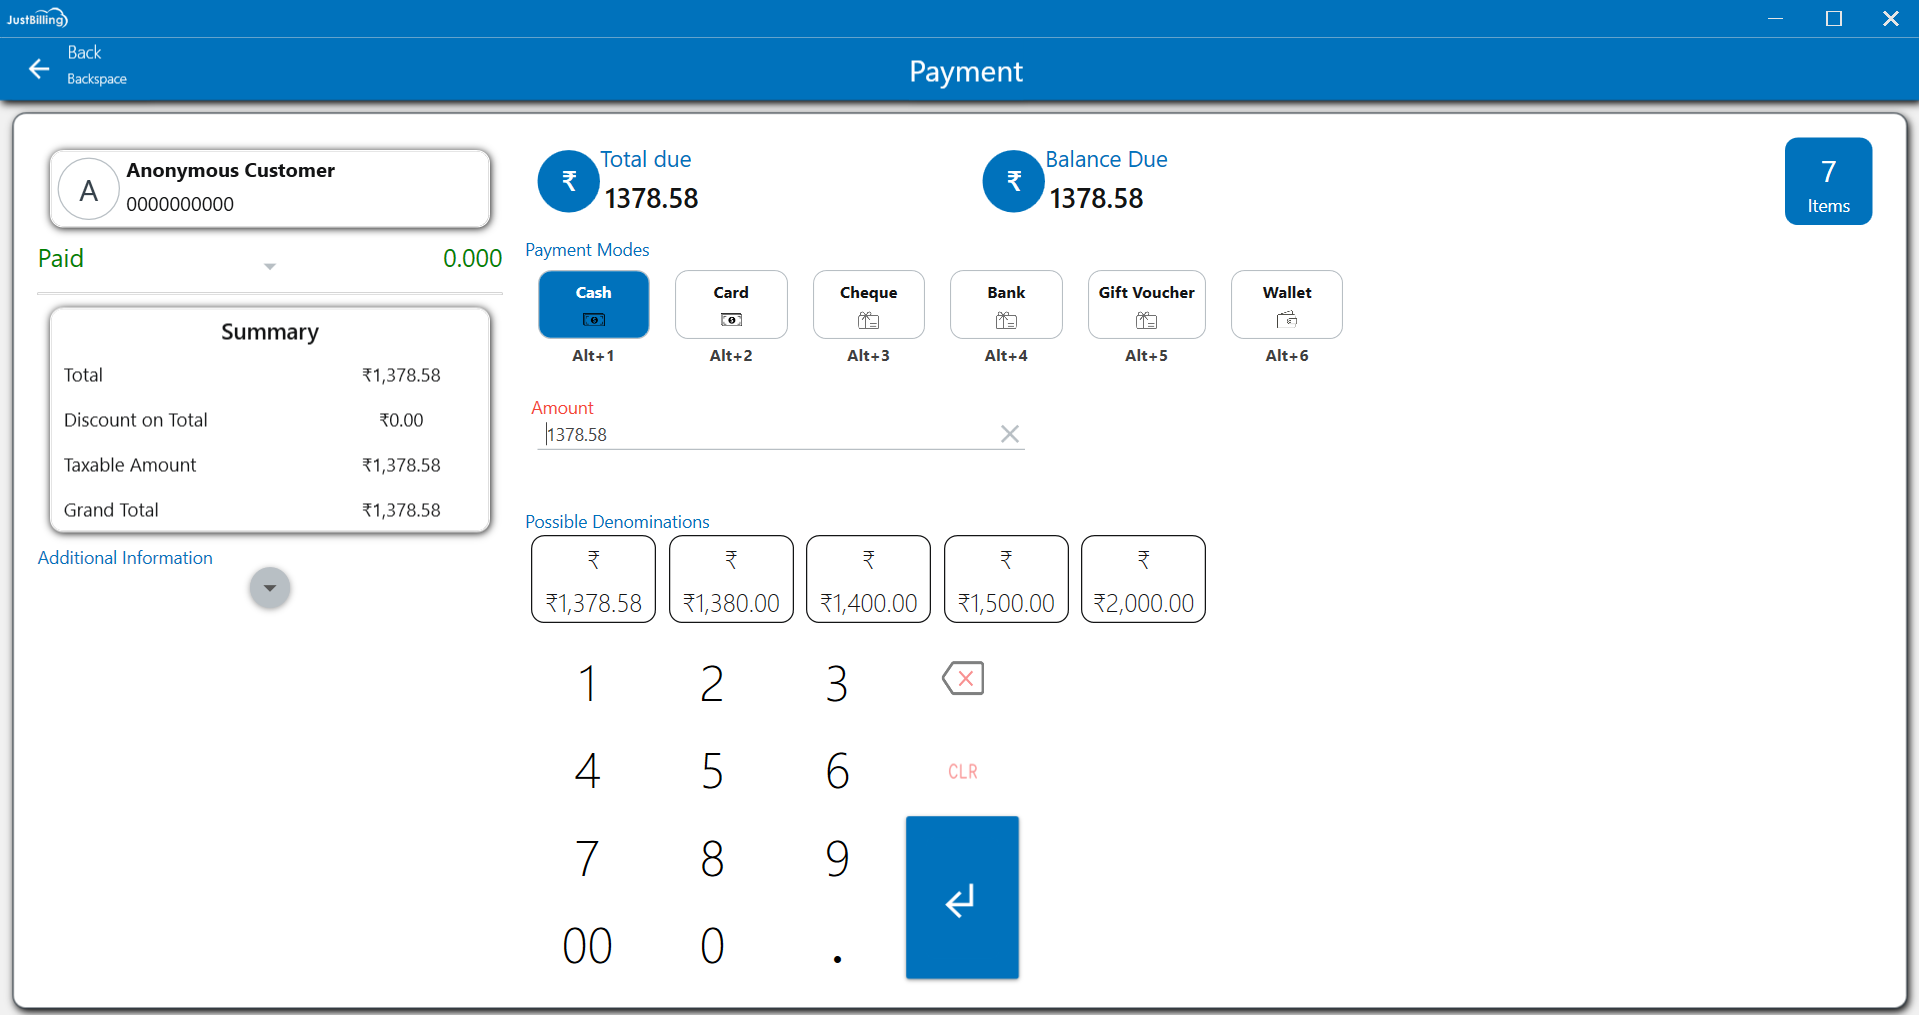
(Figure 6 - Payment screen for converting invoice)
(Figure 7 - Estimation invoice )
- In case there is a long list of estimations, you can view the estimation directly without having to scroll through the list by typing the Estimation No. in the search box.
Estimation Mode
The Estimation Mode feature in JustBilling allows users to quickly generate and record customer order estimations without converting them into invoices. This feature is especially useful in retail environments where the business needs to provide an estimated bill or collect payment without generating a tax invoice.
Enabling Estimation Mode
1. Navigate to Application Settings → Sales Configuration.
2. Locate the option Allow Estimation Mode.
3. Enable the toggle ✅ to activate estimation mode in the system.
4. Save the configuration settings.
Once enabled, users will be able to use the Estimation Mode within the Estimations section.

(Figure 1 - Estimation Mode )
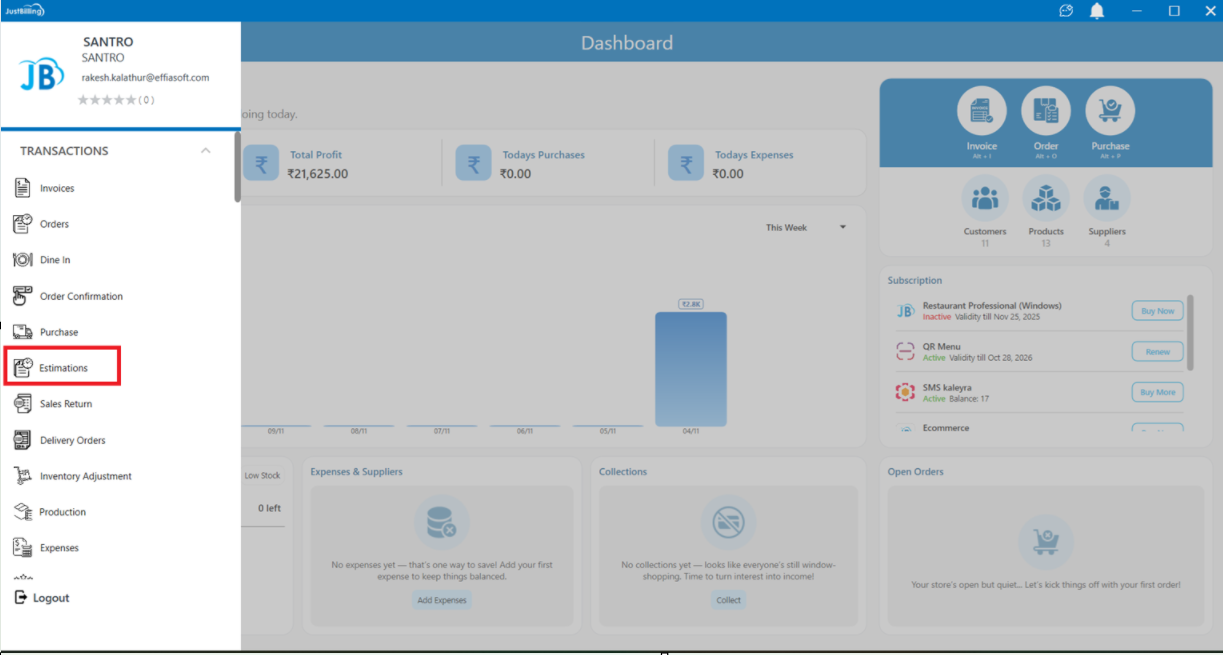
Accessing the Estimation Screen
1. From the Dashboard, click on the Menu (☰) icon.
2. Under Transactions, select Estimations.
3. The system will display the Estimation List page with an option to create a new estimation.
(Figure 2 - Estimation Page )
Creating a New Estimation
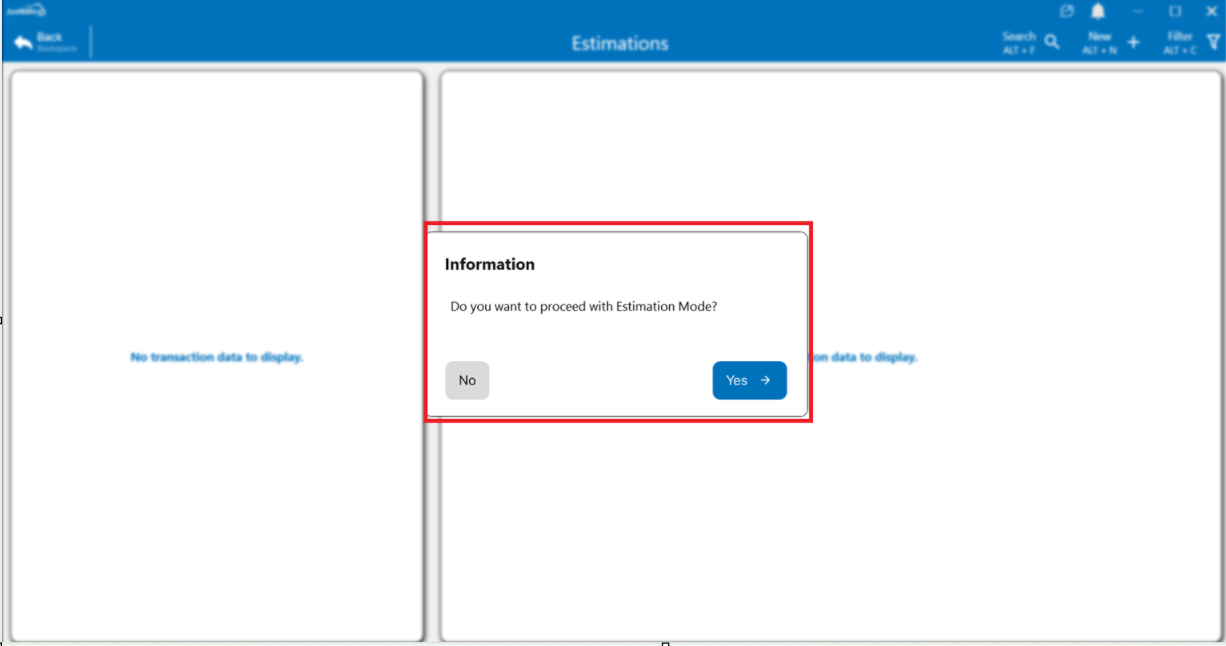
1. Click on New (Alt + N) to start a new estimation entry.
2. The system will prompt a confirmation message:
“Do you want to proceed with Estimation Mode?”
3. Select Yes (→) to continue in Estimation Mode.
(Figure 3 - Estimation Mode Creation )
(Figure 4 - Estimation Mode Creation )
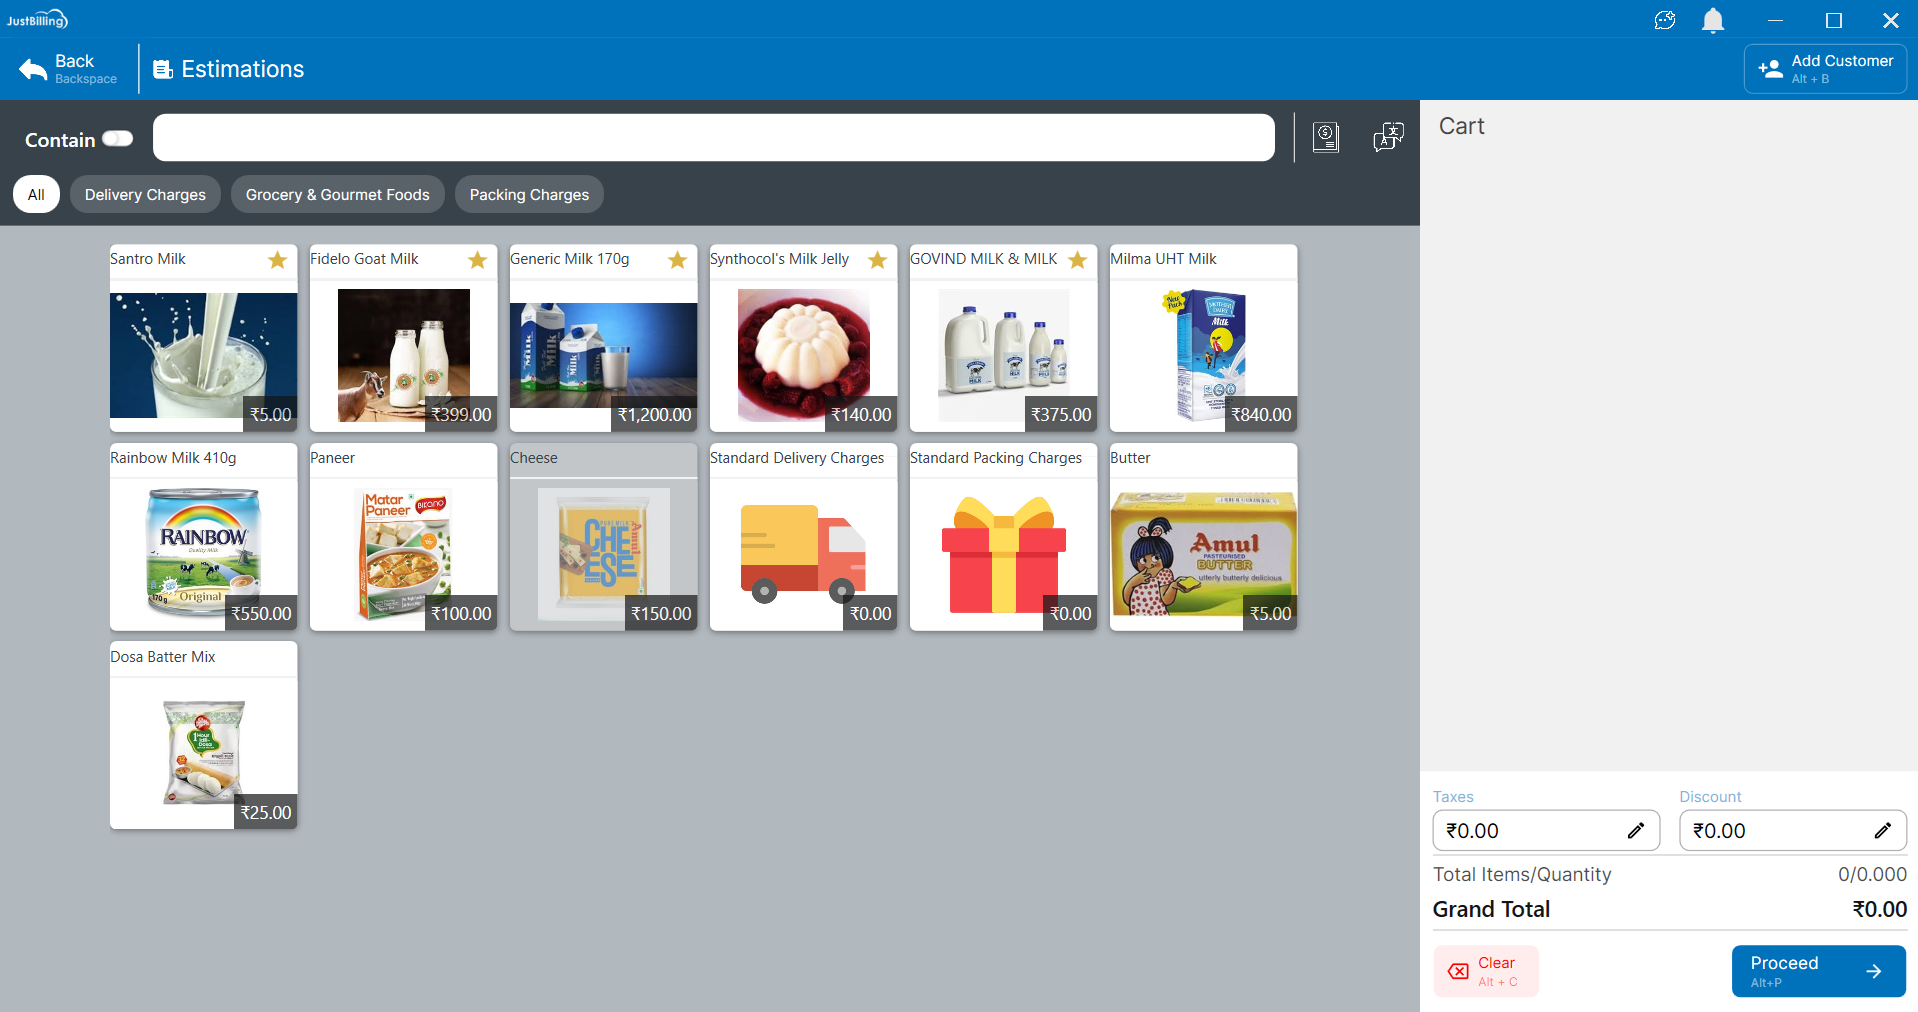
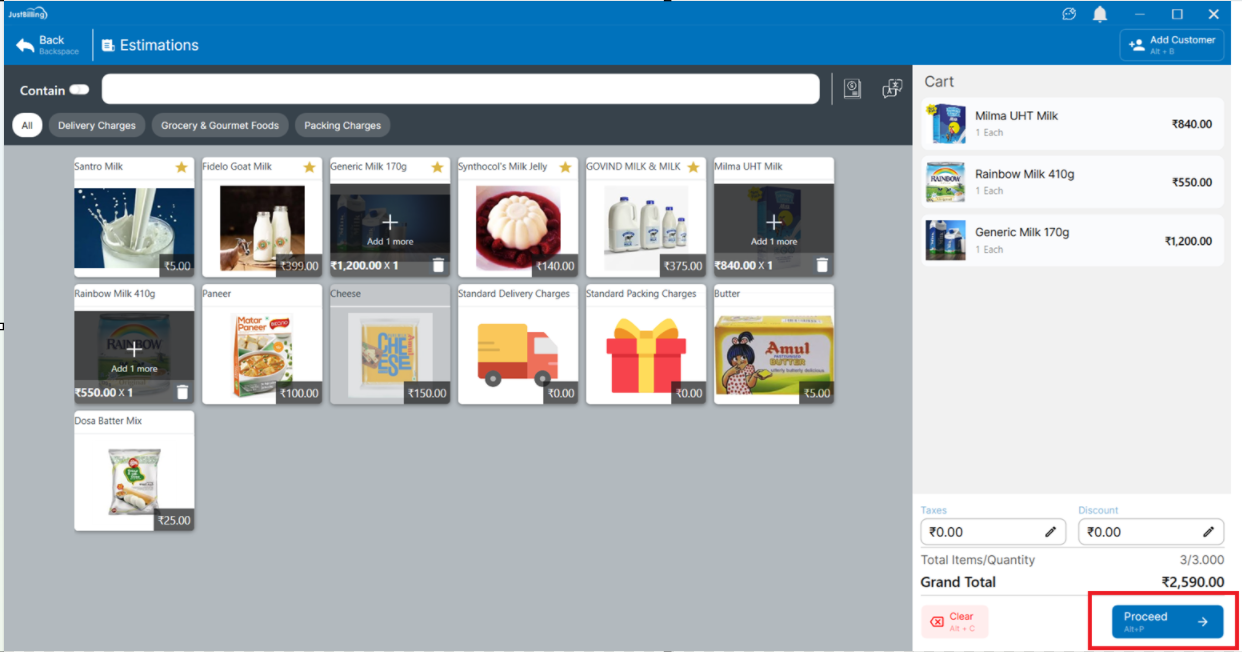
Adding Products to Cart
1. The Estimation window will open with product categories and item listings.
2. Click on a product to add it to the cart.
3. The selected products will appear in the cart section on the right.
4. The system automatically calculates:
- Item-wise price
- Quantity
- Taxes (if applicable)
- Grand Total
Once all desired products are added, click Proceed (Alt + P) to move to the payment step.
(Figure 5 - Estimation Mode Order Creation )
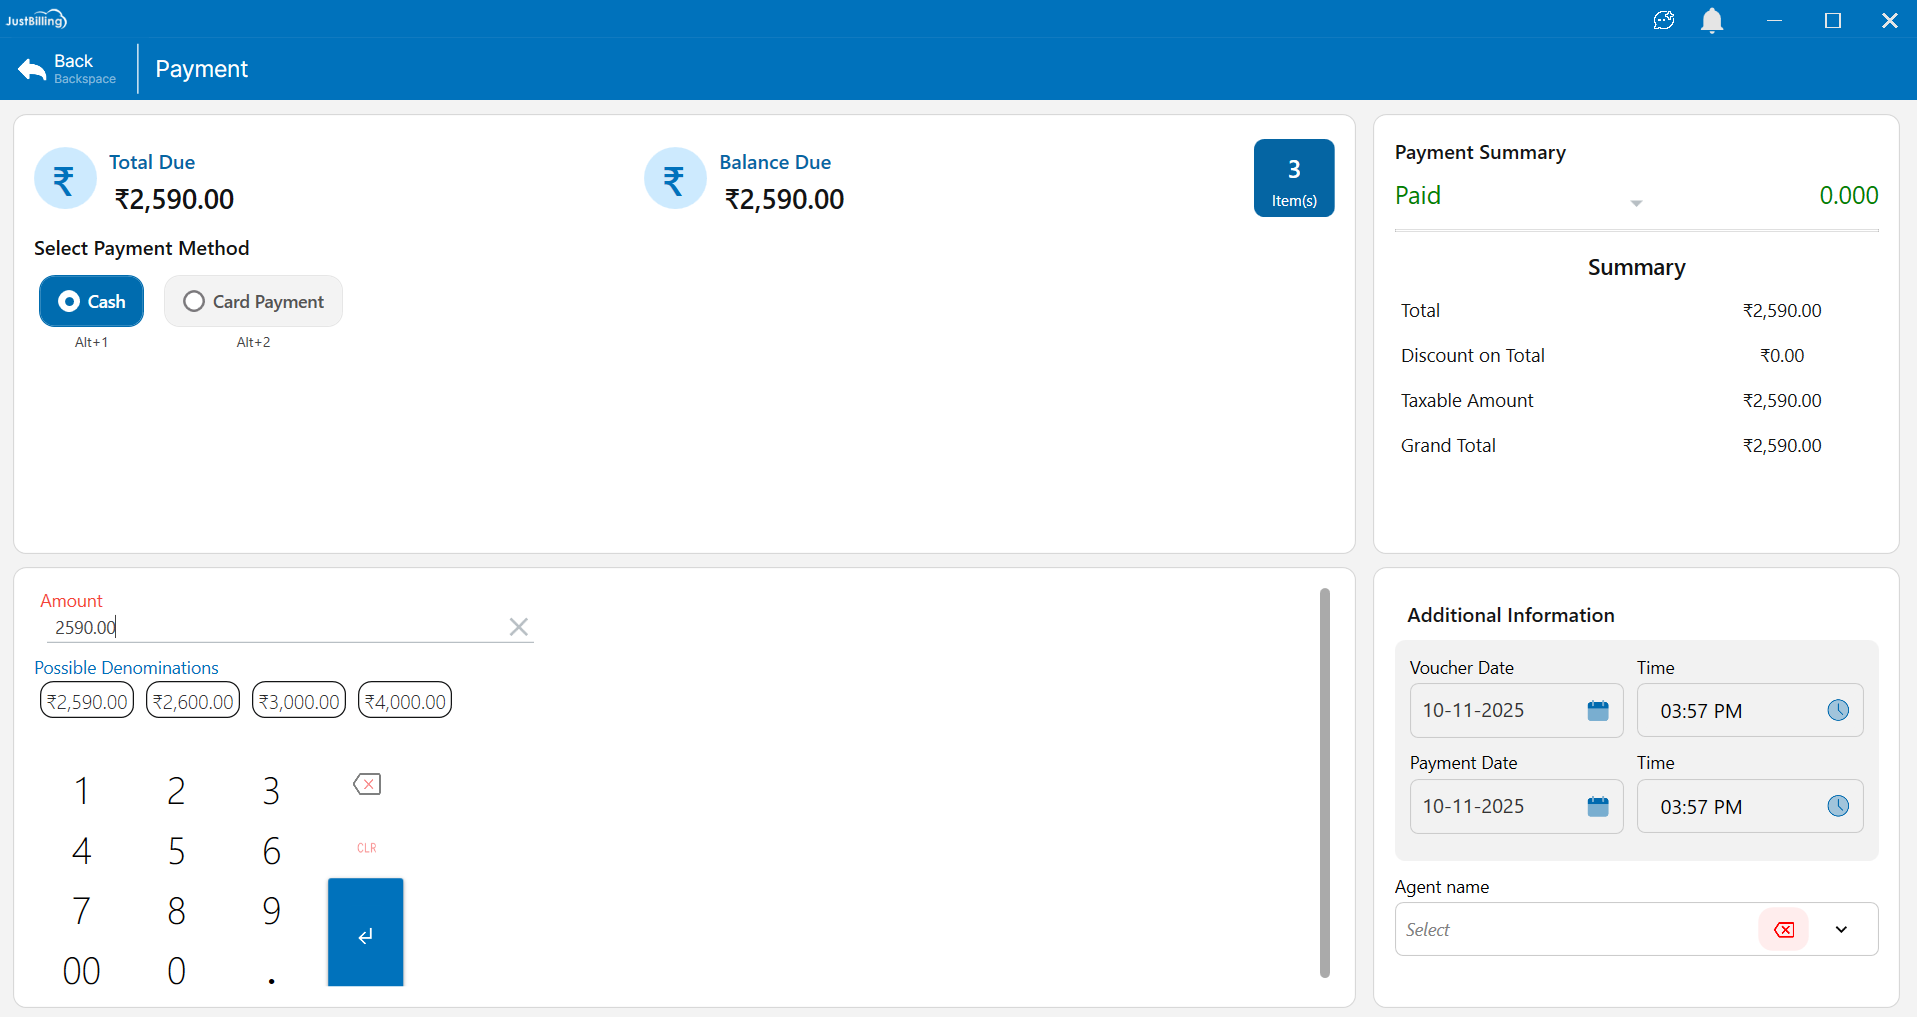
Payment in Estimation Mode
1. The Payment window displays the Total Due and Balance Due amounts.
2. Choose the Payment Method:
- Cash (Alt + 1)
- Card Payment (Alt + 2)
3. Enter the payment amount in the Amount field.
4. Confirm by pressing the Enter key or selecting the Proceed icon.
5. The system will display:
- Total Amount
- Discount (if any)
- Taxable Amount
- Grand Total
- Voucher and Payment Date/Time details
(Figure 6 - Estimation Mode Order Creation )
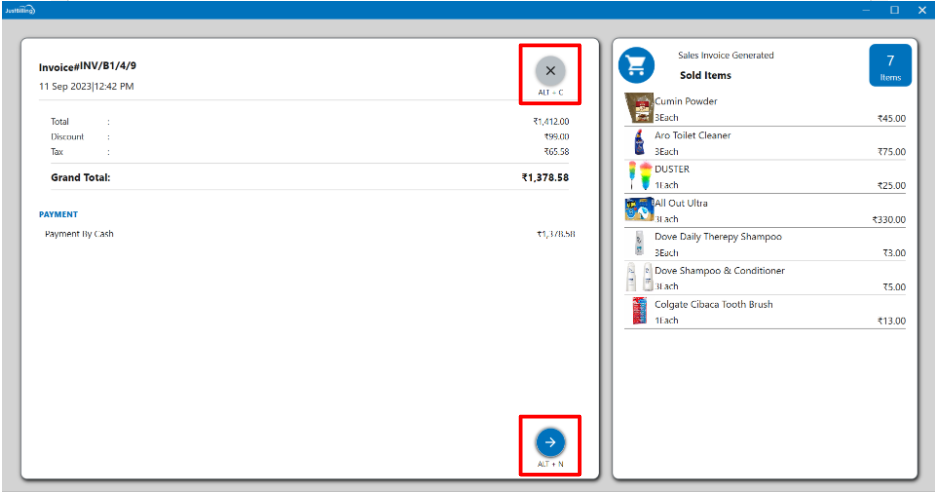
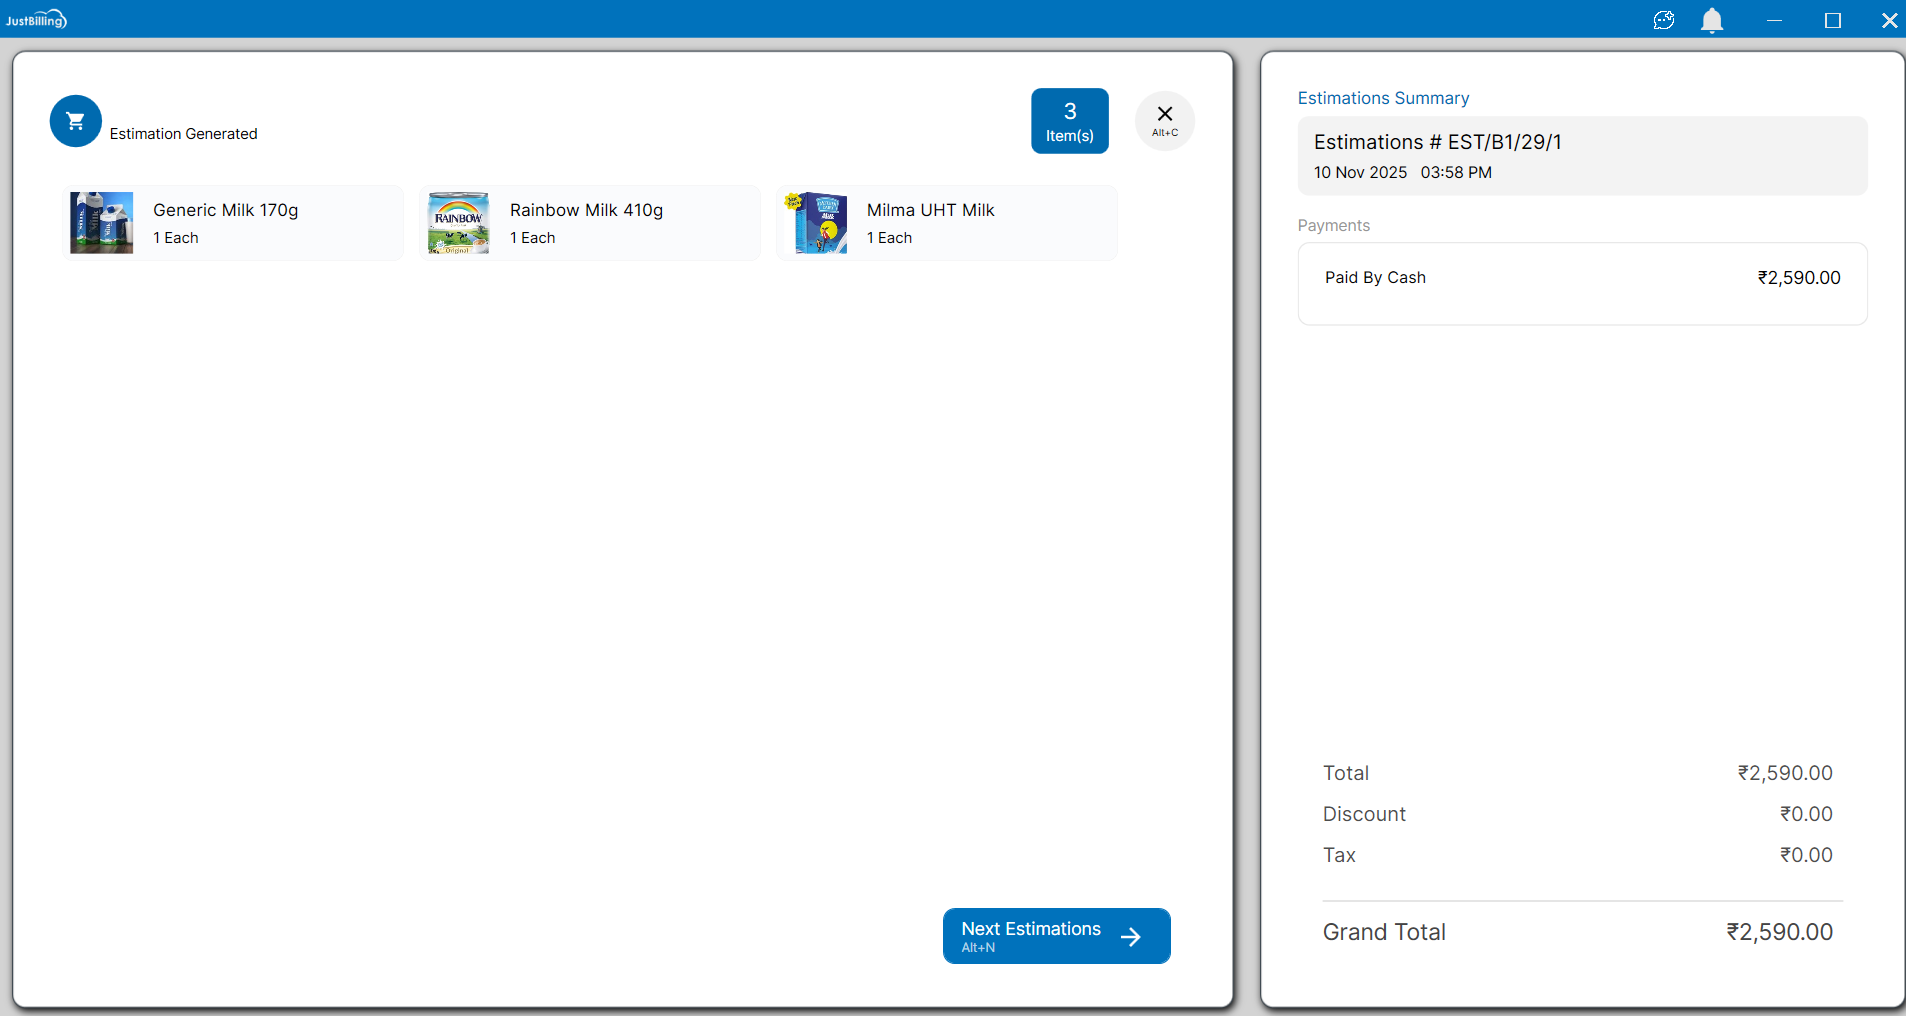
Estimation Generated
- After payment, the system confirms that the Estimation is generated successfully.
- The product details and payment summary will be shown on the screen.
- Users can click Next Estimation (Alt + N) to create another estimation.
(Figure 7 - Estimation Mode Order Creation )
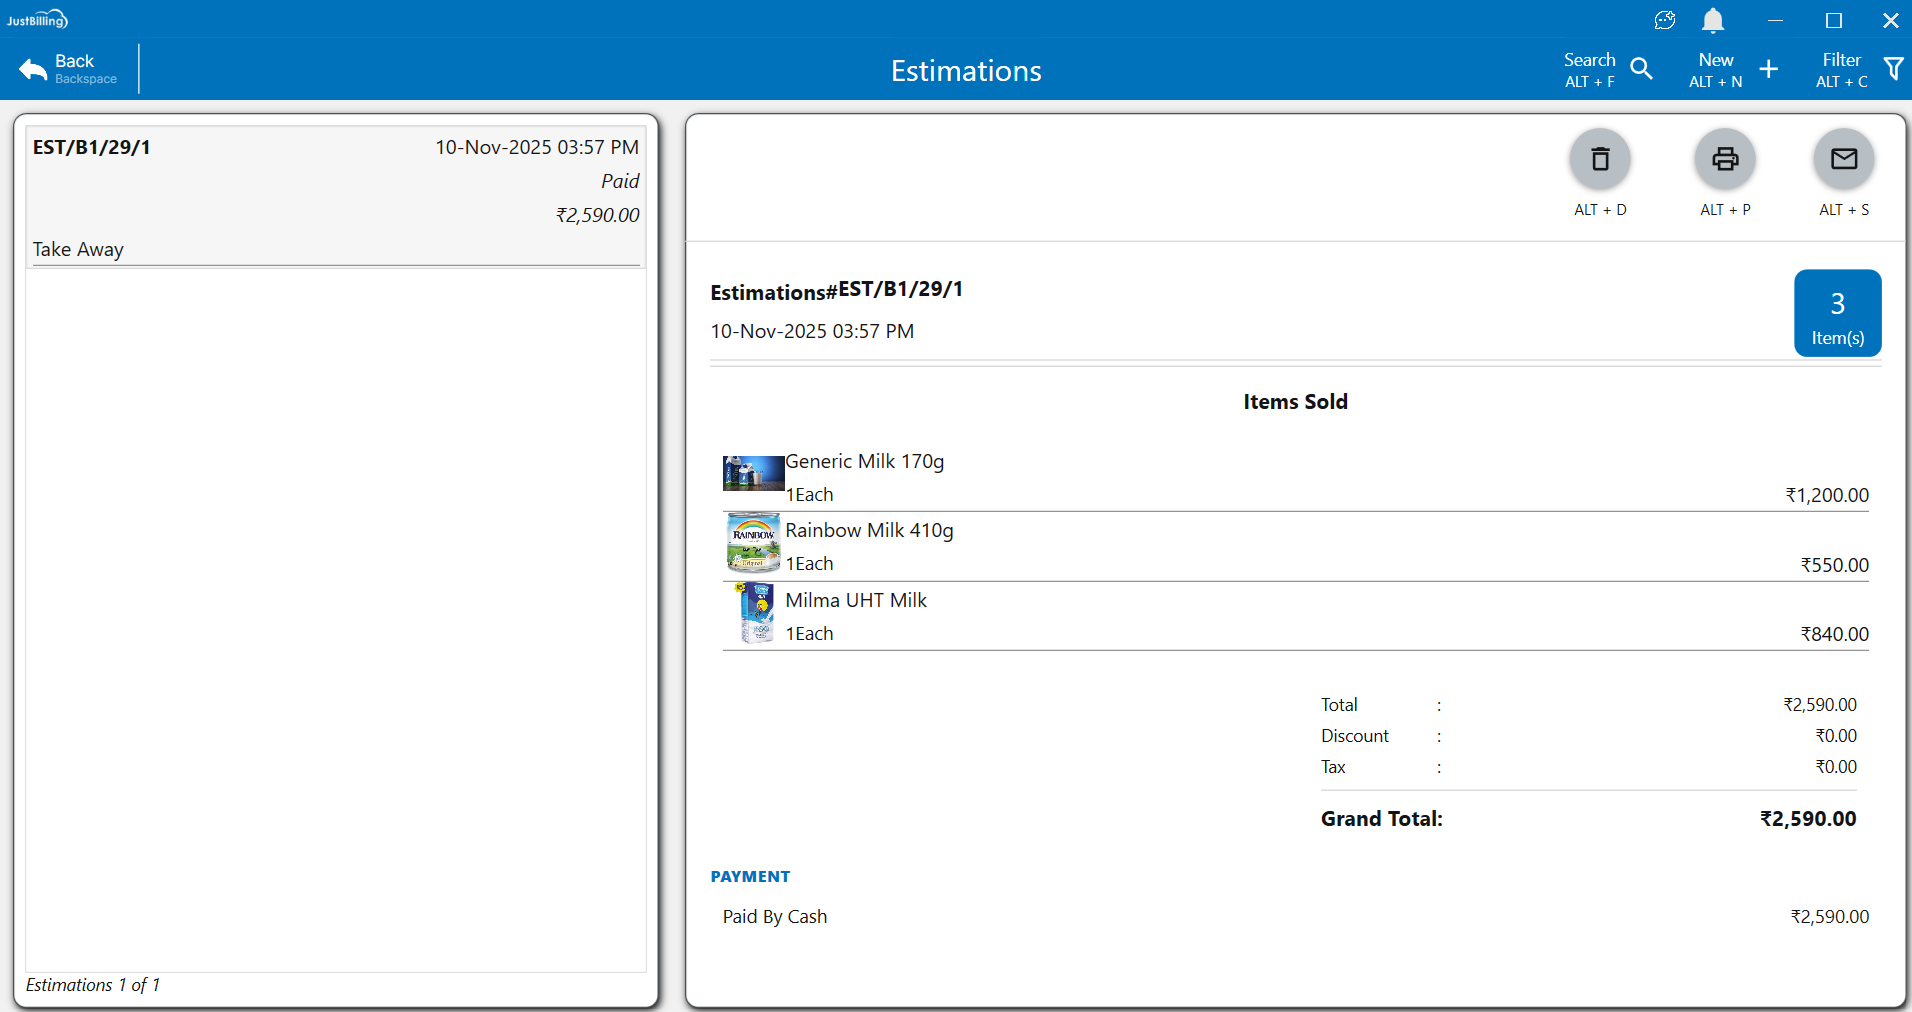
Viewing Estimation Details
- The left panel lists all estimation records.
- The right panel shows detailed information of the selected estimation:
- Estimation Number
- Date and Time
- Item details (Name, Quantity, Rate)
- Total Amount, Discount, Tax, and Grand Total
- Payment Mode and Status
(Figure 8 - Estimation Mode Order Details )
Status Display
- For completed estimation transactions, the status is displayed as Paid.
- No invoice conversion takes place in Estimation Mode — it remains an estimation-only transaction record.
(Figure 9 - Estimation Mode Order Status )