Dashboard
Dashboard
The Dashboard provides a real-time summary of your business performance, including sales, profit, purchases, and expenses. It also allows you to quickly access key operations such as creating invoices, managing orders, and monitoring subscriptions.
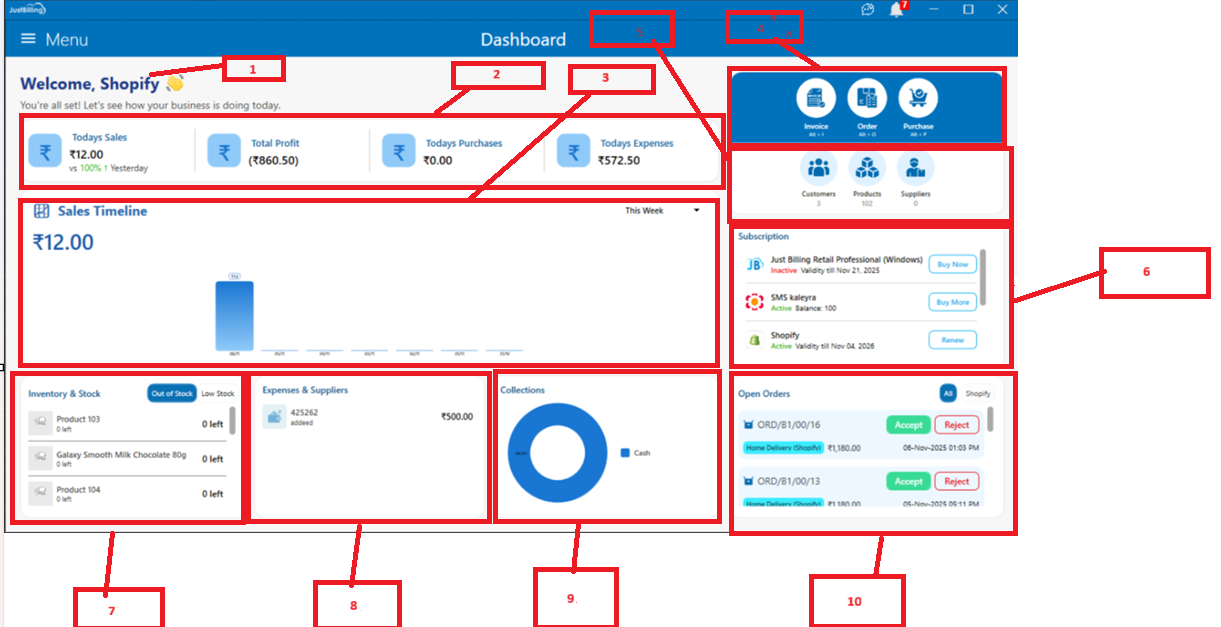
(Figure 1 - Just Billing Windows Dashboard Screen)
Accessing the Dashboard
To access the Dashboard:
- Launch the application.
- From the main menu, select Dashboard.
- The home screen will display your daily business insights and performance metrics.
Dashboard Layout
|
|
|
|
|
No. |
Section Name |
Description |
|
1 |
Welcome Section |
Personalized greeting and overview of business health. |
|
2 |
Business Summary Cards |
Displays Today’s Sales, Profit, Purchases, and Expenses. |
|
3 |
Sales Timeline Graph |
Weekly visual representation of sales performance. |
|
4 |
Quick Access Buttons |
Shortcuts to frequently used operations (Invoice, Order, Purchase). |
|
5 |
Master Data Summary |
Overview of Customers, Products, and Suppliers count. |
|
6 |
Subscription Details |
Displays activation status of modules and available credits. |
|
7 |
Inventory & Stock |
Monitors stock status and alerts for low/out-of-stock items. |
|
8 |
Expenses & Suppliers |
Displays list of expenses recorded with amount details. |
|
9 |
Collections Summary |
Graph showing mode of payment collections. |
|
10 |
Open Orders |
Shows pending or ongoing customer orders. |
Detailed Widget Description
Welcome Section
Displays a personalized greeting with your registered user name and encourages the user to check the day’s business summary
Business Summary Cards
Shows Today’s Sales, Total Profit, Today’s Purchases, and Today’s Expenses. Each card also displays comparison with previous day’s performance.
Sales Timeline
Displays weekly and monthly sales trend through a bar chart.Over a bar shows the exact sales amount for that day.
Quick Access Buttons
Includes Invoice (Alt + I), Order (Alt + O), and Purchase (Alt + P) buttons for faster transactions.
Master Data Summary
Displays total counts for Customers, Products, and Suppliers.
Subscription Panel
Shows subscription statuses for Restaurant Lite, SMS Kaleyra, Ecommerce, and PhonePe Offline modules.
Inventory & Stock
Displays inventory health with ‘Out of Stock’ and ‘Low Stock’ alerts.
Expenses & Suppliers
Displays the list of expenses recorded with supplier/category details.
Collections Summary
Displays mode of payment collection as a donut chart (e.g., 100% Cash).
Open Orders
Displays pending or in-progress customer orders. Shows a message if no orders exist.
Floater Bell Icon
Overview
The Floater Bell Icon provides quick access to important alerts and order-related notifications directly from the Dashboard. It ensures users never miss critical updates such as new orders, order confirmations, or system alerts.
The bell icon appears as a floating button on the Dashboard with a red badge count indicating the number of unread notifications.
Bell Icon Indicator
- The bell icon is displayed at the lower section of the Dashboard as a floating action button.
- A red badge with a number (e.g., 2) indicates the count of pending notifications requiring user attention.
- Users can tap the icon to instantly view detailed messages
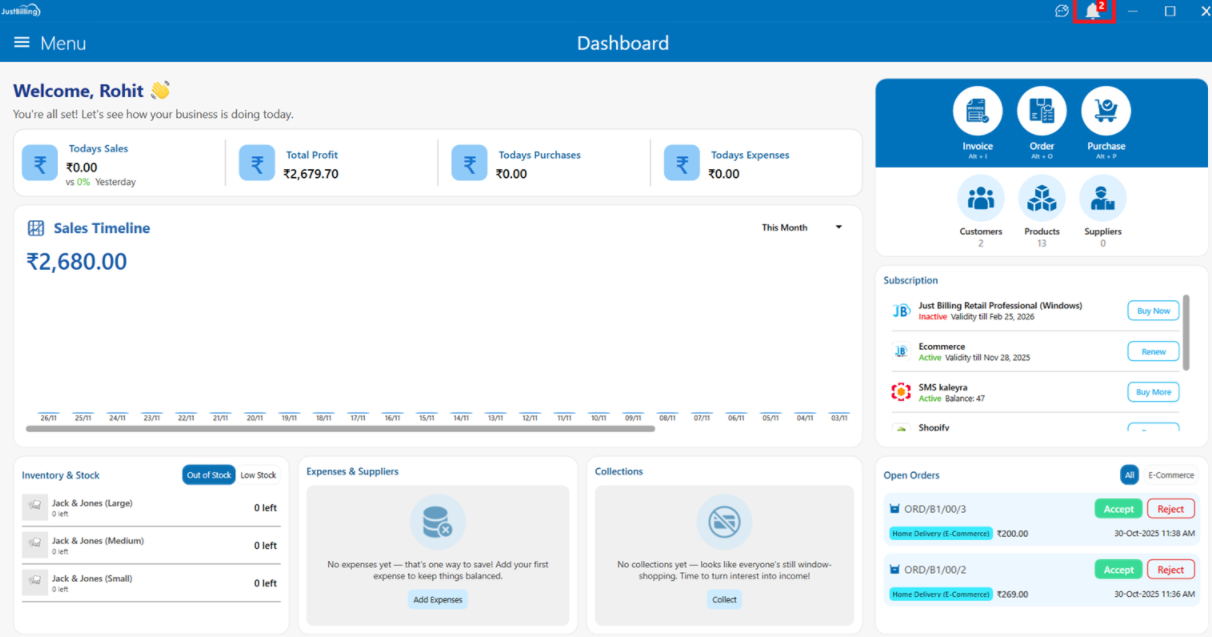
(Figure 1 - Floater Bell Icon)
3. Accessing Notifications
When you tap the floater bell icon:
- A pop-up screen will appear showing the list of notifications.
- Each notification will display:
- Order Number (e.g., ORD/B1/00/3)
- Customer Name
- Contact Number
- Order Status (e.g., Order Placed)
- Order Value
- Order Source (e.g., ECommerce)
- You can scroll to view all pending notifications.
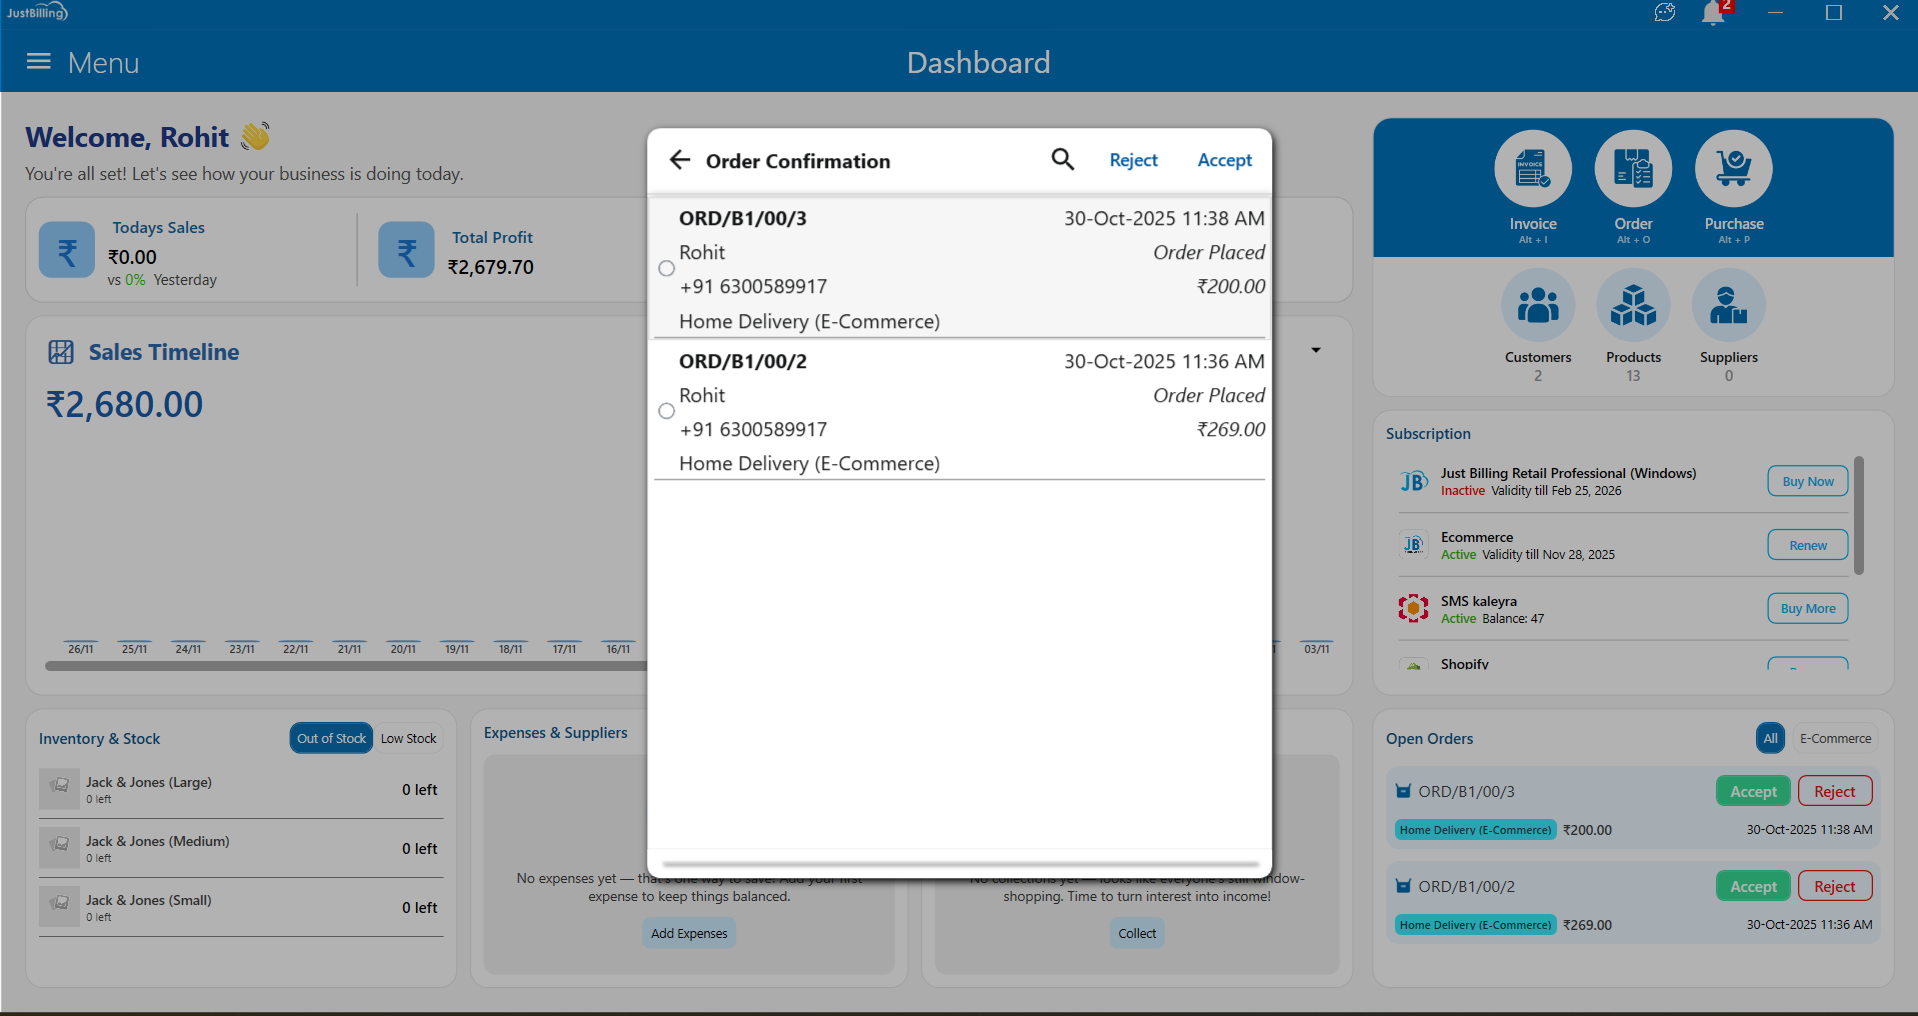
(Figure 2 - Floater Bell Icon)
4. Notification Actions
a. Select Notification
- Tap the radio button next to any order to select it.
b. Accept Orders
- Click ACCEPT (top-right button) to approve selected orders.
- Once accepted, the notification is cleared from the bell counter.
c. Quick Search
- Use the search icon to look for a specific order by Order ID or Customer Name.
5. Clearing Notifications
- After processing (Accepting) the order notifications, the red badge count on the bell icon reduces automatically.
- When all notifications are cleared, the badge count returns to 0.
6. Purpose of the Floater Bell Icon
The floating bell icon helps users to:
- Receive order updates instantly
- Quickly take action without navigating to other menus
- Improve order processing efficiency
- Maintain real-time visibility of customer orders
JB Assist – AI Chatbot
The JB Assist AI Chatbot is an in-built virtual assistant in JustBilling designed to help users navigate the application, answer queries, and provide step-by-step instructions in real time.
This guide explains how to access, use, and benefit from JB Assist.
What is JB Assist?
JB Assist is an intelligent help assistant integrated within JustBilling application
It provides:
- Instant answers to how-to questions
- Step-by-step instructions for tasks
- Quick navigation guidance
- Product creation, billing, and configuration help.
- Troubleshooting support
- Information on features and modules inside JustBilling
It works exactly like a live help agent inside the software.
Accessing JB Assist
JB Assist automatically appears on the right side of the Dashboard, or you can open it manually:
Steps:
- Log in to JustBilling .
- On the Dashboard, locate the JB Assist panel on the right side top corner
- Click the chatbot icon (JB Assist) if it is minimized.
JB Assist will slide out and become visible as shown in the screenshot.
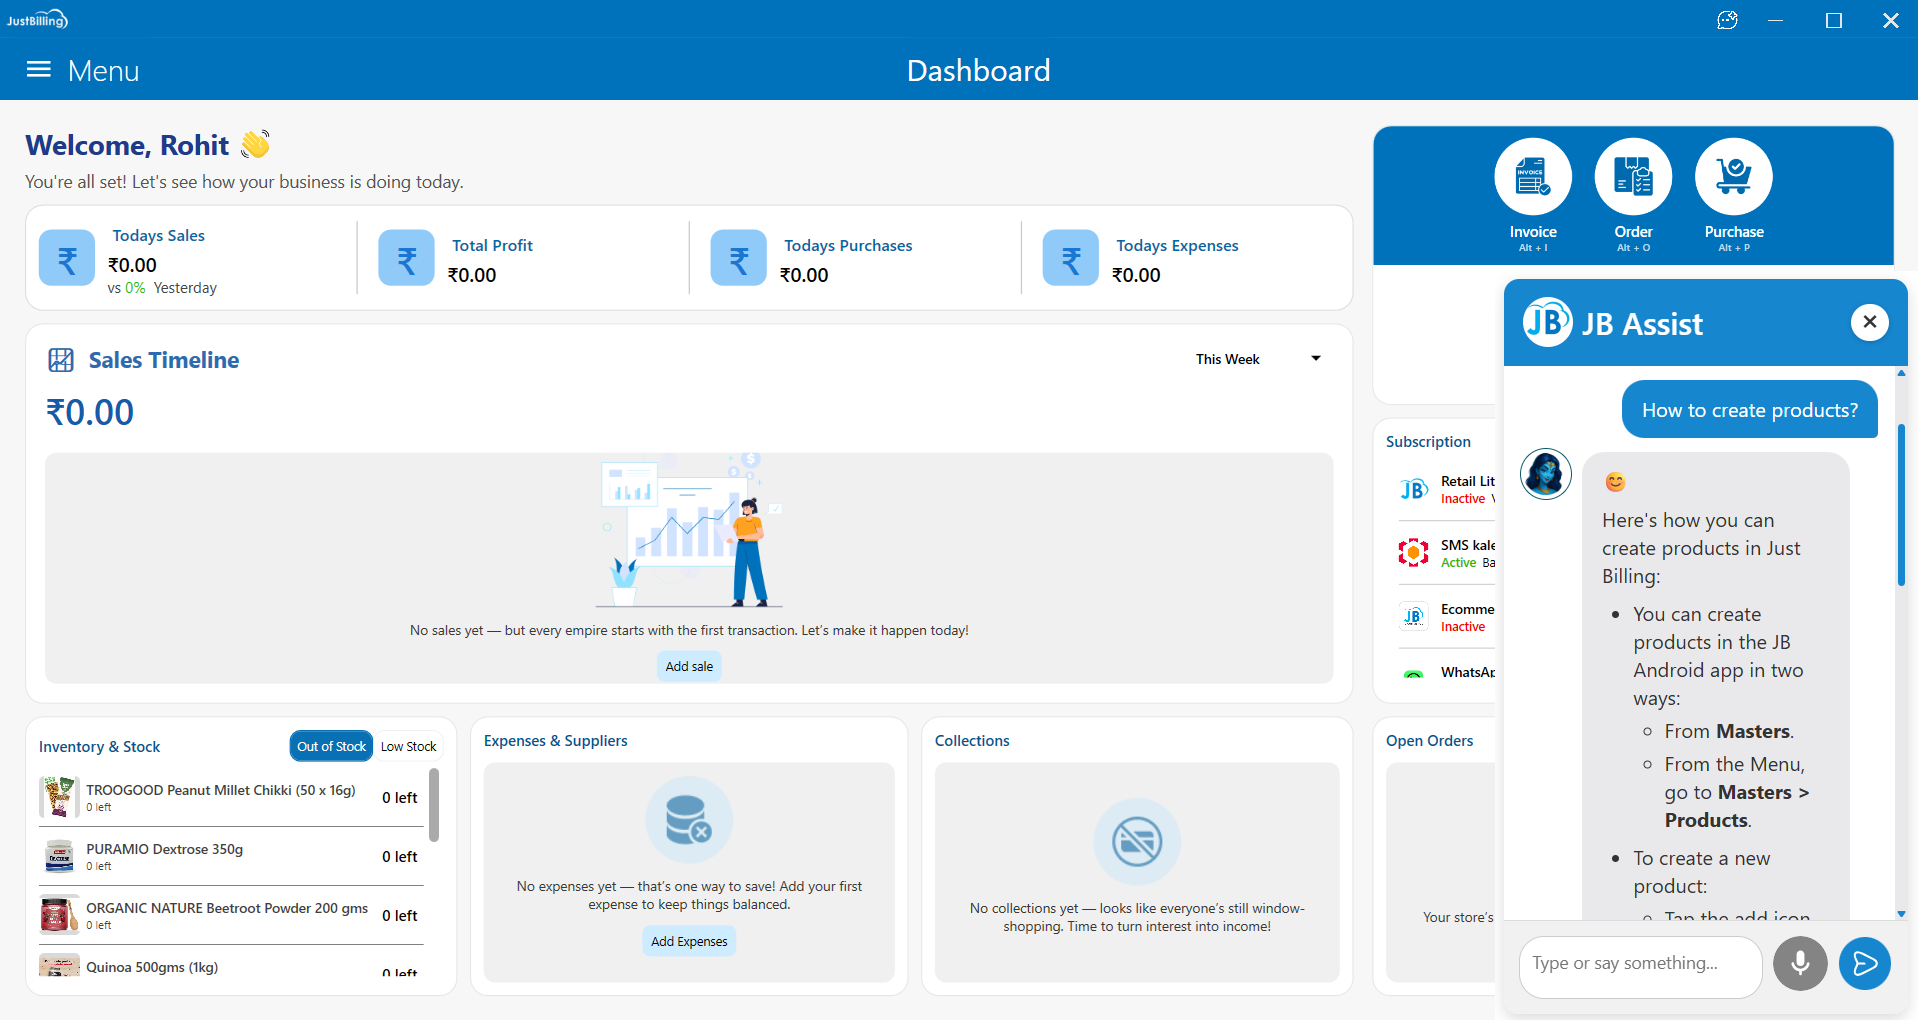
(Figure-1-JB Assist)
Asking Questions
You can type any question in the text box at the bottom of JB Assist.
Examples:
- “How to create products?”
- “How to generate invoices?”
- “How to add customers?”
- “How to enable integrations?”
- “How to check stock?”
JB Assist responds instantly with detailed guidance.
Key Features of JB Assist
24×7 Virtual Support
Instant help without waiting for support staff.
Step-by-Step Help Instructions
Clear, structured guidance for all modules.
Smart Search
Understands natural questions and provides accurate responses.
Task-based Assistance
Examples:
- Add sale
- Create products
- Generate purchase order
- Manage inventory
- Enable subscriptions
- Configure integrations
Integrated with Dashboard
Always accessible while working.
No Extra Cost
Included free inside JustBilling.
How to Use JB Assist Effectively
|
Action |
Result |
|
Ask “How to…?” |
Provides detailed steps |
|
Ask feature-specific questions |
Returns module explanations |
|
Ask setup/configuration queries |
Shows exact menu path |
|
Ask troubleshooting questions |
Gives resolution steps |
|
Scroll the chat |
View previous instructions |
JB Assist remembers your recent questions during the session.
Closing or Minimizing JB Assist
To close the assistant:
- Click the “X” button at the top-right of the chatbot window.
To reopen it:
- Click the JB Assist button on the right side of the Dashboard.
When to Use JB Assist
JB Assist is helpful when you want quick guidance regarding:
- How to create or edit products
- How to add stock / inventory
- How to bill customers
- How to manage purchases
- How to generate reports
- How to use integrations (SMS, PhonePe, Shopify, Razorpay, etc.)
- Any setup or configuration help